Disclaimer: If you find an error, or feel like you have more up-to-date or relevant information, please let us know. We’re able to update our current material after the fact, create addendums, and generally revise our process for greater accuracy and effectiveness, so don’t hesitate to tell us.
Written by: Zari0t
Match videos:
http://www.meltydb.com/resultall.php?1c=pciel&1m=Crescent&tdb=any&filt=any
Pros
+ VERY high damage overall
+ Some of the best grounded normals in the game
+ Great corner carry and meter build with her combos
+ Combos always end in an untechable knockdown with guaranteed okizeme
+ Can combo off ground throw, leading into unburstable damage
Cons
– Execution-intensive, not beginner-friendly at all
– Very low mobility
– Normals tend to be stubby or high-commitment
– Several normals are unintuitive at first glance (j.B, 2C, etc)
– Lacks aerials that cover a natural air-to-ground space
– No defensive options aside from C-moon burst
Before we even get to C-PCiel’s basic combos, let’s get this out of the way: This character is in no way easy to use. You will have to spend a fair amount of time with her, both in the lab and in actual matches, before you start to see results. She has a lot of command normals that you will have to get used to as they all have their own specific uses, the most important one of all being 3C. I can not stress this one enough, get used to pressing that button, because it’s your sweep. C-PCiel is one of the only characters in the game whose sweep is not bound to 2C, and this will mess you up a lot at first.
Now that that’s out of the way…
Basic combos:
– xx denotes a link rather than a cancel
– italics denote an optional input, omit them as you see fit
2A/throw 5B 2B 5C 3C 6C 6B 2C xx 3C 6C 6B 2C xx 3C 6C 6B 2B 5C 4C airThrow j.236A~A (land) 236B~B (video)
Also known as “The Loop”. This is your works-anywhere BnB off of any random hit as long as you can land that 3C. It will carry your opponent to the corner, regardless of where you started it from. Depending on your exact spacing or what character you’re doing this combo on, you might have to delay the 6C on every rep of the loop.
The Loop does not work on Roa, Satsuki or Riesbyfe. 2C does not OTG these three properly. Use the combo below for these cases.
2A/throw 5B 2B 5C 6C 236B~C xx walk forward 2B 6B 5[C] 236[A] xx dash 3C 6C 6B 2C xx 3C 6C 6B 2B 5C 4C airThrow j.236A~A (land) 236B~B (video)
Alternate, slightly harder, midscreen combo route that carries to the corner from anywhere. Depending on how the 236[A] connects, the opponent might wallslam – if they do, completely omit the italicized string after the dash 3C.
2A/throw 5B 2B 5C 2C(1hit) 6C 236B~C xx 236[A] xx 5[C] 236[A] xx 6[B] 236[A] xx 3C 6C 6B 2B 5C 4C airThrow j.236A~A (land) 236B~B (video)
Basic corner combo. 236[A] only connects with the second hit in this combo.
As you can see, all of her combos have the same ender, airThrow j.236A~A land 236B~B. With the exception of 236B~B, every single one of these inputs has to be delayed. How much will depend on two things: the character you’re doing it on and the combo’s current hit count. As a general rule, you’ll want to
– input airThrow as late as possible into your jump
– input j.236A as the opponent starts to fall from your airThrow
– input the A followup as soon as you go above the opponent
It sounds complicated at first, but when you get the visual cues down it becomes much simpler.
Neutral:
Stay grounded. Wait for an opening and fish for air counterhits with 5C/4C/236B~C.
Movement
One of the more apparent problems that PCiel has in all three moons is her lack of mobility. Her walk and dash speeds are abysmal, her jumps are slow and barely move forward (even superjump!), her airdash has a year of hang time before she actually dashes… This is something that you will have to get used to with her. She is very unique in that aspect – you have to fully commit to your movement options every single time.
When it comes to closing the distance with C-PCiel, you’ll usually resort to one of these three:
– dash (safest option)
– IAD j.C (risky, but covers the area in front of her very well)
– 236B~C (what you’re going to end up using the most)
They all have their different uses, and you’ll want to mix them up every now and then. If you get too predictable with your approaches, your opponent will easily counter them.
When you need some breathing room, your fastest way to back off is to IABD j.C repeatedly. Her backdash doesn’t go very far and her backwalk speed is still very lackluster, so that’s really your best bet.
Buttons
She has a lot of them. Like, a lot of them. More than anyone else in the game, for that matter. These are the ones you’ll use the most.
5B
Incredible poke. Its hitbox says everything. It will beat out a lot of things without leaving PCiel open. If you’re ever not sure which normal you should use, pick this one. You’ll probably win.
5C
Great horizontal reach, but can whiff on certain crouchers. It also has a very large hurtbox in front of PCiel, so be careful – spacing and positioning is key. On grounded hit it leads into 236B~C even at max range, so it’s a great combo starter; on block, you can ReBeat into 5A/2A to keep yourself safe. Use this move to stuff your opponent’s IADs, possibly netting yourself a juicy air counterhit in the process.
This move can be charged, making it cause a wallslam on hit; this is important for her combos but not for her neutral, however I thought it to be worth mentioning here just in case.
4C
Decent close-range anti-air. Even though it has little disjoint directly above PCiel, it’s still surprisingly effective at beating out jump-ins.
3C
This thing. Oh my god, this thing. Getting used to this move will be your first major hurdle with this character.
This sweep comes out very fast and leads straight into your loops. It also low-profiles many moves and has a surprising amount of vertical reach. If you predict your opponent trying to jump, dash into this move to catch them out of it.
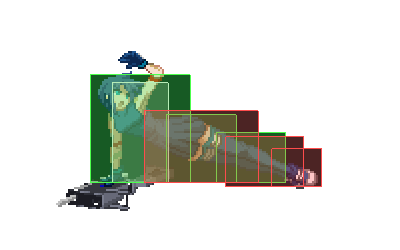
j.C
Your only relevant air normal. It is both your jump-in and your air-to-air. It can hit cross-up, which is important for her okizeme. Study the hitbox on this move very carefully.
Also, see that deadzone right between PCiel’s legs? Be very careful with air engagements, since you don’t have any air normals that hit that area. If your opponent goes in from below you, you’re going to lose the exchange.

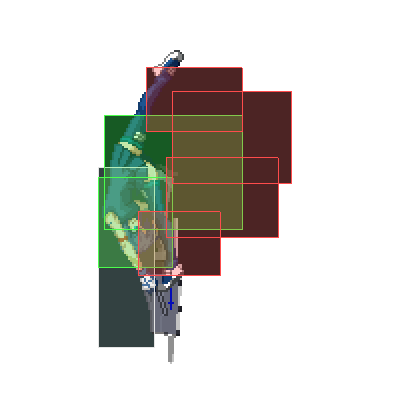
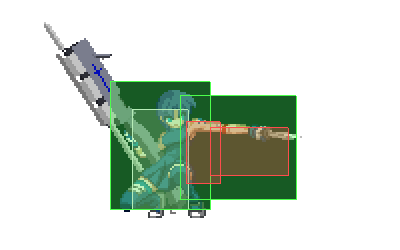
236B
Back in the movement section, I mentioned this move as one of your options. PCiel lunges forward a fairly long distance when you input it, and whilst it has no actual hitbox on its own, it does have a clashbox (that yellow square). Against opponents that like to press buttons in neutral at a distance, you can just clash into them with this move and close the gap.
This move also has three different follow-ups by pressing A/B/C during the clash frames. The only one we really care about right now is…
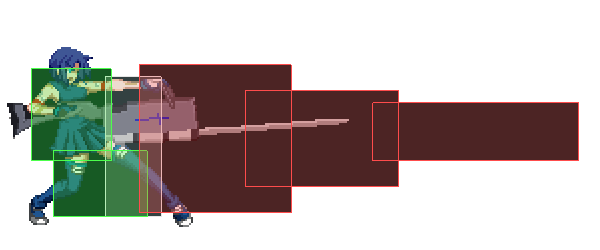
236B~C
This is what makes PCiel scary. At any moment that you see an opening, you can immediately go into this to poke at your opponent from fullscreen. On a normal air hit the opponent can airtech very early, but if you land a grounded hit or manage to counterhit with this move, it will lead into a full combo. On top of that, it is not punishable on block by a large portion of the cast. This is an insanely good move, and one you’ll learn to love tremendously as you play this character more and more.
Other buttons
Like I said, a lot of buttons.
– 2A is your only low aside from 3C. It isn’t that fast and has a very short hitbox, so don’t rely on it too much to open your opponent up.
– 5A is also quite slow for an A-button normal, whilst also porting a short hitbox. It can work to catch your opponent chickenblocking, but you have better moves to do this with. For the most part, you’ll only be using this move to make your 5Cs safe on block.
– 6C moves you forward and can go over some low-hitting attacks.

– Ground throw leads into a full combo, making it a great part of your mixups.
– 623B/C allow PCiel to perform any air action on whiff after reaching the apex of the jump, like doublejump, airdash or buttons.
Transitioning from neutral
With C-PCiel, your first goal in any given round will be to land that first hit. Due to how insanely high her damage output is, rounds will more often than not be decided based on this alone, one stray hit into a full combo and they’re down to 60% health and in the corner. Do it two more times and you win. Play smart and fish for aerial counterhits with your bigger hitboxes (from the table above, 5C and 236B~C); when you see that “Counter” notice pop up, that’s your chance to dash in, 3C and do your thing.
If the opponent doesn’t go airborne that much, don’t be afraid to 236B~C anyway. Even if it gets blocked you’re still pretty safe, so throw it out every now and then to slowly push your opponent to the corner. Once they’re there, their only real way out is by jumping, something which you’re more than well-equipped to deal with.
One last thing you can use to catch your opponent off-guard and corner them instantly in the process is your 236B and its other two follow-ups which I haven’t mentioned yet, 236B~A and 236B~B.
| 236B~A
Slow, but safe on block even at point-blank. Causes a wallslam on hit. Opponent can airtech after the wallslam. Air-unblockable. Unshieldable. |
236B~B
Not as slow, but always unsafe on block. Launches on hit. Forces an untechable knockdown. Air-unblockable. Unshieldable. |
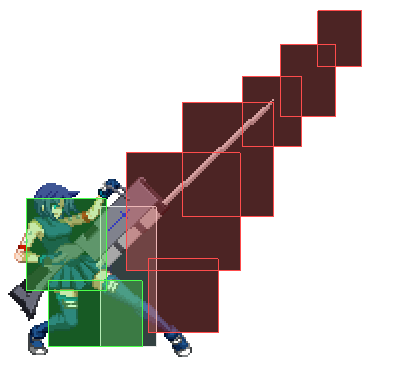
Both of these moves have spectacular reach, deal a very high amount of guard damage and instantly corner your opponent when they hit. 236B~B specifically is incredible as an anti-air if you can get a hard read on where they’re going to be in the air. Throw them out every now and then to surprise your opponent.
Offense:
Get them to the corner and keep them there. Reset pressure with 214s/ReBeat 5A. 214[X] for okizeme. They can only block for so long. If you’re feeling confident, vortex.
Pressure:
So you landed that first hit and you got them blocking. Now what?
Sadly there’s nothing really fancy to put into words here – just make them keep blocking until they can’t anymore, either because they guessed wrong or because you crushed their guard. Almost all of your moves hit mid, so you’ll have to make the best possible use out of the few moves you have that aren’t.
| 2A
Low |
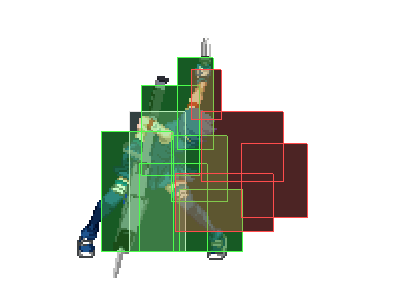
6[B]
Overhead |
||
| 3C
Low |
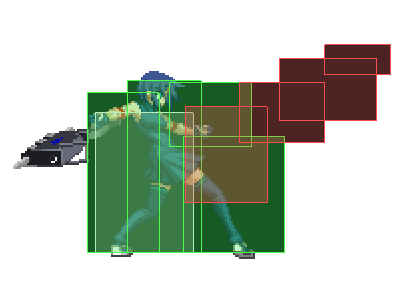
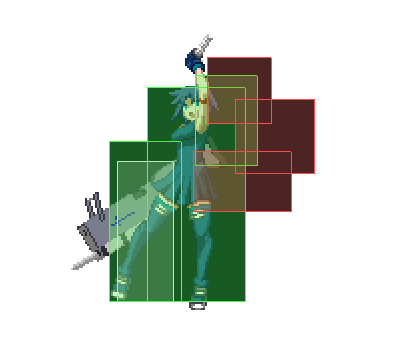
236[A] (2nd hit)
Overhead |
![6[B]](https://drunkardshade.com/wp-content/uploads/2015/09/6b3.png)
![236[A]](https://drunkardshade.com/wp-content/uploads/2015/09/236a1.png) For the most part, your blockstrings will normally start with
For the most part, your blockstrings will normally start with
– dash 2A/throw (standard low/throw mixup)
– IAD j.C (your fastest overhead option, also catches jump attempts)
– IAD j.B(whiff) 2A/throw (overhead feint into low/throw)
From there, go to town. Go through your buttons however you see fit, using ReBeats whenever you feel they’re necessary. Don’t be afraid to stop on lower priority normals, either – use that to frametrap your opponent. Something like 2AA 2B 5C 5A(whiff) 5C will catch people trying to hit buttons or jump out very easily.
After you’ve got them blocking, 6C gets its time in the spotlight. It comes out pretty fast, moves you forward and goes over lows, making it a great normal to use to close distance again after getting pushed back from all your other normals. 5[C] has this property as well; however, it is very slow to come out and has a massive hurtbox in front of PCiel before the hitbox comes out, making it not as reliable for this purpose.
When it comes to ending your blockstrings, there are a few possible ways to do so
– 214s (any version, even EX, charged or uncharged)
Uncharged 214s will catch anyone mashing or trying to jump out, but are not positive enough on block to safely dash in for further pressure.
214B xx 5B is a decent frametrap at the right spacings, as long as you know how far it reaches without leaving you vulnerable.
214[A], 214[B] and 214C all give you a lot of time to dash in for a new blockstring, however the first two have a lot of start-up. Your opponent can easily jump out of it, so condition them into blocking before trying them. If they shield these bolts, just dash up and grab them out of their shield – they can’t tech it.
– 236[A] 214C (overhead ender that’s safe on block or whiff, guarantees knockdown on hit)
If they block/dodge the second hit, the same principles as above apply.
If they get hit by the 236[A]’s second hit and you input 214C anyway, just jump forward and do j.C j.236A~A land 236B~B.
– ReBeat 5A/2A (whiff, depends on which one you started pressure with)
Your safest option by far. If you think they’re mashing a reversal, you can seriously make them regret it – just dash into 5B for that massive damage PCiel dishes out.
– 236B~A (safe on block, massive guard damage)
Against Crescent and Full-moons, at 100% guard quality (bright blue), this thing deals a massive 12.5% damage to their guard gauge (9.5% against Half).
At 0% quality (bright red), it deals 35% against all three moons.
These numbers are insane. If you think using this will guard crush the opponent, don’t be afraid to use it and get the free combo afterwards.
For the most part, stick to the first three mentioned. The last one is incredible to use when your opponent’s guard gauge is whittled down, but it doesn’t allow you to continue pressure, whereas the rest of them do.
Okizeme
Knockdowns in general are scary. Guaranteed okizeme off any hit only makes it scarier.
One of the great things about PCiel’s combos is that no matter what your combo route is, you always end with a hard knockdown. As long as you have that airThrow j.236A~A timing down, if you land a hit on your opponent and convert it into a full combo they will have to deal with your pressure for a while.
If you’ve got them in the corner, your main oki options are going to be
– dash meaty 2A/throw (low/throw)
– jump forward/IAD meaty j.C (overhead)
– 214s (charged or EX)
– dash 6[B]/6{B} 3C (overhead/fake overhead > low)
A half-charged 6B is rather hard to tell apart from a fully charged one, which is why this mixup works. You can also go into 3C off of the fully charged version, but that’s easier to react to.
If the 6[B] hits, do 236B~C to convert into a full combo.
If the 3C hits, do slight delay 2C xx 3C into The Loop instead. You need that delay or else the opponent will be too high for the next 3C to connect.
There’s only one more thing to cover…
The Vortex
This thing gets its own subsection. That’s how good it is.
Above all else, don’t bother trying this unless you’re 100% consistent with doing the airthrow j.236A~A part of PCiel’s BnB. You will lose out on damage, oki, positioning and momentum if you mess it up.
The Vortex is one of the only reasons why you’d pick Crescent over other moons with PCiel. Half’s lightning bolts are better against more match-ups (not inherently better by default, but for the most part at least vertical bolts are more useful than horizontal ones) and Full has rocks which are on a whole other level of broken, both for neutral and pressure.
So, here it is in action.
The idea behind it is very simple – instead of throwing your opponent into the corner, you throw them out of it. With that done, you have two options
– jump forward j.C to land on the same side
– walk forward for one frame and then jump forward j.C to cross up
Yes you read that right – a single frame of walking forward. The video example above exaggerates this to make the mix-up more noticeable for learning purposes, but one frame is enough to make it work.
Mind you that the j.Cs aren’t meaty, but you have more than enough time to land 5B anyone and have that meaty instead. Just be aware that you can get DP’d if the opponent knows how the mix-up works.
Defense:
Block. Don’t try to poke out of pressure randomly. Be willing to block for as long as you have to. Shield 623A, EXShield 5A/2A and HEAT are your only viable escape tools. 236B~C is gimmicky.
…actually that about sums it up. Whilst C-PCiel is an offensive powerhouse, what with her hitting like a truck and being able to win a round in two or three combos, the same can’t be said about her defense.
First of all, her defense ratings are low. Not the lowest, but low nonetheless – this means she gets KO’d earlier than normal, which means characters that needed five combos to end the round now only need three and a half, maybe four. “Don’t get hit” applies to every character in any fighting game ever, but really. Don’t get hit.
That being said, generally speaking, if your opponent forces you to block and gets you to the corner, that’s the end of the round for you. Getting out of the corner is going to be hard, especially if you’re impatient. Don’t lose your cool and just hold back/downback for as long as you have to – a chance to escape will show up eventually.
Pokes:
If you notice that your opponent’s pressure has a gap large enough in it for you to press buttons, these are the ones you should go for
– 5B
Did you see this thing’s hitbox yet?
– 3C
Sweep as a poke is a good option with any character, especially when it’s one as fast as PCiel’s. With Crescent moon, though, you have to be very careful about using it like this, since you have to stop blocking to input it. You don’t have the luxury of being able to mash sweep while blocking, remember this.
– 623A
Not a reversal in any way, but it does come out just as fast as 5A and hits directly above PCiel, making it a viable way to shut down IAD/jump-in resets.
One last option you have, provided you have the meter for it, is your Arc Drive. It’s your only real reversal option and has the added benefit of being reasonably safe on block. You won’t always have access to it, but it’ll prove to be invaluable when you do.
Shields:
Against predictable pressure, shields can be effective. Shield 623A beats most jump-ins without much of a hassle, but it’s not very good against grounded opponents; in those situations, EX Shield 5A/2A works better.
Just make sure you don’t try to shield haphazardly or in a panic – shields should be done preemptively, either off of a hard read on your opponent’s habits or to capitalize on a move with incredibly long start-up.
