Disclaimer: If you find an error, or feel like you have more up-to-date or relevant information, please let us know. We’re able to update our current material after the fact, create addendums, and generally revise our process for greater accuracy and effectiveness, so don’t hesitate to tell us.
Written by: Kyhz (@dat_kyhz)
Hitboxes by @bobo40k
Intro:
Girl Shiki. Has a knife like every other Shiki, but actually uses the pointy bit. As the only character who doesn’t originally come from a porn game, she is the purest.
Match vids:
http://www.meltydb.com/resultall.php?1c=ryougi&1m=Half&tdb=any&filt=any
Players to look out for:
Ruusha (るーしゃ), Yuuki (ゆ☆う☆き), Namiyan (なみやん)
JP Wiki (has tons of combos and gifs for ants showcasing them):
http://www20.atwiki.jp/ryougisiki/pages/16.html
Pros:
-Huge normals
-Easy and safe pressure
-Wacky hurtbox
Cons:
-No good defensive options without meter
-Subpar health
-Generally weaker oki than some of the cast
General strategy:
The basic idea is to bully people using your normals. Barring a few matchups, you will outrange your opponent on both the ground and air. If they try to zone you out, you can use knife throw for a very fast projectile to get in. Once you’re in, abuse your normals to pressure them at a range that will get them counter-hit if they try to poke out. Several of her moves move her forward, which combined with knife throw for an easy way to reset pressure, allows her to create long blockstrings with minimum gaps.
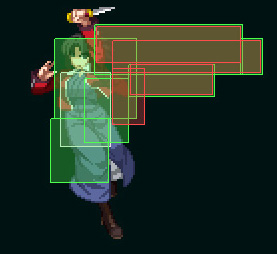
Normals:
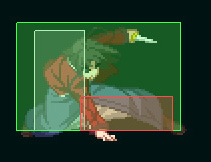
Refer to the Mizuumi wiki page for frame data. As a general rule, try not to whiff anything that’s not a 5A/2A as her moves have huge recovery. This is about usage in neutral mostly.
2A: Short range, but fast startup and hits low. Common combo starter.
5A: Okay range, meh recovery. Even though it whiffs on crouchers, since it does not chain into itself, you cannot use 5A6E to whiff it and immediately grab them a la C/H-Nanaya can (you just get 5A > Shield). Since it’s relatively fast to come out it can sometimes work as an anti-air but will generally lose to most jump-ins. Can use to whiff cancel but 2A is preferable.

6A: This has an amazing anti-air hitbox, but since you have to use 5A before you can chain into 6A, it’s not something you can easily do on reaction. If they do a predictable jump-in on you however, this will probably beat it clean. In neutral, dash 5A6A will catch people jumping out. Does not whiff on crouchers unlike 5A and can be reverse beaten out of on hit or block.

6AA: Last part of H-Moon’s 5A6AA series. Mostly combo fodder, although it is possible to end up anti-airing someone if you were going for 5A6A and they were late. Only special cancelable on block and pretty unsafe so be sure to go into knife throw (22x) or rekkas (236x) if for some reason you try to use this move in a blockstring.

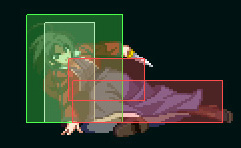
2B: Big-ass range, hits low, pretty quick. Also her best grounded normal starter.

5B: Arguably her best normal. Huge range, fast startup, starts combos. It has clash frames too, which can be used if you smell a wakeup heat. Can anti-air from certain angles. Recovery on whiff is balls.

5BB: Follow-up to 5B. Boasts similar range to 5B but due to pushback, it will whiff after a max range 5B so be wary and try not to autopilot 5BB every time. Nevertheless, 5BB is a very strong hitconfirm which allows plenty of time to either continue into a ground string or go for an air combo if they jumped.

2C: Moves Ryougi forward quite a bit and gives untechable knockdown on hit. Staple move in combos and blockstrings, but slow startup and god-awful recovery means you should not be throwing this out as a poke. The hitbox is kinda wonky in a good way but the active frames suck.

3C: It’s your only normal that’s plus on block naturally. It’s slow, it’s low, it has shit range. Useless as a poke but good in blockstrings and as a meaty. Will usually connect after 2C at everything but max range.
5C: Longest ranging normal but also pretty slow. Can be risky to toss out due to the terrible recovery but it can catch people jumping out from far away.
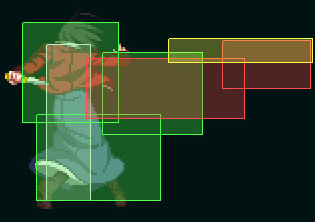
4C: Grounded overhead. Has no range and is slow as hell, but since the animation is not very obvious (read: no glowy charge stuff), it’s not impossible to land. Special cancelable only and unsafe on block, so be sure to follow it up with knife throw or rekkas.

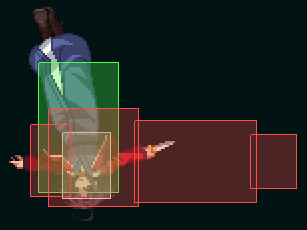
j.A: Fast and has good range. Good for air-to-air, awful air-to-ground. Like her 5A, it does not chain into itself so you can’t mash it on air block like some characters can.
j.B: Huge range and air footsies staple. Not a great air-to-ground move to approach unless you hit them with the very tip but it will at least probably hit them unlike j.A. If you hit a grounded opponent, 2B will connect even at max range.

j.6B: Pretty similar to j.B in terms of range and speed, but is angled slightly higher. Favor this over j.B if they are above and away from you. It has an even worse air-to-ground hitbox than j.B so basically only ever use this in the air.

j.C: Another big girl normal. Hits super high above her so use it to meet people in the air. It’s also her best air-to-ground move. That doesn’t mean that it’s objectively good though, so be prepared to lose against any decent anti-air normal. Remember that non-F-moon characters can air dash cancel their jump normals, which allows the common j.C air dash j.C double overhead mixup.

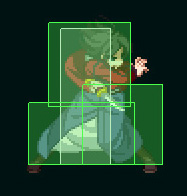
Specials:
Once again, refer to the Mizuumi page for details about specials.
236x: Rekka with different follow-ups. EX version is a multi-hitting super that OTGs and can be followed up by an air combo. 214x after the first hit is a slow and obvious overhead. 236A ender is the safest on block and gives hard knockdown. 236B ender launches them. You can link a 2B after it depending on how much gravity kicked in and do what’s basically an F-Ryougi combo. 236C ender moves forward quite a bit but is unsafe on block. It is super cancellable though, which means it’s used in some metered combos. 214x ender is a low and super cancellable on block which can be useful to extend pressure with 22C.


623x: Some sort of dash attack which can be charged. All are punishable on block. Not all that useful in neutral, although it will low profile some projectiles (like F-Aoko’s fireball) which can make it useful in some matchups.

421x: Command parries. A catches highs and B catches lows. C catches both but doesn’t let you combo after. Proration is pretty high anyway. Situationally useful but not something to toss out randomly.
214x: Slow jumping slash. A version is used in combos and sometimes as a hard backdash or jumpout read. Whiffs on crouchers. B version is overhead but has pretty obvious animation. C version is like a larger A version with more untech time. C has some startup invul so you can use it to get out. All are pretty bad on block.
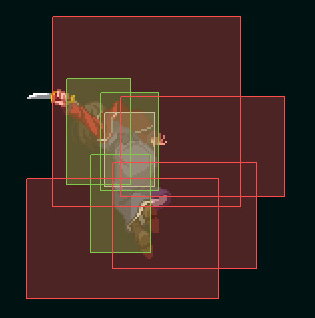
63214x: One type of knife throw. A version jumps forward in the air and tosses the knife. It’s plus on block but tends to whiff on crouchers in the corner which makes it a lot worse but not useless since you get your air options afterwards, unlike versions B and C. You can use this then air catch the knife to extend/reset pressure while keeping your knife but it will get blown up by most 5As. B version will make her run forward and cross up before tossing the knife. Don’t try to use this is the corner since she’ll just throw it away from the opponent and miss completely. Can follow up with 5B into air combo at very specific ranges, otherwise you just get a soft knockdown. EX version will have Ryougi jump back and throw the knife forward. Don’t waste your meter on this outside of combos.
22x: Second and best type of grounded knife throw. It’s a projectile, it extends pressure, it’s a combo tool, it’s (kind of) a reversal. This move is incredibly versatile and H-moon is the best at abusing it. Unlike C and F moons, H only needs to crouch to pick up the knife again if the opponent is not in blockstun. You can also catch the knife in the air, which means throwing the knife is a much smaller commitment compared to the two other moons. 22A is the one you’ll be using the most. It travels straight horizontally and bounces back. You can use it to punish things that are generally “safe” at full screen (setting orbs, charging, throwing projectiles). On counter-hit, run up 5BB will let you convert even from the other side of the screen. It’s also plus on block even at a very close range. People who do not know the matchup will tend to hit buttons after a blocked knife throw so ride that to victory until they learn better. It’s not a hard knockdown on hit but has tons of untech time which makes it a cornerstone of her more damaging corner combos. 22B is worse in almost every way. It travels at a slightly downwards angle and does not bounce back towards you. It has more recovery as well, but must be blocked low. No real reason to use this over 22A. EX version is like a beefed up A version in that it’s even more plus on block and comes out faster. You can use this at any point during a blockstring and dash up to continue pressure. It can also be used as a reversal since it comes out so fast. Finally, if you do not have the knife, you can manually pick it up using 22 and any button. It has a larger range than the auto-pickup crouch and more importantly, lets you pick up the knife while they’re in blockstun. By cancelling moves with long recovery (C normals) into manual knife pickup then cancelling that animation into another normal, you can not only reset your rebeat counter but actually generate frame advantage. Also used in her corner combos.
j.236x: Gigantic circular air slash. Pretty versatile tool, since it’s used in the middle and at the end of combos, to punish air techs and in general air to air situations. Wallbounces on hit. A version is slower and hits overhead but does not allow for any follow ups. B is the most commonly used one but is a mid. Hilariously has a hitbox behind Ryougi. If done close enough to the ground and corner, you can pick up with 5A, 5B or j.A. C has invul and an even bigger hitbox, but generally not worth using over B.

j.22x: Air knife throw. Not as useful as the ground version. You lose all air options after all versions, so only attempt relatively close to the ground. A version jumps forward and shoots diagonally down. B version also shoots down but jumps back. C shoots horizontally and is generally not very useful on top of costing meter.
Pressure:
As with all MB pressure, it’s very free-form, but here’s some pointers in the right direction. Because of the range on her normals, it’s generally risky for the opponent to try and poke out of her pressure. She has a few ways to generate frame advantage. First off is 22A. Frametrap and catch jumpouts with 5B after it. Second, picking up the knife after a blocked 3C and cancelling it into either 2A or 5B is also plus. So you’re plus throwing the knife, and you’re plus picking up the knife, and both reset your rebeat counter. Those facts, along with the fact that 2C moves you a tremendous amount forward, form the basis of her pressure and why guard crushing is a very real option with this char. Once they start to respect the knife, you can opt to rebeat into 2A/5A or cancel into 421C as knifeless options to reset pressure. Notably 5C whiff 2A is +/- 0. Since many of her normals catch jumpouts, be ready to confirm if you’ve hit them out of the air. For people who are content to just block, mix in some tick throws and the occasional 4C to open them up.
Combos:
Midscreen no effort combo: 2A 2B 5BB 5C 2C 5A6AA j.BC dj.BC air throw/j.236B
With meter and knife: end with j.22C land 2C 3C 236A x3 for better knockdown
Knife loop (corner): 2A 2B 5BB 5C 2C tk j.236B 5A 22A [2C 3C 22x 5B 22A] x2 [2C 3C 22x 2A 2C 5C 22A] x2 2C 3C 236Ax3
Note about knife loop: how many reps you can get is generally character specific. The above one is the most universal in my experience but if it looks like they’re too low it’s usually best to cut it short and get your knockdown. There are many variations on how to enter the loop and several adjustments you can make in the reps but the general idea is to buffer 3C into 22x knife pick-up and cancelling that into a normal. It takes a lot of practice but her most damaging and meter building combo in the corner.
For all cool combos (and she has many), refer to the JP wiki above.
Defensive options:
22C: Doesn’t have invul but comes out frame 1 ([citation needed]) and will trade in your favor with any meaty. On hit you can get a small combo. If they block it, it’s massively plus and lets you have your turn or guard crush them if they’re in the air. Usually requires hard reads on your opponent’s part to punish (dodge, shield,…) and even then is difficult due to how fast the recovery is. Extremely good in some matchups, but starts losing a lot of its appeal if you happen to be sitting on top of something forcing you to block (pit, lightning, crows, etc…). It can also be low profiled by certain moves, most notably Ciel’s dash.
214D: H-Moon bunker/alpha counter/dead angle. Like all H-Moon bunkers, has full invul and grants hard knockdown. You can get grabbed out of it though so watch out.
Common situations:
Post midscreen air throw: It’s a hard knockdown but puts you kind of far away. Dash up 5BB will beat most mashing and jumping. You can delay 5BB a bit if you think they’re going to reversal so you block it if they do. 5C will lose to mash but catches jump outs. Run up 5A6A is a good option if they respect you since you can confirm into air combo if they jump out or go into a grounded string if they just block. 214A will catch backdashes but will whiff on crouchers which will lead to an easy punish for them. 214B beats backdash and is also overhead, but is easily recognizable and unsafe on block. It’ll catch jumping and let you pick up with 5A6A into air combo though.
Post j.236B ender: if they air tech immediately, you can meet them in the air from below with j.C or wait for them to come down and catch them with 5A6A or 5B. You can also use j.236B if they tech late and try to do anything but block.
Post 236A x 3 ender: This is one of your best knockdown option. It lets you set up a safejump (see next section) and run a traditional high/low mixup by throwing in empty jump 2A. Can be awkward to perform midscreen depending on range.
Option Selects:
Backdash OS: Meaty 2A~5B/2B/5C/2C. Chances are you’ll be punishing wakeup backdash without even thinking about it due to the range on her normals. 5C/2C options are prone to getting blown up by dodge but some character’s backdashes outrange even 5B/2B.
H-Moon autoburst OS: 2AA2E. This is a pretty universal OS but it’s worth listing. On hit or block you get 2AAA, but if they get hit by the first 2A, you’ll shield their spark. You can’t punish it however, and you’re not even at an advantage unlike C-Moon because of the shield recovery, but it’s still better than getting burst in the face.
Safejump/Heat OS: After corner 236A x 3 knockdown, wait a fraction of a second then superjump forward j.C~421C~1A. On hit or block you get j.C 2A. If you timed it right, it’s also a safejump so you’ll block their reversal. If they heat you get 421C and parry their heat. Not as good as a hard heat read since you can’t punish but it lets you stay close and it also looks super cool.
