
Disclaimer: If you find an error, or feel like you have more up-to-date or relevant information, please let us know. We’re able to update our current material after the fact, create addendums, and generally revise our process for greater accuracy and effectiveness, so don’t hesitate to tell us.
Written by: Cristu
Match vids
http://www.meltydb.com/resultall.php?1c=sion&1m=Full&tdb=any&filt=any
Combo movies
https://www.youtube.com/watch?v=bXR67z20efI (first day combos)
https://www.youtube.com/watch?v=79zkveCmTKI (basic to advanced practical combos)
http://www.nicovideo.jp/watch/sm9725888 (basic to advanced and crazy stuff all mixed up)
PROS AND CONS
Pros
Simple and straightforward character
Three overheads
Good speed
Best normals of the three Sions
High damage potential
Good health
Full screen punish options
Decent wake up options
Ambiguous left/right mix-ups
Cons
Lack of reliable normals
Depends too much on speed to get normals to hit
Lack of other types of mix-ups potential
Backstep has too much recovery
String options are somewhat too limited
Gun shots are very punishable
Lack of plus on block moves
PLAYING F SION
Being one of the fastest characters in the game, Sion is an option for aggressive players who don’t like turtling. She’s relatively hard to play on neutral, but pays off relatively well. Even being a rushdown character, she offers some half and full screen options with her gun and etherlite (whip). Having less damage and tools than the other moons, F Sion’s best trait is her 5B and her j.A (the j.B is not bad too). Sion is a character that suffers A LOT in neutral from the fact that her normals don’t have range and priority. On the other hand in F Sion’s case, the 5B comes to ease it: goes far, starts fast and catch jumping opponents. It’s like a dream. Compare her 5B with C and H Sion’s 5B and you will see the difference, and hey, the 5B from CH Sion was already considered her best trait on the ground in MBAC before the moon system, so yeah, her normals are bad. However with the 5B F Sios gains a substantial boost on neutral compared to the other moons, making her neutral much more practical and less painful.
GROUND NORMALS
5A and 2A- Whenever you’re gonna use it, I recommend using it twice. For three reasons. The first: in the case of the 2A, your general string will probably be 2A 5B 2B. If you press 2A, release the 2 for the 5B and then press 2B, it’s possible a 22B will come out since the “2” inputs came too closely. If you do 2AA 5B 2B, this is avoided. The second: you have double the time to see if it hit or if it was blocked. The third: her most advanced combos get much easier when you have more hits on the string. Now you might be thinking of using it 3 times instead. In fact, it sometimes can be good. However, do not forget the more moves you do, the farther you pull the opponent (which is bad). Sometimes, depending on the distance, your third hit might even whiff.
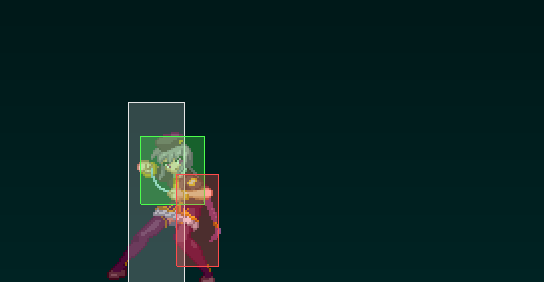
Both 5A and 2A are low and have somewhat the same hitbox. The 5A comes out in 5f while the 2A does it in 4f. Also even though the 5A hitbox is a little bigger, the 2A will reach further since it’s farther from the blue line as you can see below. The fact she does the 5A (a low) while standing can be tricky and confuse a bit the opponents (some of them instinctively release the low guard for a standing guard). The fact that this is a bit confuse also makes a good ground for an overhead after it.


5B- Neutral on block. Her best move on the ground period. Even though it’s not so good compared to other characters normals, it’s the best move of all moons and one of the main reasons people will pick F Sion, since other moons have an even more serious problem with range. Comes out in 8 frames, has 5 active frames and 10 frames of recovery. Think about this: this is the only good range move with not bad recovery Sion has on the ground among all her three moons. You can use it to whiff punish people who missed normals on the ground (sometimes you might wanna go for 2C instead) or air (in that case, hit the 5B before they reach the ground). In some match-ups, you can try and use it as an anti-air move, although I don’t really recommend it. It’s most normal use will be for attacking, mostly to catch people jumping out. Beware not to trust it so much depending on the match-up, as it’s not a so good normal overall compared to other characters. If you confirm this from far, follow with a 2C or 5C depending on the combo route you’ll follow. To catch opponents on the ground you might want to dash 2AA instead. If you confirm you can always hit a 5B as a following hit, even if the 2As caught the opponent attempting to jump. I think one of the main challenges of this move is being able use it while dashing without miss inputting into a 6B and calculating the distance accordingly.

2B- +1 on block. Comes out in 8 frames, has 3 active frames and 11 frames of recovery. Not bad reach, but still misses sometimes after a 5B hits, so you might want to go to 5B 2C instead depending on the distance. This move will be useful in your mix-ups, as it beats standing shield. This move can also move you forward, which sometimes can be useful. You can follow it with a 5C or 2C depending on the combo route you plan to follow. Even though it’s plus one, it’s not good for blockstrings, given it pushes the opponent too far.

6B- Overhead. Negative on block. Uncancelable. Probably the fastest and hardest to block among her three overheads. Also the most common and hated one, so people will most likely be waiting for it. You can follow it with a 5C or 2C depending on the combo route you’ll follow. Watch out as the opponent can successfully mash against this overhead. You may want to use frametraps to punish their mashing attempts. We’ll go further on this subject later, on blockstrings.

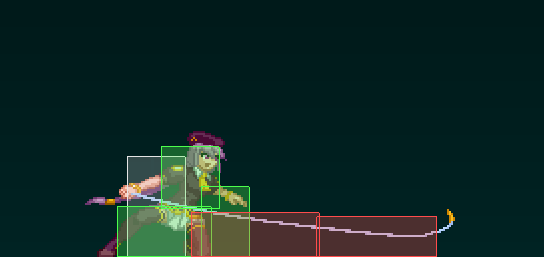
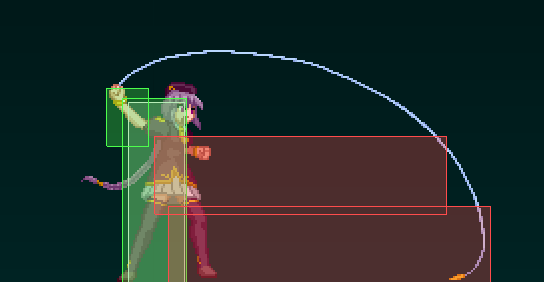
6[B]- Charged version. Also overhead. Cancelable on block on special or C moves. Neutral on block. Way too easy to block or shield. The only use I can think of it would be punishing wake-up shield attempts when you do the right/left mix-up. Maybe there are good uses to it. Who knows? Launches on hit, but I don’t really think people will get hit by it. At least decent players, I really don’t think you should care about weak players.
![6[B]](https://drunkardshade.com/wp-content/uploads/2015/09/6b1.png)
3B-Launcher. Negative on block. Takes 13 frames to come out, has 4 active frames. Big recovery (13 frames). Has clash potential. Sometimes can be used as an anti-air though I wouldn’t recommend it so much as half of the time you’ll clash with the opponent: none will get hit, but he will land while you’ll be still recovering. The other half you might score a counter hit or have your 3C eaten by some superior priority move. On the other hand it’s really good to catch people jumping out.

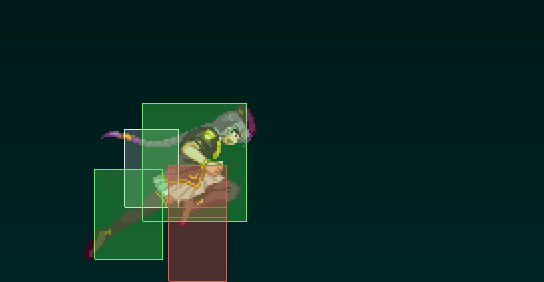
5C- She uses her etherlite to reach the opponent half screen, hitting twice. Negative on block. Big recovery on whiff. People mainly use this on strings for it’s large blockstun and it’s canceling options: 3C, 6C and mostly 5CC and special moves. It can be good for punish landing opponents half screen, as it’s air unblockable, but beware, people love to airdash just before landing, which would dodge from your attack area and most likely punish your recovery. Use this if you know your adversary has spent all his aerial moving options and all your other options are too far to reach. In the case you score one of these, follow by 236A 214C. In any case, if you miss a 5C, prepare for big punish, as it’s recovery takes a while.
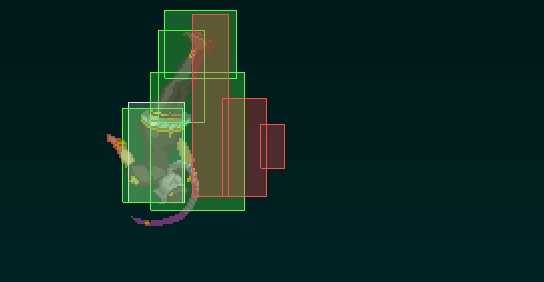
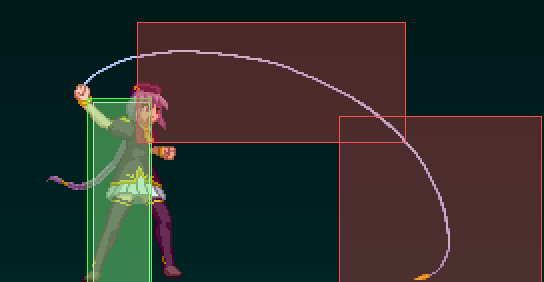
5[C]- Charged overhead version. Hits twice and both hits are overhead. Negative on block. Big recovery on whiff. Cancelable on 3C, 5CC, 6C or any special move. A nice cancelable overhead. You can also half charge it and go for 214A or 214B instead, which are lows, to catch people who will stand to block the overhead. 214A and 214B are very punishable though.
![5[C]](https://drunkardshade.com/wp-content/uploads/2015/09/5c2.png)
5CC- Mid. Everything that comes around goes around. Sion pulls back her etherlite. This move is very positive on block, however don’t expect people to block it so much as they can simply jump as 5C into 5CC is not a true blockstring (actually there is plenty of time between it for people to IAD in your face with ease). You have to make them respect the 5CC option by going for 3C instead if you are close, which will beat jump outs. If you’re far, there’s not really much you can do, so it’s probably better to finish the string with a 236A.
2C- Low. Takes 14 frames to come out, has 3 active frames and astounding 22 recovery frames (you better don’t miss it). Cancelable on block on special moves. It’s good to punish some stuff from half screen, like Aoko’s orbs. On hit, it leaves the opponent on the ground for quite a while, making it possible for 214A and 214C to hit even after some time. I really like this move, but I don’t recommend using it too much. Sometimes when you are on the ground and the opponent in the air you might think the opponent is landing and use the 2C, then he uses an airdash or air backdash, makes you miss and punishes your recovery or sometimes when both you and the opponent are on the ground, you go for 2C and he goes for IAD above it and punishes the recovery too. So yeah, take care with this move’s big recovery.
3C-Sion slides forward. Low. Takes 13 frames to come out, has 6 active frames and 8 to 13 recovery frames depending on the frame it hits. You have to use this once in a while if you want any respect at all in your 5CC string resets. Given it’s cancelable in special moves, this attack may be useful if you intend to get closer for any reason: you can either use this and cancel right away into a 236A to finish your string or wait for Sion to get closer to try and cancel in more moves, like 22A, 623A, etc. Close 236A on block is not a bad option as well as it’s neutral on block. If you’re not predictable, actually 3C into close 236A is one of her best string reset options, given F Sion is not by any means a blockstring character.

6C- Overhead. Positive on block. Takes 25 frames to start, has 9 active ones Won’t combo on some characters (mostly male). Won’t combo on standing foes. The weakness of this overhead is it’s easy to shield. Aside from that, it’s a nice safe plus on block overhead that moves you forward!

AERIAL NORMALS
j.A- Overhead (yes, overhead, all F Moon air normals are overheads). Can be used 2 or 3 times on block or hit. Can be used as a rising attack and you’ll have time to recover for another attack before landing (the recovery is still very punishable though). One of F Sion’s best moves. Comes out in 5 frames and has 4 active frames. People like to use this attack to: chase the opponent in the air with dash, jump and j.A; counter hit an opponent who is close in the air; after in instant air dash or air to ground overall. This attack is really versatile though, you may find tons of uses for it.

j.B- Overhead. Another of F Sion’s best attacks. Comes out in 8 frames and has 6 active ones. This may be your best air vs. air and air vs. ground general option due to it’s decent box down and forward and it’s good hitstun/blockstun. There may be cases when you might want to do j.A instead, like when the opponent character is too short and it’s purposely crouching to try and avoid your attack or when you think it’s possible to do j.A two times, which would be harder to block.

j.C- Overhead. An attack that looks good on neutral, but it’s not. Takes a while to start, has only 2 active frames, misses easily air vs. ground and will get you countered most of the time air vs. air. Use j.Q instead if you want it to come out faster: it’s the same attack, but j.C is chargeable while j.Q is not. That means if you take more than 1 frame pressing your j.C, the difference will be added to your start up since it was charging. That won’t happen with j.Q. Still, the attack is bad on neutral, you may only want to use it on neutral when the opponent is too high and you want to try and score a counter hit or that little damage you need to win the round. On blockstring, you may add this after a j.A or j.B as a good option. Since it misses easily, this can also be used as a fakeout: you miss it purposely to do a low or a throw as soon as you hit the ground.
j.[C]- Overhead. Charged version. Takes 18 frames to come out and has 4 active ones. Mostly only good as combo filler, although you may want to give it a try on neutral as an attack or movement option (since it pushes you higher).
GROUND SPECIALS
Since Melty’s framedata is mostly compartmentalized when it comes to special attacks – they separate the character hurtbox from the effects and the hitbox – we won’t always have the boxes now. In those cases, I’ll describe it’s hitbox.
236A- A single shot. Neutral on block. Blockable on the air. Hits forward half of the screen in straight line from Sion’s gun. This attack is not bad, but it can be a little risky. Can be used to finish strings, to get counter hits, among other uses.
236B- Seven shots. Blockable on the air. Hits full screen in a straight line from Sion’s fun. Terribly negative on block. Used as a punisher full screen or when you really think the opponent is not expecting/going to block. Comes out relatively fast and has advantage against most forms of full screen zoning, but can be easily punished with a full combo if the opponent manages to dodge the first bullet (therefore not being obligated to block the following shots). Also, this uses 7 of your bullets. If you run out of bullets, Sion will automatically recharge her gun, taking even more frames to recover.
236C- A single special shot that takes all of your bullets. Blockable on the air. Comes out much faster and does more damage then 236B, being a better punisher. If you ever counter hit with this, follow with 214C if in reach.
214A- Low. Blockable command grab. Blockable on the air. Hard knockdown on hit. Always leaves the same distance between your character and the opponent’s, being probably Sion’s best combo finisher for mix ups. Punishable on block. Takes 17 frames to start, 4 active frames. Comboes after 2C and 3C even after some time.
214B- Low. Blockable command grab. Blockable on the air. F Sion’s main launcher. Punishable on block. Takes 24 frames to start and has 4 active ones.

214C- Mid. Blockable command grab. Blockable on the air. Your main combo extender on the ground. Punishable on block. Takes 22 frames to start, 4 active ones. Combos after 2C and 3C even after some time. Comboes after 623A (you have to cancel it while still on the ground).
623A- Has lower body invincibility. Comes out in 4 frames. Cancelable on any super move. On hit, you can cancel it’s second hit (or first hit if counter) into 214C and get a combo out of it. On block you rather wait for Sion to take off to cancel it into a j.214C whenever you find more suitable. When you’re in MAX heat you can cancel 623A’s first hit into initiative heat, following by 6[B] for some hard and flashy combos with j.[C]s and j.214Cs. Big recovery unless canceled.
623B- Sion’s true reversal. Starts in 4 frames, has 7 full body invincibility frames and 21 active frames. Uncancelable. Immense recovery.

623C- Sion’s super reversal. Starts in 4 frames, has 10 full body invincibility frames and 21 active frames. Uncancelable. Immense recovery.

22A- Low. Blockable command throw. Negative on block. Not punishable. If you don’t want to block after this you can always use a 623X at your own risk.
22B- She runs for a command throw. Unblockable. This is handy sometimes although I wouldn’t recommend using it more than 1 or 2 times in a match, especially against strong foes. Throwing this on people who are in max or half moons who are in heat can be good since they can’t circuit spark/burst against this. They can, however, jump out of it. The reason they won’t jump on most cases is because it’s animation looks a lot with a forward dash.

22C- Mid. Blockable command throw. Punishable on block. This move is actually a very weird reversal, as it has 9 full body invincibility frames and takes 10 frames to start. You might want to use it to pass through some short range projectiles in cases that 2C wouldn’t work for any reason.

AIR SPECIALS
j.214A- Mid. A dive blockable command throw. Fast. Reminds of the 22A. Negative on block. Not punishable. You can use this sometimes when you think the opponent will throw a move under you: most of the time you’ll grab that move; sometimes you’ll be countered. It depends on the match-up. Use with caution as it’s not good on block. Sometimes in some match-ups it’s better to move away and try to reestablish your game. Aside from that, this move is mainly used as a fast fall for either combo or mix-up purpose.

j.214B- A dive unblockable command throw. Slow. Reminds of the 22B, but isn’t as good as people can simply jump out of it and it doesn’t look like anything that would prevent them from jumping.
j.214C- Mid. A super dive blockable command throw. Fast. Reminds of the 22C, but this time isn’t as bad. This move is actually very good. You can use it to cancel your 623A, you can use it instead of a j.214A when you think they’re throwing some attack under you, you can use it to fast fall faster than j.214A and do combos only possible with the j.214C as a fast fall, you can use it to combo out of OTG situations, you can use to punish neutral/back tech after an air throw in the corner. You can also use it as an air vs. air whiff punish attack sometimes. This attack can be either positive or negative on block according to the height it will hit (unless it hits very close to the ground, it will be negative, but never punishable). This attack can also be used as a combo ender, as it does good damage, takes to the corner and hard knockdowns. The frame advantage however is almost insignificant and won’t let you do much after it.
FOOTSIES AND NEUTRAL GAME
As you should know, footsies in Melty Blood consist mostly in anticipating while moving and finally trying something when the right moments appear. The process of searching, baiting and reacting to these moments are different for each players, as each players has a different style and approach to what he considers the fittest. Her attacks, however, are the same for everyone, and we can at least point to what’s good to use while in that process. On the ground, her best tools on neutral are dash, dash 2A/5A, 5B, dash 5B, 236A and finally 2C. In the air she has j.A and j.B with the moving option you find that works best for you (dash jump + attack, airdash + attack, jump + attack, etc). So now you might be thinking you’ll take this to battle and have good results… like it was said before, Sion is not a priority character, her neutral game is bad compared to most characters. All of this might help you ease the harshness, but it’s still very likely you’ll still have a hard time on neutral against strong opponents even after you master it. Also, even when you win the neutral, if the opponent blocks, she’s not good at blockstrings too. You have to have in mind what are your strong points: combos and mix-ups. When you’re at it, show them what you got!
BLOCKSTRINGS
Blockstrings are not a F Sion strong point and naturally, in high level play, the opponent may offer effective answers against all of your options, reason why you’ll need to vary a lot and have a sharp mind play.
Before going to the actual blockstrings, what’s most important F Sion’s case, due to the fact she doesn’t have strong blockstrings per se is the whole idea behind blockstrings in Melty. I sincerely think this can open minds on how to put this resource to act while the actual strings are the less important in her case.
There are many types of blockstrings. I think the most notable ones are strings that mix frametraps, overheads and throws and strings that seek not to leave gaps. Sadly, F Sion doesn’t have the tools for this last type.
As usual, to practice strings, go to practice mode, menu, enemy settings and in enemy action set for recovery A. In enemy defence set for all guard. That’s because you’ll try to leave little gaps between your attacks to punish mash and also to mask your overheads. In order to accomplish the right timing training this way, you need to leave the right amount of time so that, after a blocked move by the other character, your next move will cause a counter hit. Each gap between two attacks has to be trained individually, you can not leave no gap or be hit. “Why” you ask? Good. So. Overheads in Melty always take more time than normal attacks, which means if the opponent is mashing, he’ll successfully mash you overhead. By putting gaps between your attacks and mastering the right timing you inhibit the guy from pressing buttons even during gaps, thus limiting the foe to mash your overhead only when he has visual confirmation of it coming, and that’s hard even for the most advanced players. Besides, if all attacks have a little gap, then the overhead’s delay is masked, making it harder to even block. Of course, however, to make all this structure work you need to master the timing of the gaps between each two attacks, reason why you should practice a bit. This training is fast and helps a lot in the beginning, it’s always good to do before playing, it’s like sharpening the knife before cutting the meat. You can also use the gap to throw if you either dash or are close enough. F Sion doesn’t have good post throw mix-ups, so, the objective of throwing is doing the contrary conditioning of the gaps, that is, making them want to press buttons. If you want to combo out of frametraps, throw more: you’ll make them want to press buttons so you can punish; if you want to confirm overhead combos, throw less and do more gaps, since this inhibits from pressing buttons and masks overheads. There are opponents who are immune to conditioning and choose always the same options. In that case, choose the same options too (the ones that beat his). Avoiding playing this type is wrong, you have to play and never get hit by what he does: it’s a focused training to test if you can actually do the right thing even if it means doing the same thing over and over again (i.e. always baiting a reversal).
Now think with me about one thing. Let’s go back to the general theory and let’s say, just for the sake of exemplifying, that you attack without leaving gaps between the attacks. Naturally, the opponent will be lock on defense, which means doing one attack or twenty will have the same output. But what is best for you, one or twenty, considering what was explained – that F Sion doesn’t have good gapless strings? You’re right if you thought of one. Unless you really need magic circuit or if you’re going for guard crush, if you’re doing a blockstring, you don’t want to distance yourself from the opponent. You know what pushblock is? That mechanic some games have that the blocker pushes away the attacker. Doing many attacks leaving no gaps with F Sion is almost like you pushblocking yourself! She doesn’t have dangerous gapless strings. That’s why every attack has to have it’s own meaning, it’s own reason to be there.
Ok, here you might have an idea about strings. Let’s summarize:
- throw beats blocking and makes the opponent mash;
- gaps beats mashing and makes the opponent block;
- overheads in blockstrings work better with gaps;
- to be part of a blockstring, attacks have to be useful.
With this, we move on to F Sion’s actual strings.
STRINGS
1) 2A -> 2AA
This is a simple and excellent string. Using only A you save your stronger attacks; A is the fastest move, so you win in speed. Note that it’s 2AA and not only 2A in the second time. This is to give you time to see if it hit or not and react accordingly: if it hits, combo; if it’s blocked, continue the string. In the case you feel the first 2A has a chance to hit, do it twice too. Besides, this string can be made it two different ways.
The first one is doing in the timing to counter the practice mode’s recovery A, to punish mashers, like explained before; it’s the standard way. You can increase the delay if the opponent is strong.
The second one is a bait for strong opponents, who aren’t likely to press buttons for no reason. After one 2A on block, you walk forward and rapidly do 2AA. Since the pause is much bigger and you walk forward, there’s a chance the opponents instincts will make him press a button. In that time your 2AA must hit first.
2) (2A -> 2AA -> 5B) or (2A -> 5B)
Here you continue the string. You do 5B right away if you want to skip the previous string, distancing less from the opponent. The utility of 5B here is that it hits both air and ground, catching jump attempts. It also goes farther and have a good hitstun, making it easy to convert into a combo on air or ground. Always consider these kind of properties.
There many more options, but this is the primordial structure. F moon doesn’t have reverse beat, so it’s really limited. Now let’s learn what we can add to this structure, how to reset strings and how to finish them.
String Additionals
1) Overheads
Sion has 3 overheads, 6B, 6C and 5[C]. Overheads tend to be more effective when made early on strings or right after an air attack, however, you have to choose when. 6B is hard to see, but can be mashed and it’s negative on block; 6C won’t get beaten by lows and it’s positive on block, but it’s easy to see and shield; 5[C] serves as a good third option, cancelable if blocked.
2) 2B
F Sion’s 2B is a good low. It’s not so slow, not so short and it’s +1 on block. The problem of using this move on the string is that is pushes to opponent too far. Also, it’s only cancelable in overheads or C moves, which limits it too much. It can, however, be used as an extra attack always you find appropriate.
3) Throws
Remember the second way of the first blockstring, where Sion would 2A, walk forward and 2AA. For the opponent to think you’ll throw in that situation you actually need to throw once in a while. Remember, throws objective is to condition the opponent to press more buttons; it doesn’t cause good damage nor lead to food mix-ups, use it with that in mind, unless you’re going for the kill.
String Resets
String reset is something you use you to restart the string. Say you do 2AA 5B dash 2AA 5B. In that case the dash served as a string reset. Resets always have flaws, so you have to vary.
1) 66
Exactly like in the example, Sion’s dash can be used to reset a string. The flaw is obvious: if the opponent press a button, you eat it. That’s why, if you want to use it, you’ll have to constantly condition the opponent to not press buttons: gaps. It’s good to vary the moment in the string you use the dash too. Also don’t forget, you have the 2B as a trump card, it can be useful here.
2) 6C
A reset overhead, lovely! If the opponent doesn’t shield, he’s in trouble, but beware, if you start using too much he’ll start shielding every attempt. 6C 2A is a true blockstring, so it won’t leave gaps and makes you go forward, restarting the string, it’s great. If it hits the opponent crouching you can combo of it (with the exception of some characters); if it hits the opponent standing, it’s positive on block, but he has time to do a reversal if he wants to.
3) 3C *delay* 236A
Depending on the character you are fighting against, 3C 236A can be a good reset option. 3C approximates quite a bit, but it’s only special cancelable. By doing close 3C *delay* 236A (after a 2A 5B, for example) you stop in opponent’s face with 0 on block, that is, if you have a faster attack you’re in advantage. Sion’s 2A comes out in 4 frames while 5A does in 5. Most light attacks come out in 4 or 5 frames too. Another thing you should consider is that, if you practice, you’ll know the right timing better than the opponent, so it’s more likely you’ll hit first, but it’s risky. Another bad thing about this reset is that it’s so obvious you’re doing a 2A next, so shielding is easy. Shielding the 236A after the 3C *delay* is also easy. In this case, if you want to use this reset, you’ll need to have answers to the opponent’s answer. He began to use shield? Jump instead and punish or something. It’s all about the mindgames now.
4) 5CC
The second 5CC hit pulls back the opponent close and it’s positive on block. This reset’s flaw is the opponent can simply jump between 5C and 5CC as it’s not a true blockstring. Like it was mentioned before, there is enough time to easily IAD and punish F Sion with a full combo when she tries this reset. What you can do if you want them to respect this reset is doing 5C 3C since 3C will beat jumping attempts leading to 214A or 214C follow up. Still, it’s not good to abuse against opponents that know the flaw (strong ones).
String Finishers
Well, the name is obvious. You use this when you want to stop pressuring or try a new approach. With F Sion, the best frame advantage you can get from far is 0 with 236A, that can be used after any C attack. If you want to distance the opponent, the best option is 5C 3C 236A, with 2C 236A in the second place. If you want to keep him close, but not much, do 3C 236A, but, contrary to the reset option, here you cancel the 3C right away into 236A.
COMBOS
[ ] command must be held
- command made in air
General notes
– F Sion doesn’t have different combos for corner/midscreen (she has, but they’re not relevant).
– The button ‘A’ is almost always optional: may lightly increase or decrease the damage. Doing more As will make it easier for you to do the most advanced combos, as they require more gravity. Also, more As equals more magic circuit. Doing too much As, however, may increase the number of hits too much, giving lots of magic circuit to opponent. With that said, I tried to list the best for each confirm.
– In the okizeme combos with 214C, instead of doing the complete version, which is dash AABC 3C 214A, you can simply make ABC 3C 214A to make it easy. Doesn’t reduce damage too much. Making sure you won’t miss may be more important than doing the optimal version.
– After 6C overhead, the combos are just like the basic ones, reason why they’re not listed.
– The reference character used for damage was C V.Sion.
– Combos starting from overheads consider the opponent crouching for damage.
– Inside parentheses are: damage, magic circuit gained by you, magic circuit gained by the opponent.
– A good tip to choose your combos is to value symbolically okizeme, difficulty, spent magic circuit, style, corner carry and magic circuit gain and then do the equation. For example, if a combo has okizeme, I give it 2000 symbolical damage (since this is F Sion’s main strenght and going to neutral would be terrible to her), if it’s easy I give it more damage. If it’s hard, it loses a proportional number. Depending on how much you think 100% magic circuit is worth, you give it a value in damage. Do the math and find what’s better to you.
Basic > no okizeme combos
No magic circuit required
- (4367, 68,8%, 25,1%) AB 2B C 214B *delay* B 9 j.ABC j.29 j.ABC airthrow
- (4655, 76,9%, 27,8%) AB 2B C 214B 9 j.[C] j.8 j.[4] *delay* j.[C] j.214A *lands* 8 j.BC j.29 j.ABC airthrow
- (5359, 102,1%, 36,2%) AB 2B C 214B 9 j.[C] j.8 j.[4] *delay* j.[C] j.214A *lands* *delay* 3B 7 *delay* j.[C] j.8 *delay* j.[C] j.214A *lands* 8 j.BC j.29 j.ABC airthrow
100% magic circuit required: 214C can be used as a ground combo extender
- (4806, 55,1% – 39,2%) AB 2B 2C 214C AB 2B C 214B *delay* B 9 j.ABC j.29 j.ABC airthrow
- (5041, 66,8% – 49,7%) AB 2B 2C 214C AB 2B C 214B *delay* 3B 7 *delay* j.[C] j.8 *delay* j.[C] j.214A *lands* 8 j.BC j.29 j.ABC airthrow
100% magic circuit required: fishing with j.214C do more damage and carry to the corner
- (4853, 63,4% – 24,4%) AB 2B C 214B *delay* B 9 j.BC j.29 j.BC j.214C
- (5136, 74,2% – 28,0%) AB 2B C 214B 9 j.[C] j.8 j.[4] *delay* j.[C] j.214A *lands* 8 j.BC j.29 j.BC j.214C
- (5715, 99,4% – 36,4%) AB 2B C 214B 9 j.[C] j.8 j.[4] *delay* j.[C] j.214A *lands* *delay* 3B 7 *delay* j.[C] j.8 *delay* j.[C] j.214A *lands* 8 j.BC j.29 j.BC j.214C
100% magic circuit required: j.214C is used to fast fall
- (5743, 76,4% – 47,6%) AB 2B C 214B 9 j.[C] j.8 j.[4] *delay* j.[C] j.214C *lands* 8 j.[C] j.8 j.[4] *delay* j.[C] j.214A *lands* *delay* 3B 7 *delay* j.[C] j.8 *delay* j.[C] j.214A *lands* 8 j.BC j.29 j.ABC airthrow
200% magic circuit required: j.214C fast fall + j.214C finisher
- (5979, 75,2% – 45,5%) AB 2B C 214B 9 j.[C] j.8 j.[4] *delay* j.[C] j.214C *lands* 8 j.[C] j.8 j.[4] *delay* j.[C] j.214A *lands* *delay* 3B 7 *delay* j.[C] j.8 *delay* j.[C] j.214A *lands* 8 j.BC j.29 j.BC j.214C
Basic > okizeme combos
No magic circuit required
- (2674, 34,6% – 12,6%) AB 2B 2C 214A
100% magic circuit required: damage and magic circuit sacrifice for okizeme
- (3999, 43,7% – 31,5%) AB 2B C 214B 214C dash AABC 3C 214A
- (4330, 43,7% – 29,3%) AB 2B 2C 214C dash AABC 3C 214A
Counter > no okizeme combos
No magic circuit required
- (3881, 46,8% – 15,6%) j.B counter hit -> B 9 j.BC j.9 j.ABC airthrow
- (4205, 49,5% – 16,5%) j.B counter hit -> 2B C 9 j.BC j.9 j.ABC airthrow
100% magic circuit required: 214C as a combo extender
- (4844, 47,9% – 34,4%) j.B counter hit -> 2C 214C AAB 2B C 214B *delay* B 9 j.ABC j.9 j.ABC airthrow
- (5095, 58,2% – 42,6%) j.B counter hit -> 2C 214C AB 2B C 214B *delay* 3B 7 *delay* j.[C] j.8 *delay* j.[C] j.214A *lands* 8 j.BC j.29 j.ABC airthrow
- (5328, 78,5% – 55,2%) j.B counter hit -> 2C 214C B 2B C 214B 9 j.[C] j.8 j.[4] *delay* j.[C] j.214A *lands* *delay* 3B 7 *delay* j.[C] j.8 *delay* j.[C] j.214A *lands* 8 j.ABC j.29 j.ABC airthrow
100% magic circuit required: less damage this time around, but takes to the corner
- (4747, 44,1% – 15,8%) j.B counter hit -> B 9 j.BC j.9 j.BC j.214C
- (5192, 46,8% – 16,7%) j.B counter hit -> 2B C 9 j.BC j.9 j.BC j.214C
Counter > okizeme combos
No magic circuit required
- (2173, 26,1% – 9,8%) j.B counter hit -> 2C 214A
100% magic circuit required: 214C increases 2000 damage!
- (4192, 35,2% – 26,4%) j.B counter hit -> 2C 214C dash AABC 3C 214A
Raw airthrow > no okizeme combos
No magic circuit required
- (2909, 43,2% – 14,4%) Raw airthrow > *lands* dash 2A B 9 j.BC 9 j.ABC airthrow
- (3159, 55,8% – 18,6%) Raw airthrow > airdash j.[C] *delay* 7 *delay* j.[C] j.214A *lands* 3B 8 *delay* j.BC j.29 j.BC airthrow
100% magic circuit required: a little more to kill!
- (3361, 49,5% – 17,6%) Raw airthrow > airdash j.[C] *delay* 7 *delay* j.[C] j.214A *lands* 3B 8 *delay* j.BC j.29 j.C j.214C
Raw airthrow > okizeme combos
No magic circuit required
- (1864, 9,0% – 4,1%) Raw airthrow -> *lands* 214A
100% magic circuit required: a little more damage
- (2728, 18,1% – 20,7%) Raw airthrow -> *lands* 214C dash AABC 3C 214A
Overhead 6B > no okizeme combos
No magic circuit required
- (4003, 57,6% – 21,4%) 6B C 214B *delay* B 9 j.BC j.29 j.ABC airthrow
- (4338, 68,4% – 25,0%) 6B C 214B 9 j.[C] j.8 j.[4] j.214A *lands* j.BC j.29 j.ABC airthrow
- (4592, 75,6% – 27,4%) 6B C 214B 9 j.[C] j.8 j.[4] j.214A *lands* *delay* 3B 8 *delay* j.BC j.29 j.ABC airthrow
100% magic circuit required: 214C ground extender
- (4633, 49,2% – 38,5%) 6B 2C 214C AAAB 2B C 214B *delay* B 9 j.ABC j.29 j.ABC airthrow
- (4881, 63,2% – 45,6%) 6B 2C 214C AAB 2B C 214B *delay* 3B 7 *delay* j.[C] j.8 *delay* j.[C] j.214A *lands* 8 j.BC j.29 j.ABC airthrow
- (5083, 78,5% – 55,2%) 6B 2C 214C B 2B C 214B 9 j.[C] j.8 j.[4] *delay* j.[C] j.214A *lands* *delay* 3B 7 *delay* j.[C] j.8 *delay* j.[C] j.214A *lands* 8 j.BC j.29 j.ABC airthrow
100% magic circuit required: j.214C as finisher
- (4594, 54,9% – 21,6%) 6B C 214B *delay* B 9 j.BC j.29 j.BC j.214C
- (4856, 65,7% – 25,2%) 6B C 214B 9 j.[C] j.8 j.[4] j.214A *lands* j.BC j.29 j.BC j.214C
- (5077, 72,9% – 27,6%) 6B C 214B 7 j.[C] *delay* j.8 *delay* j.[C] j.214A *lands* *delay* 3B 8 *delay* j.BC j.29 *delay* j.BC j.214C
100% magic circuit required: j.214C as fast fall
- (5515, 67,8% – 40,5%) 6B C 214B 9 j.[C] j.8 j.[4] *delay* j.[C] j.214C *lands* 8 j.[C] j.8 j.[4] *delay* j.[C] j.214A *lands* *delay* 3B 7 *delay* j.[C] j.8 *delay* j.[C] j.214A *lands* 8 j.BC j.29 j.ABC airthrow
200% magic circuit required: j.214C fast fall + j.214C finisher
- (5822, 64,6% – 40,7%) 6B C 214B 9 j.[C] j.8 j.[4] *delay* j.[C] j.214C *lands* 8 j.[C] j.8 j.[4] *delay* j.[C] j.214A *lands* *delay* 3B 7 *delay* j.[C] j.8 *delay* j.[C] j.214A *lands* 8 j.BC j.29 *delay* j.BC j.214C
Overhead 6B > okizeme combos
No magic circuit required
- (2251, 26,1% – 9,8%) 6B 2C 214A
100% magic circuit required: 214C ground extender
- (4058, 35,2% – 26,4%) 6B 2C 214C dash AABC 3C 214A
Overhead 5[C] > no okizeme combos
No magic circuit required
- (3223, 47,7% – 18,1%) 5[C] 214B 9 j.BC j.29 j.ABC airthrow
- (3710, 65,7% – 24,1%) 5[C] 214B 7 j.[C] j.8 *delay* j.[C] j.214A *lands* 8 j.BC j.29 j.ABC airthrow
- (3951, 72,9% – 26,5%) 5[C] 214B 7 j.[C] j.8 *delay* 3B 8 *delay* j.BC j.29 *delay* j.ABC airthrow
100% magic circuit required: j.214C as finisher
- (3749, 45,0% – 18,3%) 5[C] 214B j.BC j.29 j.BC j.214C
- (4158, 63,0% – 24,3%) 5[C] 214B 7 j.[C] j.8 *delay* j.[C] j.214A *lands* 8 j.BC j.29 j.BC j.214C
- (4239, 63,9% – 24,6%) 5[C] 214B 7 j.[C] j.8 *delay* 3B 8 *delay* j.BC j.29 *delay* j.C j.214C
Overhead 5[C] > okizeme combos
No magic circuit required
- (1860, 23,4% – 8,9%) 5[C] 214A
100% magic circuit required: 214C ground extender
- (3209, 32,5% – 27,7%) 5[C] 214B 214C dash AABC 3C 214A
Shield counter > no okizeme combos
No magic circuit required
- (2461, 46,2% – 15,9%) Shield counter -> B 9 j.ABC j.29 j.ABC airthrow
100% magic circuit required: 214C ground extender
- (3035, 45,0% – 37,9%) Shield counter -> 2C 214C AAAB 2B C 214B *delay* B 9 j.ABC j.29 j.ABC airthrow
- (3186, 60,3% – 48,4%) Shield counter -> 2C 214C AAAB 2B C 214B *delay* 3B 7 *delay* j.[C] j.8 *delay* j.[C] j.214A *lands* 8 j.BC j.29 j.ABC airthrow
- (3328, 74,2% – 54,7%) Shield counter -> 2C 214C B 2B C 214B 9 j.[C] j.8 j.[4] *delay* j.[C] j.214A *lands* *delay* 3B 7 *delay* j.[C] j.8 *delay* j.[C] j.214A *lands* 8 j.BC j.29 j.ABC airthrow
100% magic circuit required: j.214C as finisher
- (2978, 43,8% – 15,2%) Shield counter -> B 9 j.BC j.29 j.BC j.214C
Shield counter > okizeme combos
No magic circuit required
- (1267, 28,7% – 9,2%) Shield counter -> 2C 214A
100% magic circuit required: 214C ground extender
- (2596, 28,8% – 25,9%) Shield counter -> 2C 214C dash AABC 3C 214A
Dealing with F Sion’s airthrow in the corner:
When F Sion airthrow an opponent in the corner, he has 4 options:
- no tech
- forward tech
- neutral tech
- back tech (back tech in the corner is pointless, people will neutral tech instead).
If he doesn’t tech, you win a free okizeme/mix-up situation.
If he techs, you have two options to cover his options:
- To punish forward tech, do a j.A right after the airthrow and do 2A as soon as you hit the floor. Timing is strict. Try this on practice, your 2A has to hit the opponent by his back.
- To punish neutral and back tech, do a j.214C after the airthrow.
It all may seems too good. However, the catch is, to punish, you have to guess.
- If you do j.214C and he don’t tech, you waste 100% magic circuit (this is the least worst that can happen).
- If you do a j.A and the opponent neutral tech, both recover at the same time. However, he knows beforehand he will tech, you don’t. Also, most character have better attacks to use in situations like this.
- If you do j.214C and he forward tech, you waste 100% magic circuit, put yourself in the corner and is in a frame disadvantage situation.
Usually strong opponents will vary between forward and neutral tech. That means if you want to airthrow in the corner, it will be all about the mindgames. It’s a 50% for you and 50% for the opponent situation.
OKIZEME & MIX-UPS
Sion has a good mix-up potential overall, but when it comes to solid, reliable mix-ups, there is only one move to set them: 214A. The general idea of a mix-up is using two or more antagonic options in the same, last, moment, so the opponent will have to worry with many options in a very few time to see and react. If you don’t do in the last moment, you fail. If the antagonic options don’t come out in the correspondent time, you fail. Let’s say the time of knockdown is 0 and the time of oki (the time the opponent wakes up) is 15. The pattern until 14 has to look the same, but in 15 you have to be able to either attack one way or the opposite way. That would be the ideal. Many people try and copy mix-ups, but they either make it too early (thus making easy to see from where the attack will come) or the options come out in a different timing (thus making it possible for the opponent to block in two different timings to nullify the mix-up). If you’re playing Sion, mix-up is one of your strengths. Don’t throw it away by missing the timing: if you’re doing a mix-up, doing it with the right timing is the minimum. If it’s not in the right timing, it’s not a mix-up, you’re just mimicking something people do like wearing a band shirt that you don’t know a song.
In Melty there is an immense mix-up potential, so I don’t think anyone will ever be able to do a complete list of some character mix-up options. Still, I’ll list some of the most common ones after 214A and explain a bit how they work.
214A is considered her best combo finisher because it leaves the opponent in the ground always in the same distance and gives plenty of time to come up with something before the opponent wakes up. The most common after a 214A are left/right side mix-ups. In this regard, there are many ways to vary which side you’ll land and, even though you can go far with two variations if you can execute them perfectly and have a good mind play, the more you master, the more you’ll be able to throw your opponent’s mind in despair, opening your way to victory. Also, some characters, like Archetype Earth, have a weird hurtbox that prevents you from switching side. In those cases, if you know more options you can find those that may work better.
Now some variations to practice. Before you begin to practice, go to menu, enemy settings, enemy action and set for recovery A. This will help find the right timing for each variation. Remember: different options in the last, same, time. That means you have to attack as soon as you land and be able: not get hit; strike the opponent with your first hit as soon as you land.
Some Mix-up Variations
1) 214A -> 7 j.66 j.attack *land* -> attack
Variables:
– Attacking in the air decreases the momentum, so, the earliest you attack, the shorter will be the displacement.
– The time you wait to airdash after the jump backwards.
Comment: this mix-up gives you two variables to control, so you can play with the opponent’s mind, for example, airdashing super early after the jump backwards, but also throwing the j.attack early, which will make you not cross sides. Also you can airdash late and attack also late, which may cross the opponent.
2) 214A -> 7 j.66 j.214A *land* -> attack
Variables:
– The time you wait to airdash after the jump backwards.
– Time moment you do the j.214A.
Comment: this option works together with the first option: note the initial pattern is the same. However, doing a j.214A instead of attacking can make you switch sides in the same distance attacking would not. With this it becomes futile to analysing your trajectory.
3) 214A -> 29 j.214A *land* -> attack
Variables:
– The moment you do the j.214A
Comment: another compatible option with the two previous options. This option mixes speed with a little bit of confusion from the first two options to be good. The confusion is due to the fact that even if you do the j.214A higher here, it will be much harder to switch sides. This is because the j.214A change sides easier when horizontally forward, the height doesn’t influence too much, which is not intuitive. Because of that, sometimes this option may look like it will clearly cross sides, but it doesn’t, while the second option makes look like it won’t cross, but it does. All of this may confuse the opponent deeply.
4) 214A -> *delay* IAD j.attack *land* -> attack
Variables:
– To not cross, the only way is doing the j.attack very early.
Comment: this mix-up has less variables, but it’s fast and very efficient. You need to wait for the proper timing to IAD so that your attack won’t either whiff or be late.
5) 214A -> *delay* IAD j.214A *land* -> attack
Variables:
– The moment you do the j.214A.
Comment: option to mix with option 4.
6) 214A -> 9 j.9 j.attack *land* -> attack
Variables:
– The time you wait to double jump after the forward jump.
– The moment you do the j.attack
Comment: works somewhat as the option 1 (controlling the same two variables). Here the timing is harder to control. As this version is different, it may work even against who already knows the option 1, however, since it’s harder to control the timing, you need to practice and be more careful.
7) 214 -> 9 j.9 j.214A *land* -> attack
Variables:
– The time you wait to double jump after the forward jump.
– The moment you do the j.214A.
Comment: option to mix with option 6. The idea is the same of the option 2, that is, making useless to analyse your trajectory. Even if you do the j.9 early, the j.214A has a good horizontal displacement, so it’s easy to switch sides.
8) 214A -> 66 6C *land* -> attack
Variables:
– The distance you do the 6C
– The moment you do the 6C
Comment: plus to the left/right mix-up, if you’re close to the corner you can also extend your dash, pushing the opponent to the corner and control the timing of the 6C to hit as an overhead as soon as the opponent wake up. You can also fake that you’re doing this and instead do it a little earlier: if the opponent is already all the way into the corner, it won’t cross; if he’s not, it will. Another interesting property of this option is that, if the opponent character is already raising from the floor, they might prevent you from crossing, so you have another variable to control but the distance, the timing.
Mix-up Additionals
Having mastered the basics there’s some more you can do.
1) Using 6B overhead
If you mastered the basic, most of the time you know which side you’ll land and thus, using 6B overhead becomes possible. Overhead loses to throw, so you should know when to use it or not according the match flow. The good thing about doing an overhead is that it will beat shields most of the time, that is one of the strongest options the opponent has against this mix-up.
2) Delay the mix-up a bit so that the j.attack you throw will actually hit
When the opponent is used to the left/right mix-ups he’ll most likely not cogitate the possibility of that j.attack hitting him, and you can take advantage of that. If you do it the right way, even if he blocks, you’ll get a good opportunity. It’s not a mix-up because the opposite attacks can’t happen at the same time, but you can vary from: two j.As (double overhead); one j.A and one 2A as soon as you land (high into low); one j.A and one overhead as soon as you land.
3) Throw
Controlling the timing (you need to delay) you can throw instead of attacking. It’s not so good and it’s hard to control, but it can be useful if the opponent is almost dead and reacting well to the other options. Don’t use this otherwise, there’s no need to condition the opponent here.
Opponent Answers
Now, there are answers the opponent can offer: shield, heat activation, 22 reversals. You’ll have to deal with them according to the match-up and use mindgames.
Shield
The idea to punish shield is doing 5B to punish low shield and 2B to punish high shield. You can overhead if you think they’ll shield or maybe jump to punish.
Heat activation
To punish heat activation jumping is a good option. If they don’t have and they have a good anti-air, it can be bad though.
22 reversals
Reversals that start with the command down down don’t need to know if you’re left or right, so take extra care against characters that have this kind of reversals, like C Satsuki, C Arcueid and such.
