
Disclaimer: If you find an error, or feel like you have more up-to-date or relevant information, please let us know. We’re able to update our current material after the fact, create addendums, and generally revise our process for greater accuracy and effectiveness, so don’t hesitate to tell us.
Written by: ScrawtVermillion
Match Videos: http://www.meltydb.com/resultall.php?1c=mech&1m=Half&tdb=any&filt=any
Pros:
– Some of the best long range pokes in the entire game, restricting the space in which the opponent can move.
– High damage combos
– Requires adaptation to her gameplay and due to her lack of usage it is difficult to know how to react against it
– Builds up meter extremely fast.
-Very interesting meter usage options, as well as one of the best Arc Drives in the game
-Dhalsim players will feel identified
Cons:
-Pretty slow and awkward angled air dash.
-Normals are pretty slow, struggles at close distance.
– Only good defensive options require meter (Bunker Shield and Arc Drive)
– Very difficult to open up an opponent due to lack of overheads outside of J.B and no command grab
– Some normals whiff on crouching opponents , forcing you to be aware of when to use your normals to maximize damage.
– A lot of DP motions are required during neutral game and combos, which can be difficult for some players.
Index
- Neutral
- Offense
- Defense
- Combos
- Mixups
- Neutral
Neutral is key in order to succeed with H-Mech (or Mech from now), your objective is to zone away your opponent with your huge pokes and projectiles while confirming any hit into huge damage from across a screen, covering air space with your summons is also mandatory since any counter hit off of a summon can lead into huge damage and meter build. How to utilize Mech’s tools will be explained individually in the following sections.
1.1 Essentials
5A is a 5 frame normal, it works pretty effectively as an anti-air, it will sometimes whiff on crouchers with small hitboxes, so use it carefully.

2A is similar to 5A, however it starts at 6 frames, making less helpful on close distance fights, but it has an ok range, use it to dash forward and start pressuring your opponent. It’s pretty effective as an starter.

5B is the first “little” tool that we get to use to set up our poking gameplay. It takes 11 frames to be active and it’s important to know that there is no active hitbox while the hand is growing or shrinking, so it’s definitely not safe to use at close range. Also be aware that this normal WILL whiff on crouching opponents, so don’t use it inside of combos if your opponent is crouching.

2B is another huge normal, it is a 2 hit normal, it takes 11 frames to be active, similar to 5B but it also has an active frame on frame 15, it deals a lot of damage and it low profiles several projectiles while punishing at the same time, which helps you win against zoners. A great tool to win the footsie battle on the ground.
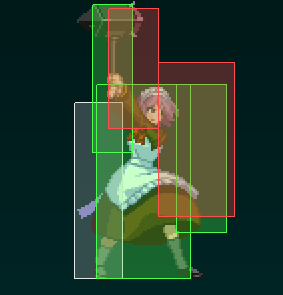
J.B, also known as Objection finger is your bread and butter overhead, short air dashes into this move can lead into great damage, it is important to know that similar to her B moves it has long startup and no active frames after her hand fully extends, it is air dash cancellable on hit AND block, so you can dash cancel into another J.B or back dash yourself out for safety. J.236A can also be used to be somewhat safe after using this move because of the pushback it causes on block. Be aware that skilled players will shield this move if they see it from far away which can sometimes hit you, outsmarting your opponent is key to not getting blown back by him.
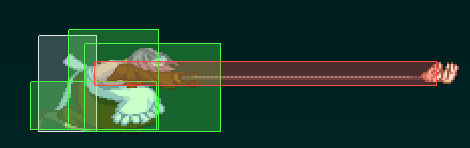
623A/B/C This is the reason why you play this character. These are absolutely ridiculous long range attacks with absurd damage and meter gain, they are also pretty effective to frame trap your opponent and are also air unblockable so your opponent cannot jump out if you finish your blockstring with any of these moves, since you can use it again and punish him. 623A is very fast and is not so large, but is a good way to space out your opponent, using 236236C after it will reset the situation in your favor in which you can start your zoning game again. Note that 236236C WILL ONLY CONNECT ON THE SECOND HIT OF 623A, otherwise it will whiff so you need good reactions and execution in order to pull that off. 623B is your normal combo ender if you don’t want to use meter, it covers great portion of the screen, and it’s cancellable into 623C if you want a better setup, since 623B by itself will not cause any knockdown.

623C is the longest one and will cause a hard knockdown status, excellent for mid screen summon setups and IAD overheads. Your bread and butter combo ender.

1.2 Important
6C is your generic launcher, there is nothing too special about this move, you cannot reverse beat this move and there is a lot of recovery, however , it is strong as an anti air but because of the recovery it can leave you off guard. it’s special cancellable on both hit and block so you can use 236a or 623a to make it safe on the ground
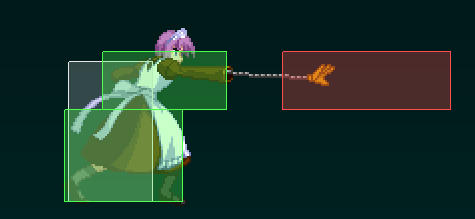
236B. This is one of Mech’s fireball moves. 236B is a fast mini god hand that will travel the whole screen, is very spammable and can force your opponent to jump out if they don’t have good timing with shield.

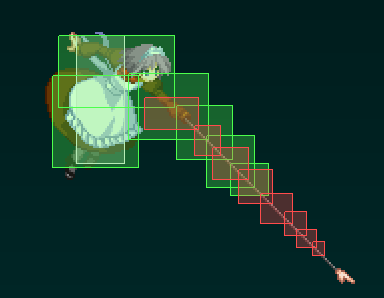
J.236A/B/C these are Mech’s air laser moves. These are fired on an angle, similar to Akuma’s Gohadous from Street Fighter. The A version is pretty fast, while the B one has longer startup but it hits several times, the C version is fast and can be comboed after J.236A if you need some extra damage to take a round. These are excellent tools to zone from the air as well as to confirm after J.B if you are too far away from the opponent and will not be able to confirm with a full combo after.

1.3 Extra
4B is a flamethrower move, it has an ok startup and the range is ok, however it cannot be cancelled into any move and the damage is pretty mediocre, so you would want to avoid this attack unless your opponent has really low health and he’s trying to rush you.


J.2C is an aerial flamethrower move, great startup and range is ok, lacks damage and is also VERY unsafe and you WILL get punished if you jump forward while using this move, not the best option but is a way to end the game as well as to control air space. It can be used when backdashing making you more safe, however there are several ways to punish it, so use it carefully. It is an ok way to end combos since it gives a good amount of meter.

63214A/B/C are your summon moves. after a fast summoning animation a random Mech will appear from the opposing side that you are facing at the moment of the summon. 63214A and B can be destroyed if the opponent hits them.
63214A will summon a Mech that will run across the screen, use this move to force the opponent to time differently his shields or jump. Punish him if he tries to hit the Mech instead of shielding or blocking with your 2B and 623B for huge damage. There is a VERY SMALL chance that instead of a Mech an old guy will appear, this old guy will wall bounce the opponent if he hits him from which you can combo off while regular Mechs are kind of difficult to combo off depending on spacing. He is also invincible.


63214B is your air summoning, it will summon a jetpack flying Mech that will go from one side of the screen to the other, this is your best tool to control air spacing as you don’t have to put yourself into danger, abuse it if your opponent is jumping too much. The hitstun from one of these Mechs is enough for you to fully combo on the ground.

63214C is a very interesting move. It has a very long startup animation in which Mech will summon an airship. After the summoning the ship will move forward while shooting lasers and missiles. If Mech gets hit at any moment during this summoning animation the ship will go away. After the summoning the Ship will keep going even if you get hit. Use this move from a very safe distance if you want to be aggressive but be aware that it takes 150% of your meter to use this move so it’s a very high risk move that will utilize most of your resources. The ship is completely invincible

Arc Drive (41236C)
This is a very strong move, one of the best Arc Drives in the entire game. It will instantly summon a horde of Mechs that will travel across the screen, similar to 63214A, use this a strong way to move into the aggression, as well as a punish. If the opponent blocks mid air you can use 5A and follow up with a complete air combo. If he shields in the ground you can throw them and if they air shield you can air throw. Use it whenever you have the meter for it.

—————————————————————————————————————-
- Offense
As you can see from her normals Mech shines at controlling the movement of the opponent. 623B, 5B and 2B are your best ways to zone out your opponents when you are not a screen away from your them, you can also use 623A after 623B to catch people trying to jump. When you are far from your opponent and he shields Mech’s projectiles send a Mech summon and get proper spacing for your 2B and 623B. IAD into J.B is a great way to catch an opponent that is holding down-back.
2.1 Essentials
2A is an effective normal when dashing in to start pressuring the opponent, because of the range of the move it can be used in a space in which you are not really close to your opponent, meaning that your other normals are more threatening
2B can be used as a frametrap, hitting 2B and canceling it into 623B will keep the opponent checked and constantly guessing on how to react.
5B serves a similar purpose as 2B while pressuring your opponent. Remember that it will whiff on crouch, so this move is strong if you predict your opponent to try to jump out of your pressure. If your reactions are good enough you can confirm with an air combo.
J.C is an ok normal, not great for the air to air battle, similar to J.B it can be used effectively as an overhead, however this move is better when up close to the opponent so this is the option that you would want to use while your opponent is in the corner, important to mention that this move can be charge, hitting airborne opponents with it will cause a hard knockdown status, while on standing opponents it will have no additional properties. Use J.(C) to fake overheads into grabs or lows.

623A/B/C do a good amount of chip damage (something that is not mentioned as much in Melty Blood), as well as frametrapping your opponent.
2.2 Important
5C is a slow normal that you don’t want to use outside of combos and blockstrings, because of his long startup and long recovery is not useful as an anti-air and is only required for pressure and combos. It can be charged, however it will not change any of the properties of the move, so use it as a frame trap in the middle of a blockstring.

2C is a very slow normal, similar to 5c in that you should not be using it outside of combos and pressure, it can also be charged, giving no additional properties to this move, so use it as a frame trap with your other moves, also because of the small hitbox it is difficult to hit airborne opponents after a successful shield.

6aa/6aaa are ok moves from when you have to fight up close with the opponent, however, you will soon realize the lack usage of your target combo because of the lack of range and difficult ways to combo into them, but is always nice to know that is always there.

J.A is a great button to use on air to air situations, it has a very good range and it’s good inside of combos, since you will later find how difficult is to chain your other normals together consider utilizing J.A as a secure way to finish combos if you don’t feel confident.

214A/B/C. These are drill attacks that will send Mech forward. 214A and B are multi hit moves that are air cancellable on hit which can lead to overhead resets, 214A is also a very good launcher after 2C, while 214B has long startup and it travels farther, which makes it unreliable.

2.3 Extra
236C has 2 variations, 236C and 236236C, the first one has a longer startup animation and will launch a spike ball that will send the opponent flying on a knockdown status, in which you can OTG and follow up with a full combo after. 236236C has faster animation and will launch and Atomic Nasu which will create a hard knockdown status in which you will not be able to follow up with a combo. While both options are great, 236C is very difficult to combo out into because of the long startup, while 236236C is a good long range punish as well as a good combo ender.


J.623A/B/C They are exactly the same as the ground versions so I will not go into detail about them. They are amazing tools for air to air game at distance. 623B is your air combo ender, reason being that it gives you a lot of meter and the air throw is not a safe option on Mech due to her slow normals not being able to punish properly on some occasions.


—————————————————————————————————————-
- Defense
While Mech has great spacing tools and great damage when you make a mistake you pay a lot, since her options are lacking on wakeup, you can’t really contest on wakeup due to lack of a real DP, you can master the art of shielding and actually blocking, which takes time learning the options of the other characters, luckily you have H-moon bunker shield which can help you forcing a knockdown on the opponent which gives you enough time to dash away to try get some space. Obviously this option takes a lot of meter and some of the best tools of Mech are based on meter so there is a huge drawback on bunker shield. Your Arc Drive can help you escape the corner, however if your opponent is too close and has good reflects he can throw counter you to gain invincibility during the arc drive, and in the case of characters like Kouma or Satsuki they can use their EX command grabs to get full invincibility and big damage while you lose all your meter.
Other than that there is not many options, knowing when you can contest with 2A is very important, also you can use 623A if there is enough space, it is normally a good option to use after the opponent uses a special move like Ryougi’s Rekkas or C-Sion’s Gunshots, it can also be used when the opponent is reverse beating to continue with his pressure, however it’s a rather unsafe move that can get you punished.
Some players use 214C as sort of a wakeup DP, because of the fast startup. While it can be used as one it lacks invincibility, so it cannot be used against meaties or people mashing against you, save that meter for bunker shield is normally a stronger option
—————————————————————————————————————-
- Combos*If the opponent is crouching omit 5B on your combos and use both hits of 2B*All damage calculations were done on training mode with Vsion as the dummy.
4.1 Midscreen
*5/2A > 5B > 2B (2 hits) > 623B (3573 damage 36% Meter). This is your basic bnb for the neutral game, notice how a simple combo can lead into almost 4k damage.
*5/2A > 5B > 2B (2hits) > 623B > 623C (4063 Damage 31% Meter uses 100% Meter). Similar to the last combo this one uses 623C to get a hard knockdown for a summon setup. Make sure that you don’t cancel 623C too late, as if it is done before 623B is about to end it will not combo.*5/2A > 2B (2 Hit) > 5C (2 hits) > 2c > 214A > J.B > J.C > double jump forward > J.B > J.C > 623B (4581 Damage 77% Meter). A long combo that ends in 623B for extra meter. The Jump Bs can be swapped with 2 J.As, making the combo way easier by sacrificing just a little bit a damage. It doesn’t provide you much control over the opponent after, so use it if you need extra damage in order to take a round.
Off a successful 5D
*5D counter > 2C > 5C > 6C > J.C > Double jump > J.B > J.C > 623B (2995 Damage 59% meter) Standing Shield combo, 2C has to be timed precisely because of the low hitbox
Off a successful 2D
*2D counter 2A > 6C > J.B > Double jump > J.B > J.C > 623B (3383 Damage 53% meter) a way to confirm off a 2D shield, it may whiff if you are too far from your opponent
4.2 Corner*2A > 2B (1 hit) > 5c (2 hits) > 6AAA > 236C > 2C > 5C > 6C > J.B > Double jump > J.B > J.C > J.623B (5153 Damage 45% meter, uses 100% meter). Best option in the corner, utilizing the target combo and 236c for extra damage. If you are too close to the opponent J.623B will not connect, in which you can replace it with air grab or J.2C.
—————————————————————————————————————-
- MixupsWhile not the most important thing on Mech, due to her lack of options, it is important to know how the Summon mixup works after 623C. It’s a very simple but effective high low mixup that can be done mid screen or in the corner, After the knockdown send a 63214A summon while using either 2B or J.B to force block on the opponent, 2B will force them to block low and will catch them if they attempt to jump out, J.B will force high block and if done quick enough can catch someone off guard, in case that 2B is blocked you can reverse beat into 2A continue your pressure after the summon connects with the opponent, if the opponent blocks J.B then air dash forward J.B again after the summon connects, if the opponent blocks correctly they will be pushed back at a range in which you can zone out with 5B or 2B, so either he blocks the incoming or gets hit you get the momentum advantage. The summon will also catch the opponent if they get hit by either 2B or J.B, sending them in the air that can be followed up with an air combo for a good amount of damage and forcing neutral game.After 623C it is also possible to do a fake overhead with J.(C) if you position yourself close enough, this can also lead to a throw that can be followed up by a summon setup, or a 2a for a quick low or not completing the J.(C) charge for an overhead against opponents trying to mash out or expecting the low or grab. While not the strongest mixups they are small tools to make your close range game somewhat threatening.
