
Disclaimer: If you find an error, or feel like you have more up-to-date or relevant information, please let us know. We’re able to update our current material after the fact, create addendums, and generally revise our process for greater accuracy and effectiveness, so don’t hesitate to tell us.
Written by Dogysamich
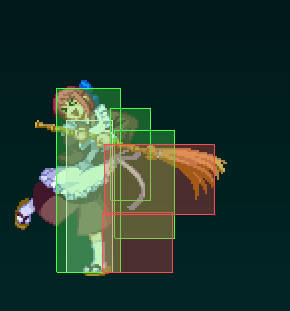
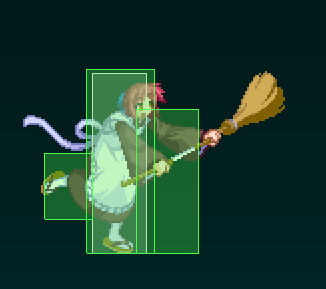
Hitboxes by Goofy
- Introduction
2. Normals
A) tl;dr
B) Overview of Normals
III. Specials
A) tl;dr
B) Overview of Specials
IV. “Combo Logic”
V. Odds and Ends
VI. Random Tidbits
_____________________________
- Introduction
What Does Full Moon Kohaku Do?
Full Moon Kohaku, for the most part, is sorta-a mid-ranged pokey-kinda character . … I mean… even though you’re playing Melty Blood, you’re not really gunna just run in there and mindlessly flail at somebody who has a brain. Not with this char, at least.
She can get a lot of mileage out of neutral since she has a ton of good buttons and specials to control the area around her. She doesn’t specifically hit very hard, but it’s reasonable for her to convert most things you recognize into “meaningful damage.” Even though she’s not a speed demon or insanely mobile, she’s quick enough to get into the positions to do these things fairly well.
As for offensive pressure and okizeme (SETPLAY SETPLAY), F-Kohaku isn’t ridiculously dangerous. She has tools to put people into somewhat stressful positions or to lock people down, but they require meter or a multi-layered read. She’s not C-Kohaku nor C-Maids, so it’s not like F-Kohaku says “Hey, I tagged you, so you’re holding a mixup when this is done” or anything. She can’t really latch onto people and lock them down that freely. Whenever she does earn her chance, she doesn’t have any of the crazykool tools that some of the other characters have to really mess with people (no fuzzies, fast double overheads, instant overheads; ya know “the cheap stuff”). However, the fundamental kit she has is solid enough to make her mixups not plain-as-day obvious.
Defensively, she’s….. ok. Again, F-Kohaku can hold onto her spacing really well from a neutral standpoint. However, when she blocks something relatively close to dangerous, she starts having to do some guesswork that’s not in her favor. She has very little invincibility to work with, and it mainly comes from metered moves; they’re easy to deal with. You’d think that because she has counters, Kohaku should be able to blow through a lot of faulty strings and stuff but nope~~ they’re so many degrees of “not guaranteed.” In short, she’s not above being bullied in any capacity.
All-in-all, Full Moon Kohaku is the kinda character that has the traits of a good character but, by herself, isn’t entirely strong enough to be one of those chars to makes people quit the game. She’s a character that would probably get filed under “somewhat annoying” long before “depressing to deal with” (like her Crescent counterpart).
2. Normals
A) tl;dr
Your A’s are + on block and hit. 5B/2B/5C are good stopping points in pressure. 5C is even on block. 2C is good, but dear god make contact with something. You’ll probably use a lot of j.B. j.C if you wanna jump on somebody. GO GO GO.
B) Overview of Normals
5A: Broompoke. It hits as a mid
There’s 2 hitboxes on this move; one that’s the broom itself (the handle Kohaku pokes with), and one that’s kinda on her elbow when she pokes. Even though it looks like there’s a lot of dead space below the handle, the 2nd hitbox reaches low enough to hit something like a crouching Neco. The thing is, the higher hitbox reaches further than the lower one, so you have to be standing ON TOP of the crouching Neco to actually hit with 5A (that’s just one example; a decent number of chars fit under this rule).
It’s still useful for stopping people from jumping away from you. It’s also ok as an anti-air~~ NOT THE “don’t jump at me” KIND OF ANTIAIR! (horizontal) — more of the “don’t land on me” kind (vertical).
2A: It’s a low swipe. IT’S A LOW JAB
Unless I’m incompetent with FrameDisplay, this is her fastest normal. It’s stubby, so you really need to make sure they’re wedged in front of you before you go crazy with it. It’s + on block, and it’s low. Not a whole ‘lot to say ‘bout it.

5B: Mid-ranged hits-as-mid “poke”
Good button to put out if somebody’s in the space for it (i.e. pokes, when you’re staggering strings, so on and so forth). Slightly – on block, but that’s not a huge deal. It’s also useful for picking up air CHs, catching jumpouts, air-unblocking when you drag somebody down, filing taxes, saving babies, defending coasts, blah blah.
It’s crafted similarly to 5A as far as hitboxes go, meaning it has a higher one and a lower one. The lower one DOES reach all the way to the ground (imagine her literally sweeping, that’s what you’re working with). p.s., she actually slides forward as she does 5B.
2B: The Anti-Air thingy
Well, it’s a decent anti-air. It has a clash hitbox on it. It is commonly seen as string fodder after 5B. Know that it’s possible to space 5B in a manner that 2B will miss, even though Kohaku scoots closer as she does 2B. It’s actually just shorter ranged that 5B to begin with (horizontally speaking).
*So this clashbox… here’re somethings you have to realize. YOU ARE FULL MOON KOHAKU, so if you wanted to do something like 2B *clash* > 5A… na. You also can’t shield after it, but you can shield bunker. You can’t dash from it either. (I know I’m kinda going through basic mechanics at this point, sorry.) You can jump, continue into another normal in the string, special, EX, ArcDrive, Another Arc, IH~~ point is there’s a lot you CAN do. You just need some kinda plan and logic behind it.

4B: 2-hit fast-feet standing low. MUST BE SHIELDED STANDING (‘cause it’s a standing normal)
Another move that’s a usual suspect for string/combo fodder, more specifically when Kohaku’s either confirmed or is pushing someone far away from herself. Might shock you to know, but it’s only slightly – on block. It’s a hard KD on hit.
She can cancel the first attack into special / EX / IH / Arc /AnotherArc on block. On hit, she could jump out if she really wants to. The second kick is deceptively long (it’s friggin’ longer than 5C by a pixel or two). Because of this, it’s not a horrible idea to put out in neutral. Maybe not the first thing to ever cross your mind, but far from bad imo.


5C: mid poke, [pooooke], or [SURPRISE!!]
Another really good button to just cram into someone’s face.Great against people who’re trying to IAD at you (usually trying to read 2C and IAD over it). It’s even on block (I don’t completely trust my testing, but that’s what I see). A go-to button for picking up air CHs, but just a really good button all-around. It’s also chargeable!
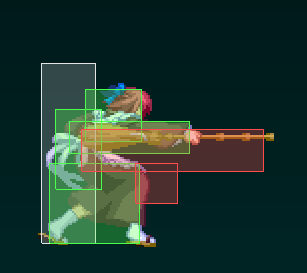
5[C] (slight charge)
Extends the katana from the broom. (Don’t ask me how this works, just call it science or something). Adds some more range to it and does more guard bar damage. (It’s actually the most damaging guard meter normal she has). You might stagger into this to fish for CHs, might try to use this in guard break scenarios, possibly just poke with it once a week~~ you should get used to doing this, just to have the option in your pocket.
5[C] (full charge)
Kohaku just throws the damn katana at ‘em. It’s techable KD on hit (soft KD). When she throws it, there’s a brief window when you can Special / EX / IH / Arc / Another Arc cancel the recovery, even if it hasn’t made contact yet.
If your opponent is in your face, they have to shield this standing, even if you full charge it. It still counts as a standing normal while it’s connected to the broom. However, when it’s detached and is a projectile, they can shield it whichever way’ll make them sleep better tonight. It’s a mid, so they can block it however they want.
As gimmicky as this is going to sound, you’ll probably use this as one of those “bet you forgot Kohaku could actually do this” kinda things. You may occasionally use it to chase backdashes as well. … it’s not a terrible projectile to just “put on the screen”, but it’s really tricky to make work because your opponent can literally see it coming a mile away.
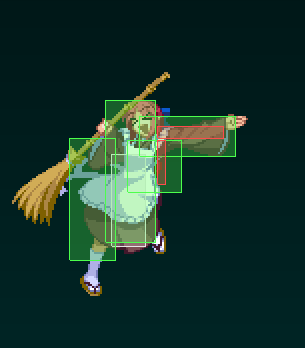
2C: Long range low
There are 2 things you need to know about this before you try to go full-retard. First, there are hurtboxes on the broom, all the way down the broom. Second, THOSE HURTBOXES ARE THERE BEFORE THE HITBOXES ARE ACTIVE. (Read: if you’ve ever watched Street Fighter and’ve seen Dhalsim “magically get swept” from full screen, that can happen to Kohaku. Any Kohaku, actually).
It’s also unsafe as block by itself (dear God please don’t just whiff this move, either ;n; ). However, if you’re poking with it, you have no reason not to buffer 236A along with it.
IT’S ALSO CHARGEABLE ! But you won’t really care about how charging effects the move. It’s mainly used for timing after a command throw in the corner if you want to go that route. For the record, charging it actually removes the hurtboxes on the broom (along with adding damage and some other things). Because of that, if you -really- wanted to do it in a string to fish for a CH (expecting somebody to mash 2A through your stagger), this could work, but that’s making life harder than it has to be.

3C: Your Full Moon standard issue command normal launcher
It’s not safe on block, although it has a really long window to cancel into specials and stuff….. It can also reflect some projectiles. Beyond that, you’re not going to use it much outside of a confirmed string.
Despite how it looks, it’s not that great of an anti-air.
Also, if you come from the land of H-Kohaku, the move doesn’t magically turn into a DP (I wish ;n; ) nor does it relaunch OTG’d people.


j.A: It’s a jump jab.
Chains into itself, so you’re A-OK to fly at somebody with the turbo button on. Since you’re in Full Moon, you can airdash out of this on hit or block (height-restriction permitting). Because of that, you can actually do the j.A > airdash j.A combo route that a lot of chars can do. ( although it’s really hard since Kohaku’s airdash has a long startup )
The hitbox is literally Kohaku’s arm in the sleeve (and she’s not fat, therefore it’s not a wide hitbox). There’s also another thin hitbox that goes from her arm down to her hip.
It’s high up, which is double edged because it’s really hard (sometimes impossible) to hit crouching people. … meaning it’s really difficult to hit a crouching person with it… but if you wanted to whiff something and land in their face~~ here ya go!
j.B: The button that does damn-near everything for you
It’s longer than j.C and it reaches upwards too! You’ll be using this a fair amount in the famous “Melty Blood air footsies”. You can also use it as a super-low poke (IADback jB is extremely useful ) or to jump on people. You have to be pretty accurate with it if you’re intending to hit a crouching person.
This move also has hurtboxes on the broom, so you can’t lose your mind with it.

j.C: The jump in button
Yup, pretty much your go-to button for jumping at people below you. It reaches pretty far down. Has a decent sized crossup hitbox as well. And..
IT’S CHARGEABLE!! \ ( ^_^ ) /, though the main property is similar to 2C, where charging it removes the hurtboxes on the broom. (You should know that, when you full charge, the hitbox appears a decent number of frames after the spark appears. So it’s entirely possible to see the full charge spark, but no hitbox comes out.)
III. Specials
A) tl;dr
236X is pretty much like politely closing a door on somebody. If you have the nerve to shield, you probably wouldn’t be faulted for 214’ing instead. You might forget about other stuff beyond those specials, 22B, 22C and j236C. Heck, you might even forget your 214s, honestly.
B) Overview of Specials
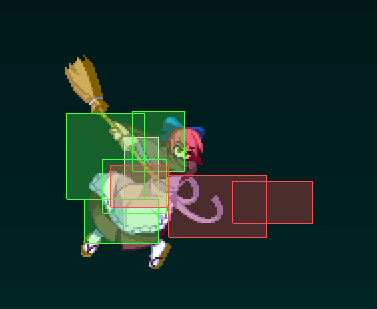
236A/B: Crescent slash projectiles
A goes horizontal, B goes 45 degrees. They’re IH cancellable “on whiff”~~ and THEY’RE CHARG~~yeah. Above all else, charging makes the the slashes go a lot further.
While you could just throw 236A out for some ground zoning, you normally throw it after a 5C/2C poke. It’s safe enough that you can accidentally throw it out point blank and be safe. (Don’t come to me if you find the contradiction to this.) It a hard knockdown when it hits.
B can be used as a preemptive anti air, and [B] will make you feel kinda like Satsuki without all the kool grab combos after it (counter) hits. B is air unblockable, though you’re not really gunna convert from it unless it counter hits. (You can pretty much 236C or IH, but that’s it. You can’t really do anything after the 236C, and IH’ing is asking a lot).
Know that if you’re trying to stop your opponent from coming in and you miss, you’ll probably lose a 3rd of your life or more for it. Both of them have -a bunch- of recovery if you don’t make contact.
236C: EX Crescent Slash
It travels full screen. FULL. SCREEN. The hitbox is like an L ( more like steps or a signal icon on a phone) where the smaller end is in front. It wallslams when it hits, and there’s a spacing where it’ll hit twice (it’s at the tip of 2c to barely where 2C whiffs. This isn’t imperative, though. You’ll get a feel for it if you mess with corner otgs). It’s also blockable in the air..
If you’re the kinda person who likes keeping control of people (oki/SETPLAY SETPLAY), you’ll use this a lot in corners for setups. If that’s not your cup of tea, you may think of using it to keep people from mindlessly moving in from longer ranges. Could also use it to whiff punish stuff, punish slower projectiles, etc etc.
There is a little bit of lower body invincibility on 236C. But it’s so little that if you’re trying to rely on it, you have to absolutely know what you’re going through. It’s not the kind of invincibility that should honestly deter anybody from doing anything to you.
*If it’s never crossed your mind, I don’t think any/many projectiles actually clash with each other in this game. Never crossed my mind ‘til now*
214A/B: Counters
They both have notable startup (more than a shield); they don’t activate instantly when they’re triggered, so they’re not the kinda counters where you laugh at everybody ‘cause you have them and people can’t button you to death. No no.
When your opponent triggers a counter, it works like they whiffed the normal…. as in not hitting a shield or block. So they can’t jump cancel nor continue the string, but if they could normally cancel the move on whiff (i.e. IH or EX on whiff), then they could do it before the hitbox comes out. Heck, if you counter a jump attack, it’s possible for them to just land and block before they get hit.
Speaking of boxes, the activation box is where Kohaku holds her katana. It’s not specifically a high and low counter, though you pretty much have to counter jumpins with 214A. (jA can be done with either/or, but you’re liable to get hit trying 214B).

214C: EX Counter
Entire-screen unblockable counter when activated. Like, Aoko can literally put an orb on Kohaku, triple jump to the top of the screen, and Aoko’ll still get blown up by the counter. It’s possible to dodge the attack, but the planets have to be aligned for it.
Wallslams on hit (and if for some ungodly reason they don’t tech when they hit the wall, it pulls them out of the corner).
When Kohaku does this counter, there’s no superflash when she inputs it, and it’s the 214A animation. She loses the meter for trying, regardless of whether anything happens or not.

**Note that there are some moves that are uncounterable. They don’t specifically go hand-in-hand with things that can or can’t be shielded. (i.e., you can shield the counter attack lightning flash, but you can’t counter it yourself.)**
22A: Pinetree ^_^
Fastest activation of all the plants.
You can hold any button (except D) to hold the tree in place, then release to launch the tree. Whatever button you use, you’re “locked out of” until you launch the tree (I quote that because you can actually repress fast enough to use a button and not launch the tree). If, for whatever reason, you wanted to “pass the charge” from button to button, you can do that.
In case you immediately thought of the kool idea where you (regular) throw somebody and then launch the tree, that doesn’t work. ;n;
Generally speaking, it’s one of those things that you either have your own personal setups for, or you’re liable to forget it exists. Nothing wrong with just throwing it out when you’re far away to take up a diagonal in the air. If it hits, it’s possible to follow up with an air combo or even a simple air throw. Some people like to do it after 2C (like, a “stray hit conversion into 2C), others like to toss it out after a regular throw (you can to the tree and block before your opponent can press a button).
If Kohaku gets hit before the tree launches, you should just assume it’ll disappear. There’s actually a period when she tosses the tree where Kohaku can get hit with something light such as a rogue 5A and the tree will stay, but it’s super finicky.

22B: Spinning Plant
One of the things Kohaku’s been known for for years, though F doesn’t get to use it as often as C (but infinitely more than H… ha ha ha!). Good setup tool: if your opponent blocks, you run mixups; if they block in the air, you air unblock them; if they get hit, well, they just decided they wanted to get hit and you could probably do it again. It has a front (the lower end), and when they block they’ll be pushed towards that side, regardless of where you are. If they get hit, they’ll kinda get tossed around in the middle.
Even though you’re not C-Kohaku/C-Maids, you can… “force” this onto people from some KDs. You can also throw this at long range in the sense of “Man, you’d probably be really upset if you dove onto this grenade here.”
When this plant leaves your hand, it’s not your responsibility anymore; it’s GOING to happen. The only way for your opponent to stop it is to either push you clear away from or “put you in a capture state” (which roughly translates to “they throw you”). And those don’t literally stop the plant, they just avoid the carnage in the area.

22C: Cactus
When Kohaku throws it, there’s a hitbox as it flies in the air, then it does a buncha punches (LOCKDOWN).
This is something that should reeeeaaaaally cross your mind when you have meter and your opponent in a corner (that’s not to say never do it midscreen, but it starts looking REALLY GOOD when they can’t just run away from it.) When your opponent blocks its, you basically pick some strats and try not to trip over Shield Bunkers. High/lows, guard crushes, regain some meter (A+B+C, you’re Full Moon, you can do that), time scam strats, there’s a lot you can do.
If they ever get hit, the Cactus keep swinging until it does the last, superflash, wallslam-to-hard-knockdown swing. They’re still juggleable when they’re hit by the last hit. If you opt to “just sweep” (more notably, 2C > 22B), they’re not in the corner. *If they’re blocking and get ‘opened up’ on one of the last few hits, it’s possible the cactus won’t super freeze before the last hit*
If your opponent stand blocks during the initial toss, there’s more than enough time for them to push a button or move before the cactus starts swinging. The toss animation recovers fast enough for you to completely snuff this, but you have to know it’s a thing. If they crouch block it, they’re kinda resigned to their fate. If they somehow get away but land (jump) on the punches, those are air unblockable.
Cactus has a “responsibility clause” that’s similar to Pinetree. If you get hit by something like a B, C, specials, big stuff, it’ll probably go away. If you get hit by an A, it’ll probably keep swinging. If you get hit by a bunker, it’ll go away, but your opponent has to make sure they don’t somehow bunker between swings and don’t get their shield hit. That’s entirely possible.
(psssst if you’re hoping this is one of those guides that slips and tells you how to deal with Kohaku, this move is ex-guard fodder. Unless you’re in H, you really shouldn’t be guard broken by this)


2222C: Johnny (costs 150 meter)
It’s a plant that shoots a buncha (six) fireballs very low to the ground. Johnny doesn’t turn if your opponent switches side, and there’s actually a dead area right next to him where he can’t hit your opponent (they’ll be in proxy block if they hold back, though). When a fireball hits, it launches your opponent into the air. (The hits won’t specifically combo.)
When Johnny sprouts, he checks which side your opponent is on as after he rises to know which way to face (meaning the opponent doesn’t have a big window to flat out make him shoot “the wrong way”).
One of the ideal places for you to throw Johnny is off screen so that your opponent can’t get behind it (read: you’ve got them in a corner, and you do a setup where you chuck the pot off screen. Don’t worry, it’ll still go off.) Know that in this scenario, where you’ll pretty much have them the closest to Johnny, all 6 of the fireballs don’t jail / aren’t a true block screen / whatever-termonology-you-like unless you walk them back towards Johnny. You’re probably gunna swing at them at some point anyway, but if you crossup and they’re getting pushed away, there’ll be a gap.
Johnny is like Spinning Plant in responsibility; you can literally die and he’s still shootin’.
22222C: Poison Plant (costs 150 meters) yes that’s five 2’s I’m not making this up.
Shoots one cloud of poison. If it hits, it’s a hard knockdown (you can still hit them after the poison cloud). The poison goes away after [x amount of time] or you get hit. Like Johnny, Poison Plant checks for the side when it sprouts.
One common place to throw this is after a regular throw (more specifically in a corner). If you execute this correctly, they have to respect you pressing 5A to stop them from jumping.
Realistically, this is another one of those specialty setups tools.
Poison Plant is also “not Kohaku’s problem” once it leaves her hands.

**Note about plants: I’m pretty sure Kohaku only owns 1 flowering pot, therefore she can only have 1 plant on the screen at a time. Whenever one disappears, there’s a slight “cooldown” before you can throw one out. (It’s not really long but, for example, you can’t just sweep somebody directly out of Spinning Plant and throw another one. You have to do some filler first (typically something like 5B 2B 4B 2C)).
Christmas Tree, Spinning Plant, and Cactus can be blocked either way, so you usually just expect these to hold people in place (It is possible to setup some left-rights from the blockstun when the plants end, though). Johnny and Poison Plant have to be blocked the correct way.
j236A/B Broom Ride
Kinda-sorta like another airdash, with some recovery. A starts up faster (practically instant), while B goes further. You still have most of your remaining air actions afterwards when you do this. You can’t backdash directly from it (you can still double jump > backdash, if you have an airdash). You can also attack and airthrow. You cannot shield directly out of this.
Both of them are IH cancellable, which is really useful when you’re above somebody and realize coming down with j.C would be a grave error. If you IH cancel in front of them (like you’re jumping on them), you’ll have regular momentum. If you cross over them first, you’ll slingshot off the broom. (You don’t actually have to fly over them in 236A/B. You could jump over, airdash back, 236A > IH, and you’ll still slingshot. It’s weird)
This might not have crossed your mind, but you’re in CH state while you do this. Soooo don’t get hit. ^_^
j236C: EX Broom Ride
Combo filler/ender. It hits up to 6 times, and after the 6th hit she takes her cloak off. Before she takes it off, you can either airthrow or double jump. If you miss the window, she takes her cloak off and lands on the ground.
Seriously, if you have meter and just feel like “doing more damage”, you do this. It’s not a truckload more, but if that MAX meter’s just going away anyway, why not?
j214A: Molotov
Kohaku drops a Molotov while riding her broom.
When it ends, you can jump, do a normal, or airthrow. You cannot air dash at any point for the rest of the time you’re in the air. Even if you try to double jump > airdash, double jump > Broom Ride > IH, you just lose your airdash. RIP Airdash, you served Kohaku well.
Aside from preference of how you like to mess with people during oki, a reasonable time to use this is, like Broom Ride, whenever you’re above somebody and don’t want to land on them.
j214B: More Molotovs
Kohaku drops UP TO three, depending on how long you hold [B]. Afterwards, you can jump or airthrow (you can’t do anything else). If you jump, you can do whatever else you want to (you can airdash as well).
The B molotovs have more hits and, therefore, cause more blockstun than the A molotovs. They do more damage as well, but it’s the kinda move where you expect your opponent to block and ponder why they’d ever get hit by it.
j214C: Even more Molotovs
Kohaku drops 4 molotovs, then hops off of her broom. When she hops off, you can jump, airdash forward, airthrow, a normal, and that’s it. It’s not really amazing, but I can’t pretend it doesn’t exist.

**Notes about Molotovs: The molotov bottles don’t have hitboxes as they come down, only the flames as they explode. Kohaku is hit invincible during all 3 version of molotovs. She can be thrown out of them (which registers as a Neutral Throw; the one you combo from). It’s possible to throw Kohaku out of it, but be in a scenario where you still have to block the molotovs (typically happens with EX or B). I also don’t think you can be command thrown from the ground out of them (I tried Satsuki’s and Kouma’s; neither worked. Didn’t think of any others at this point)
63214C: Command Throw
You have to manually press a button (A_B_C) to swing. There are 3 timings for this; Meh, Decent, and PARTY-TIME (ok, good, and great, respectively). The PARTY-TIME hitbox is literally the floor, but it’s not unreasonable to rely on it. (IF YOU WANT TO COMPLAIN, LEMME INTRODUCE TO AN UNFORTUNATE SOUL NAMED FIONA MAYFIELD)
If you were to just command throw somebody and whiff, that does less damage than a regular throw. But if you hit them with the ok hitbox, that does more damage than a regular throw.
It’s possible to actually combo into command throw (most notably, grabbing somebody out of a Cactus series before the last hit.)
When you hit them with PARTY-TIME, you launch them full screen in a juggleable state (into OTG). As long as you’re hitting them INTO the corner (which will pretty much happen unless you grabbed them with your back to the wall) you can Arc Drive if you have it, and Kohaku will literally run them down in the corner and kick the crap out of them. If you’re grabbing in the corner (or somewhat close to it), you can just combo them (this is one of the only times where 2[C] is guaranteed, although you might opt to do 4B (2nd hit) 2C [stuff]) or OTG them.
If you command throw them and miss (whether by intent or by accident), know that you’ll pull them out of the corner. In fact if you whiff it, they’re still OTG (so if Arc Drive would finish the round, Command Throw > immediate whiff > Arc Drive is a good idea).
Know that it’s not possible to swing late, whiff the entire swing, and still OTG. It’s just not. Also know that PARTY-TIME is the last available timing (as it’s on the floor). There’s no sour spot after it.
1632143C: Drugs. (No no, seriously.)
A really-long startup EX where Kohaku injects herself with something and winds up in Blood Heat. The Blood Heat you get from this drains faster than BH normally does. Of all the things thus far that seem to be once-in-a-blue-moon around here, this move really is rare.
When you use this move, Kohaku becomes invincible (as in, doesn’t lose health) and gains hyper armor (as in, she can’t be put into hit stun). She could literally walk at her enemy with “no fear.” (It’s like Kouma’s 22C, if you want some in-game reference.)
“So why do you rarely see this?” [I’m not 100% sure why this happens mechanically, so I’m going to just tell you the end result of what happens]. If you get counter hit while in this state, your attack’s hitbox disappears… I think? It doesn’t connect. So it’s possible for somebody to mash 2A in your face, constantly CHing you so you can never hit them. And… that’s why you rarely see this.
“So is there a practical use for it?” Actually, yes there is; timer scamming. The only time you can actually do this move and it’s guaranteed is directly after your opponent blocks Cactus (and you have to stand in a place where they could just bunker the trash out of you if they have meter). You can’t do anything of merit during THAT Cactus rep, but you’re in Blood Heat with “full meter”, so you can throw another Cactus on them. The clock runs during all of this because you’re a Full Moon char; the clock doesn’t stop when you go into heat or blood heat. Beyond that, you could just be “That guy who Last Arcs his friends”.
“But I go into Blood Heat; do I get my red life back?” You do, so if you wanted to do it for that, you could. The timing where it’s actually “worth merit” is when you have 200% to not-in-max, and you feel like you need your red life back. Make them block cactus > inject drugs > profit.
41236C: Arc Drive
It’s “unblockable” (they can jump out of it if they’re in neutral and you can combo into it. It’s technically an attack-throw). IT OTGS, which is how you’re normally gunna hit somebody with it. It also causes circuit break (as in, they can’t use their meter for ___ amount of time).
You’re invincible until you either hit them or run into the wall. If you run into the wall (a.k.a., u dun goof’d), you’re juggleable until you hit the ground. When you hit the ground, there are a few frames where you’re still “airborne”, so you can be punished. If you don’t get punished, you’re on the ground in a special KD state where you don’t have an impassible box (meaning your opponent can’t push you into/away from the corner, but they can dead body walk back and forth over you ‘til you start standing up).
41236C: Another Arc Drive
Unblockable, but it doesn’t otg nor does it cause circuit break.
I’ll be honest here, I don’t know how you’re supposed to practically use this. You can do it from CHs, but you have to do stuff like raw 5C 41236C. You can do it when 22B or 22C hits, but your opponent’s really prone to just falling out. *shrug* I dunno.
You’re invincible until you either hit them or run into the wall. If you run into the wall (a.k.a., you messed up), you’re juggleable until you hit the ground. When you hit the ground, there are a few frames where you’re still “airborne”, so you can be punished. If you don’t get punished, you’re on the ground in a special KD state where you don’t have an impassible box (meaning your opponent can’t push you into/away from the corner, but they can dead body walk back and forth over you ‘til you start standing up).
IV. “Combo Logic”
Read: the part where I talk about hitting people without blindly shouting “Do X, Y, and Z!!” Because everybody doesn’t follow formulas and stuff.
The foundation of what you’re going to do stems from this string
{2AA 5B 2B 4B(2hits) 2C 3C j.BC dj.BC AirThrow}
If you can do that consistently, you have a pretty solid start as to “what to do when you make any kind of contact”. (Honestly, if you’re ok at neutral and you can do that, you can effectively play F-Kohaku)
When you hit somebody on the ground, there’s one big juncture where you have to choose what you want to do, and that’s 2C. From there, you have ( at least ) 3 things you should consider.
1) 3C into Air Combo
~~ This typically puts you back in neutral and gives you the most damage. If you have meter and you want to tack on even more damage, sprinkle some j236Cs while you do your air combo. (If you’re in MAX and you wanted to do like, jC j236C djC dj236C AT, nobody could really fault you).
If you’re hitting somebody midscreen and want a little more corner carry, you could do this carry extension from a slightly delayed 3C (so they’re not super high up)
{~3C > [instant air dash] > j.B > (land) > j.AAB dj.BC AirThrow}
If you let them go really low before you 3C, you can actually do j.BC dj.BC for the rejump segment. (And to go even further, if you let them get to the lowest point when you 3C, you could actually IAD j.C instead of j.B, but it’s an absolute nightmare to try and line it up.)
This also works in the corner, but you need to let them fall really far before you 3C, and you just wanna shoot for rejumping into j.AAB (it’s a lot harder than doing it midscreen, but still very reasonable).
2) ~236A
This route has a few branches by itself but, fundamentally, it’s the okizeme (SETPLAY SETPLAY) route.
If you do it midscreen and you’re close enough to run in and OTG, you’re probably going to just do this with normals (something like, 2AA5B, but it could be more or less). Your goal is to either look for a tech and punish it, or take your left-right mixup if they don’t tech. There’s a lot of guesswork in this, and how you punish the tech (specifically the tech towards you) depends on how many normals you put on them. If you hit them with the end of 2C (tip of the bristles), you can’t actually OTG. You could also 236C them, but it throws them fullscreen. Sooooo that depends on if that’s your M.O. at that point or not.
If you hit them in the corner, you have 3 OTGs you could do. Those are
A) the midscreen OTG, but now you can add some more 2As and a 5C at the end
{2AAA 5B 5C}
B) an okizeme setup that pulls them out of the corner
~236A for knockdown {236A > 236C > 236A}
This allows you to do left-right and high-low mixups. You can actually do -A LOT- with this setup if you mess around with it
C) another okizeme setup that allows you to throw plants
~236A for knockdown {236A > 236C > 2C > [stuff] }
You can actually do stuff other than just plants. You could 3C into aircombo, you could just 236A to put them back down, but this is the prime place to put a spinning plant out if you can hit the 2C (it’s a somewhat-specific window). Air comboing from here isn’t the best choice because you’re hitting them from OTG, so the damage is scaled. Note that if the 236C htis twice in this scenario, you actually have to delay the 2C. *if you screw up, mistime the 236A, and only get 236C (which’ll be the hit to pick them off the ground) don’t panic! Just 5B into air combo.*
Another huge point about 236A is this is pretty much the place to do IH combos. After you input 236A, you can IH (remember, you don’t have to wait for the projectile to hit, just for it to be released). After you IH, you typically would do 2C 236A (wait) 41236C (OTG). You could also do some stuff like aircombo { IH 2C 3C [ AIR COMBO ] }, so, either
{ ~2C 236A IH 2C 236A (wait) 41236C OTG}
or
{ ~2C 236A IH 2C 3C [AIR COMBO] } < you have to be close enough for this one to work
If you’re a huge stickler for damage, you actually could add 4B in as well, though you have to be close enough and only the 2nd hit’ll hit, so that’d look like
{~2C 236A IH 4B(2nd hit only) 2C [STUFF] }
Whichever suits your fancy.
3) Throw a plant
You could just throw a plant after you 2C, typically Spinning Plant, but you could do Pinetree or Cactus.. If you do this, you throw away a good chunk of damage in exchange for keeping your opponent in your grasps. And you don’t HAVE to commit meter to it.
The next thing to talk about would be air combos. I mean, there are some universal nuances to know (jAAA air combos if you air to air with jA, preference of jAAB, jAC or jBC when applicable), but the thing I want to point out is j236C. You can do it to tack on a little extra damage to an air combo. You could do jBC djBC j236C AT, which is typical. Could do jBC j236C dj BC AT. Again, if you have the meter, you could do jC j236C djC j236C AT. It’s one of those things that’s good to know, but isn’t super BnB. It’s more meat and potatoes.
As mentioned somewhere in this mess of a guide (j.A section), you can actually do the j.A > [AIR DASH] j.A confirm that a lot of characters can do. It’s -pretty hard-, but if you wanted to do even more corner carry for the midscreen extension, it’s possible.
After that, you have “loose end” combos. This is actually more of a concept, but I’d think this would be a meh guide if it weren’t mentioned. Depending on where and when you hit somebody, you’ll probably have to omit some stuff to be able to convert all the way down. Don’t be alarmed or discouraged, it’s perfectly normal.
So take the main string again~~
(dash in) 2AA 5B 2B 4B(2 hits) 2C 3C jBC dj BC Air Throw.
And pretend you hit somebody with a j.C. First and foremost, you’re not hitting them with any of the A’s. Depending on where you hit, you might not be able to do 5B 2B (since 5B might push them out of 2B range). So you could do 5B 5C 236A at that range, maybe even 5B 2C [stuff] . Staying with j.C you may even hit them far enough away that your only option is either 5C/2C or even just 2C. These are the kinds of things people usually chalk up to “experience”, and they are experience conversions. Just know that it is a thing.
Some of the more notable ones are
-Hitting with j.B. IAD Backwards j.B is somewhat common to land, but you pretty much will NEVER get 2A or 5A to hit afterwards. You also will probably be at a spacing where 2B won’t reach either, so something like j.B 5B 5C 236A is pretty useful here. You could do j.B 2C at max range, but you basically have to be high-fivin’ floor when you hit the j.B.
-It’s been mentioned a few times that when you get an air CH; you have buttons like 5B and 5C to pickup the conversion. If you’ve never thought like a simpleton, you could just jump and j.BC dj.BC. You also could 2C if you could get down to the ground fast enough (or you’re already on the ground).
The other thing that crosses my mind is the occasion when you land a neutral air throw. Kohaku still does her regular animation where she drops the weight on them and flips away. However, you’re in control immediately after you put the weight on them. !! Press A !! If you don’t, you’ll fly all the way out to the edge of 2C land…which isn’t bad if you’re only planning on hitting them with
{2C 236A [stuff]}
~~but if you want to hit them with more, you want to j.A immediately so you don’t float as far out. From that point, you’re just picking up an air combo, so you could still do the 2C stuff, or you could do something like 5C > [AIR COMBO].
V. Odds and Ends
A section for a bunch of random notes I wanted to throw in here.
-If you ever want to OS backdashes, you could either do 2A 2A 2C (if you’re on the ground), or jC 2C~5C (if you’re jumping in). For the first one, the 2nd 2A shouldn’t come out if the first whiffs, and you’ll 2C at a time to catch them in backdash recovery. For the second, if jC doesn’t connect, then 2C will come out instead of 5C.
-Whenever somebody gets hit by cactus, you can’t do either one of the corner OTGs. However, if you still want to put them in oki, remember it’s a techable KD. So you could just 2C > [whatever makes you sleep better]
-Whenever your opponent’s put in blockstun by a “separate entity” (read: your plants, possibly a crescent slash), you won’t be pushed back when you yourself hit them with a normal. This isn’t horribly important for F-Kohaku (I think?), but I noticed it while messing with F-Maids, so I figured I’d mention it.
VI. Random Tidbits
A section with some random things that aren’t entirely relevant to playing F-Kohaku or even knowing how she functions, but I kinda felt like throwing in here to round things out.
*F-Kohaku doesn’t have C-Kohaku’s “scoot” [3]. H doesn’t have it either, for the record. I wouldn’t be horribly surprised if you said “I didn’t know C could do that.” I often forget myself.
Ya know how C-Kohaku and C-Maids are basically interchangeable characters? Yeah~~ well that’s not the case with F-Kohaku and F-Maids. In F-Maids, Kohaku and Hisui lose all of their command normals except their 3C F-Moon Launchers (they still have the charges on their normals). They also lose all of their specials except for their 22x series (Yes, Kohaku even keeps the extra plants you probably forgot about. She also super-technically keeps her Slashes, but ONLY if she does full charged 5[C]). My point is if you were thinking “Hey, if I learn F-Kohaku, I also learn half of F-Maids by default” you’re, sadly, wrong. That’s the only Maid pair that doesn’t remotely work like that. ( To be fair, H-Maids don’t really work like that either, but H-Maids is a combo that I’d imagine people wouldn’t bid on in an auction tourney ).
There -is- another Kohaku that almost fits into the F-Kohaku mold. She is, believe it or not; F-KohaMech. She still has the command normals and the Crescent slashes. She loses all of the Broom Ride stuff ( ;n; ), her counters, which isn’t really horrible imo, and plants …which is depressing, but I mean~~ you get a RPG out of it. Some things change; her command throw is the KohaMech command throw, you get the KohaMech 2[C] and j[B], the airdash changes as well (That’s honestly the biggest thing I noticed, as I think it makes the air extension either not possible or really-really hard.). And then you get a buncha nifty KohaMech stuff.
I don’t really know how good F-KohaMech is or isn’t, so I dunno how meaningful this could be to somebody. Just figured I’d give you the lore.
