
Disclaimer: If you find an error, or feel like you have more up-to-date or relevant information, please let us know. We’re able to update our current material after the fact, create addendums, and generally revise our process for greater accuracy and effectiveness, so don’t hesitate to tell us.
Written by Necrofantastic
http://www.meltydb.com/resultall.php?1c=nanaya&1m=Full&tdb=any&filt=any
Match videos
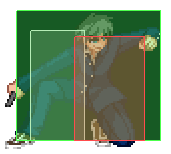
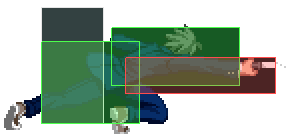
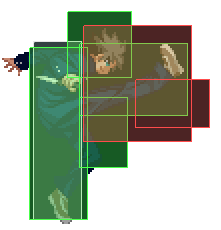
http://imgur.com/a/smCEU
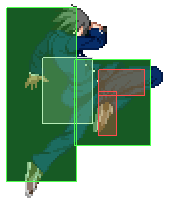
Album of F-Nanaya normal hitboxes
Pros
+ Ambiguous okizeme
+ Relatively strong pressure (aka keeps your enemy guessing)
+ DP is very rewarding as it is very fast for its kind, leads to a hard knockdown and a considerable amount of meter, which you need your enemy to be constantly afraid of
Cons
– Only one of his normals (J.2X) ever has near-definite priority over other normals (which, by the way, is conditional), which leads to the following:
- Does not have a true answer to air-to-air battles
- Very difficult time getting in (neutral game)
- Easily zoned out
– Although this is universal for all Nanayas, he is pretty fragile so getting comboed is brutal
– Maintaining momentum is crucial, losing it may cost you the match if you’re not careful
In more detail, this character will test your patience to the limit. You can never go over-aggressive with F-Nanaya because it WILL get you killed. Lots of lab time is recommended to grind his most important combo. F-Nanaya CAN close space gradually, and once he’s in the enemy is in for a world of hurt.
Combos
Legend:
X-Y = indicates Y is a followup to X
X(n) = indicates X must hit a certain number of times
Universal Ground Chain [UGC]: 2AA 5B 2(B)C – Omit 2B if too far away for 2C to hit.
UGC Rekkas OR 623B-B DJ.BC AT
Day 1 combo. Use rekkas for midscreen okizeme.
2B Rekkas(B ver.)
Confirm off of max range 2B.
UGC 214A
Okizeme in corner. Provides ambiguous divekick shenanigans (see end of offense section).
UGC delay 623B-B 282 land 623B delay -B SDJ.BC AT
The double DP combo. Recommended to master TK fastfall as this will earn you an additional 30% of meter and grant a ~3k combo off of any reversal, provided they’re on/near the ground. Doesn’t work on the Necos, just use Day 1 Rekka combo.
Airthrow 5[C] (66) 2C double DP finisher
Must dash after 5[C] if started midscreen.
Optimal Stuff
UGC (delay) 214B[close],2C double DP finisher (w/back airthrow)
Squeezes out a little more damage for when near the corner. Some chars may need a delay after 2C in order for 214B to launch properly. On some chars you need to delay 214B (STohno/(W)Arc); doesn’t work on Necos. Not really recommended as it puts you too far away from the enemy to do anything threatening.
UGC 214B[close],66 2A 214B,double DP finisher
Use it when YOU are in the corner and want to side-switch.
Works on: Kouma/Miyako/Ciel/Ries/Wara/Nero/Kohaku
2AA 5B 2B 5C 236C
Ends in hard knockdown for easy which-way and decent damage. Recommended if you still have most of your life and don’t want to go into MAX just yet.
UGC 623B-B 282 land 623C(4) land 2A double DP finisher
The quad DP combo. Grants many swag points. Not worth the meter or damage otherwise. Corner only, doesn’t work on Necos.
Important Normals
2A – Sure, it’s active in 4f, but that doesn’t mean you get to mash it like no tomorrow. Don’t complain if this whiffs because of its poor horizontal range and you miss your chance at a full punish. It is, however, +3 on block so you can go for easy blockstring resets.
5B – Pretty decent normal as it moves you forward while having great horizontal reach. It’s +1 on block, but the pushback is immense. You can attempt 66 2A to stuff out their normal afterwards, or press 5B again. Since it’s active in 8f, doing 5B again isn’t all that great an option, though this does set up a tick throw.

2B – F-Nanaya’s other decent ground normal. Moves you forward about the same distance as 5B, but reaches farther. Typically you’ll be using this to fish for a hit or keep the opponent from dashing out of the corner. At max range, this is -2 on block, so you can’t really be punished. If it hits, going into rekkas is the best option.
5[C] – The overhead version of 5C, which is active in 28f. -3f on block, so while it IS safe, it’s recommended that you cancel into one of his teleport series to keep the mixups going. Use sparingly.
2C – This sweep is actually nice since it can low profile some normals/projectiles. Not safe on block up close, but at max range it becomes +1 so you’re free to do whatever afterwards. Makes for a nice tech punish as well since it’s active for EIGHT frames.

J.C – Your go-to air-to-ground normal. When you’re not using divekick, this should be the other button you press. It’s also his slowest normal (5[C] aside), active in 10f, so take great care in not allowing your enemy to get close to you and poke you out of this.

J.2A/B/C – Saved the best for last: the divekick. Notorious for being annoying as all hell, and for good reason. On a grounded enemy, this can get stuffed out by various anti-airs, but it will beat out/trade with almost anything an aerial enemy throws out if they’re below you. Not only that, but it also hits overhead, can cross-up, and is always safe as long as the enemy blocks it at the lower half of their character’s sprite. Oh, it can OTG relaunch as well. Active on frame 6, and stays active until landing. However, this can only be done at the apex of a neutral or forward (super)jump. The button pressed changes Nanaya’s angle at which he divekicks, with the C version traveling the furthest, respectively. A version is typically used as okizeme, while B and C versions are more useful in neutral and covering ground. Use with utmost care.
Other Normals
5A – This is a normal that isn’t pressed very often for obvious reasons. However, it can still be used as a tick throw setup (since it whiffs on crouchers) or to stuff out mashing by pressing 2A right after this.

5C – Hopefully you’ll be reserving this normal for combos only. -2f on block, so it’s relatively safe, but you’ll lose your pressure if you end your blockstring with this, which you don’t want. Can be used as an okay IAD stopper.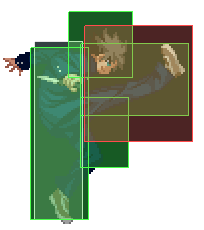
J.A – You probably won’t see this normal a lot either. You could use this to make your enemy block when they’re in the air at point-blank range, but airthrow is faster and grants you a free combo.
J.B – A mediocre button for air-to-air battles, which is fairly obvious: it doesn’t reach very far in either axis. Only active for 2f, so whiffing this is dangerous.

Neutral
F-Nanaya is not a zoning character. He has nothing to keep the enemy away from him aside from pressing certain normals (or DP) in reaction to whatever he or she does. It will almost always be the enemy zoning YOU out, since experienced players are well aware of how big a threat Nanaya becomes at close range.
Remember: divekick is your biggest threat.
More specifically, J.2B. J.2C is easier to see coming but both are good tools for getting closer to your enemy. Use these in conjunction with his forward airdash, which travels roughly half of the screen at once. Don’t limit yourself to aerial approaches, though. You have 5B and 2B, both of which have excellent reach and are safe on block from far away. None of these normals are disjointed, so a lot of commitment is required for each button press.
If you find yourself in the air with the enemy, you can attempt to J.B to keep them away, but generally you should be going for airthrow or positioning yourself above them for divekick or J.C.
Approaching the enemy, dash 5A does its job fine at catching jumpers, and for air counterhits you can go for traditional aircombo or 2C into double DP for a little more meter if you need it. If they were hit high enough, you can tack on 5[C] before 2C for more damage.
At farther ranges there isn’t much you can do. 22A, his forward teleport, is one option that works fine if used seldomly. 214B is the other option, which is hugely unsafe on block, but on hit it blows the enemy towards the corner, so you’re free to advance and begin pressuring. Otherwise, charging your meter is a perfectly viable option.
Finally, don’t forget Nanaya’s special aerial fastfall (J.22), which halts all his momentum and grounds him very quickly. Excellent to bait out anti-airs and shields while you get a full punish and eventually carry them to the corner.
Offense
Oh boy, now we’re at the fun part!
2A dash 2A dash 2AAAAA is an example of a viable blockstring. You are always +3 so as mentioned earlier you are free to do whatever you want after it. Spamming 2A will probably push you too far to do 2C if they all hit, however, so after 5B 2B, go into B rekkas for a tech punish opportunity, provided you’re in the corner.
[2AAAA (5B) 2BC 22C] is an OTG string that checks for techs. Again, 2C is active for eight frames so don’t be afraid to use it as your punish. This is only possible in the corner, however.
Akin to spamming 2A, “spamming” divekick is also viable, since (typically, if you’ve been careful about positioning) it’s safe and you can always fastfall as a feint and go into lows. J.2B in particular crosses up point-blank, and J.2A provides a dumb-looking which-way in the corner.
Various teleports (and feints) means your pressure doesn’t have to end at 2C. In fact, you could attempt to reset since it’s advantageous when blocked at max range. 5B is advantageous whenever. Normals aside, though, let’s go over his special options.
214 teleport series (A and C ver.) are purely offensive. 214A has a HUGE hitbox below Nanaya which hits overhead and causes a hard knockdown even on OTG relaunch. This compliments his okizeme perfectly, especially in the corner, where his divekick shenanigans shine the most. If the enemy tries to jump out after they see him teleport, chances are, they’ll be getting hit. In order to avoid this, they must jump away as soon as possible. At -3f, this is safe on block, but unfortunately you’ll have to give up on pressure, unless you feel like risking half of your life on blowing through whatever the enemy pressed with DP.
214C is a command throw which is a nice alternative for those who become scared of jumping out. Even better, after the throw, Nanaya is put in an aerial state, so guess what that means? More shenanigans!
22 teleport series (A and B ver.) are purely passive. They are true teleports, doing nothing but translocating Nanaya from one spot to another. A version moves him forward the same distance as an IAD. B version moves him not forward, but straight up, the same height as a normal jump.
A version can be used for subtle cross-ups midscreen or as a tick throw setup in the corner. For the B version, as soon as Nanaya reappears he can divekick, though this is fairly obvious as a blockstring. Mix it up with fastfalls, airdashes, or even doing nothing (and waiting to see if they approach you).
22C is not a teleport; rather, it’s a feint whose recovery frames (when Nanaya stands back up) can be cancelled into anything. This is just another addition to his arsenal of mindgames, although it’s main use is to see if your enemy does anything in reaction to his stance, since all his teleports use the same stance before actually doing something. Best used after 2C.
Remember: rekkas are NEVER safe!!
At max range, rekkas aren’t punishable (-3 for A version and -5 for B), but they end your pressure regardless. Yet again, you do NOT want that to happen. You may have seen in various matches the second rekka being delayed in an attempt to catch the enemy doing something. Here’s an example of what may (or may not) be going through the player’s head as he chooses to do so:
“Hmm, do I want to finish the rekka series if it hits and get nothing else off it, or lose half my life because I’m always -11f no matter how far away they block it?”
If they get hit by it anyways, but you don’t expect it, right when you realize you can finish the rekka series, the hitstun from the second rekka is over and they block the third one. Which means you’re at -20f. Which means you lose half your life as a result. Which means you immediately feel like killing yourself afterwards.
In any case…
Hard knockdowns are your main priority. 214A and rekkas are ideal for this. Off of airthrow you get nothing except a small window in the corner to press 2B from the moment you land to see if they block it. If blocked, let the pressure begin. If not, you get another combo into more mixups.
Ambiguous divekick shenanigans (J.2A/B only) is your main gimmick after a 214A in the corner. Nanaya is free to do anything right as he lands after 214A, so you can go for easy which-ways. [2A(whiff) neutral jump J.2A/B) is just an example of one. Some which-ways don’t need divekick. [Neutral jump into forward drift] is a mixup that switches sides on some chars, and is same-side for others. IAD (forward or backward) into DJ.2A/B is another example. The moment at which you double-jump or drift can also affect what side you land on before you divekick (or not), so experiment not only with timing, but with char wakeup speeds as well!
Defense
Oh boy, it’s the not so fun part!
Use 2A with caution. As hinted earlier, it has bad range so mashing won’t really yield anything great. The point is that you press this when you know there’s a gap large enough to punish.
Remember: DP (623B) is your best friend!
DP is active in 6f and beats every attack grounded or aerial, period. (Beware of safejumps!)
Against IAD heroes you can attempt to interrupt them with 5C (or airthrow) and get a full combo afterwards, but DP is arguably a safer option since all three hits of it are air unblockable and Nanaya is invincible throughout all three hitboxes. If you try 5C but end up getting hit anyways, you’re still in a grounded state which means the enemy can go for their max damage combo.
623A is practically useless. No invul means you can be hit out of it at any point in the animation. Disjointed hitboxes aren’t present, either, so don’t even think about trying to anti-air with this.
For all other aerial approaches DP (B) is good but you also have shield, which is never a bad option in these cases.
Backdash is fairly spammable so if you need to run away or smell a reversal coming, it should suit your purposes fine.
