
Disclaimer: If you find an error, or feel like you have more up-to-date or relevant information, please let us know. We’re able to update our current material after the fact, create addendums, and generally revise our process for greater accuracy and effectiveness, so don’t hesitate to tell us.
Written by: Adelheid
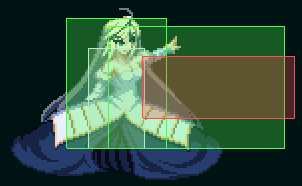
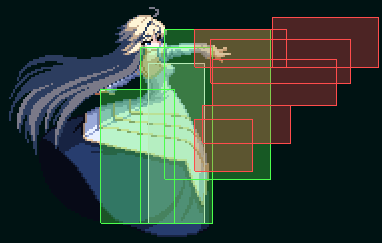
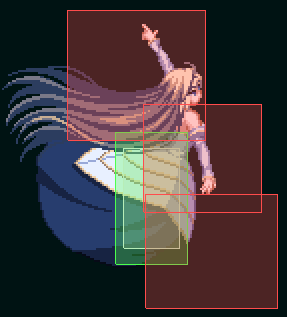
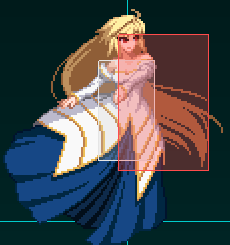
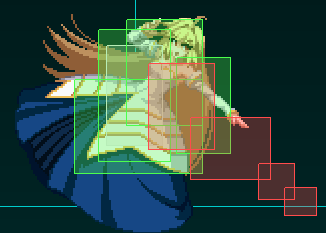
Hitboxes by Lezyes
Match videos: http://www.meltydb.com/resultnew.php?char1=hime&moon1=Full&player1=&tdb=%25&filt=%25&npflag=%25&char2=%25&moon2=%25&player2=
In particular, watch out for recent matches by Alicecolor. Ash and Shachou are less commonly shown players to watch for. Eve was very strong but hasn’t shown up in awhile.
Glossary: http://wiki.mizuumi.net/w/Melty_Blood/Glossary
Pros
Long-range normals
Very fast ground movement
Strong combos from shield counter
Easy hitconfirms in almost every situation
Consistent knockdowns & strong okizeme
Cons
Low health
Slow normals
Getting the best knockdowns requires difficult links
Overview
Full Moon stands out from other moons based on the consistency and range of her conversions and her ability to get a knockdown (and pretty good damage) off of anything. The opponent is never safe – Any stray 2C or 236B while they play keepaway could be it, and any successful shield while they rush you down will turn the match on its head.
Hime has the unique ability to bypass melty blood’s crossup guard while flying, giving her an unmatched depth of mixup on oki, and F-Hime is the best at exploiting that. If they’re cornered, you can just pin them down with j.236A to do unshieldable mixup.
Although her normals are slow, F-Hime is a threat at all ranges at all times, and any mistake the opponent makes can quickly snowball out of control. For good reason, she is considered to potentially be the strongest character in Current Code.
Notable Moves
22D: Flight. Can also be done in the air. Causes Hime to start hovering and causes her meter to drain slowly until you touch the ground, but even if it starts at or reaches zero, flight will not end early. No stick input makes you hover in place, while holding 6/3 or 4/1 will move forward or back and slightly down, holding straight down will fall quickly, and pressing down twice quickly will make you fast-fall to the ground.
All air moves can be done while flying, and entering flight with your air dash used will give it back to you. Normals outside j.6B will retain your flying momentum, though using any move except j.236A/B will cause you to control normally afterward; despite this, you’re allowed to act in the air after your moves finish recovering, even your air throw. If you lose flight control from using a move or jumping/air dashing, j.236A/B will restore flight control.
The most unique thing about flight and indeed the most unique thing about Hime is that 22D is considered an EX special for the purposes of cancelling, even allowing specials to be cancelled into it, except for her DP. Specials and air normals can be cancelled into it and her EX specials on whiff, though air normals must be cancelled during recovery frames and not active frames; this is important because normally after an air normal Hime will be left unable to act until hitting the ground.
Do note that you cannot fly forever, and after several seconds you will float gently to the ground in a very punishable state. Also, while flying, you cannot block, giving it limited utility in neutral.
2A: It’s slow for an A move, but the distance it covers is similar to most character’s B moves. No one has a farther-reaching A move. Can slide in with dash momentum and can be cancelled into itself.
2C: One of F-Hime’s best moves. It has enough hits to easily confirm into 236A/B on hit, and it’s a bit plus on block, allowing a pressure reset. Plus, it is absolutely gigantic; at its farthest tip, it is essentially uncontested. Its only downside is that unlike 2A, 2B, and 236A/B, it doesn’t hit low.

236B: This is why the opponent is scared of you. It’s as fast as Hime’s B normals, lets you punish things from absurd distances with a full combo into a knockdown, and it’s meterless. It’s low and air unblockable and can catch people holding up in block to try to jump away and people who have just left the ground, but the hitbox isn’t as tall as it looks and won’t strike at people who are higher in the air than hime’s head. It’s very negative, though; against some characters, it is safe to delay chain into 236B after a 2C because of how far away you are, but for instance Roa 236C and F-Hime 236B (of course!) will punish it on block with a full combo. Despite this, It’s invaluable as an anti-zoning tool, and moving into its range is your most threatening option against someone who’s trying to run away. (To do dashing 236B, hold 3 while running instead of 6.) 236A is the same in all properties but appears closer to you, but since it leaves them closer and is just as minus, it’s only to be used in combos and to punish certain things.

5B: Excellent anti-jump tool and sometimes anti-air. Moves you forward and chains to 2B on block or hit, and if it hits someone out of the air you can jump cancel and combo. Does not hit crouchers at its tip.
j.B: Just as fast as her other B normals, but in the air and the distance it covers is mostly vertical. Can go air-to-air with it, but you’d better be confident if you do and you should usually fly cancel it.

j.C: A gigantic mess of air hitbox. Slow to start up, but still your best air-to-ground move if you find yourself in the air, especially if done out of an air dash. Notable for hitting behind it. Can go air-to-air with it since while it’s slow it’s very disjointed, but you will need to fly cancel it to avoid a punish. Can be charged to groundbounce and alter air momentum; the charged version is a staple in combos but not useful in neutral.

j.236A/B: Creates a pillar of light a set distance in front of Hime, or in the corner if they would normally appear beyond the corner. Slow to start up but gives very good lockdown if done while flying as you recover well before them. Should almost always be flight cancelled if not already done while flying.
22A/22B: A tool to get in. Slow to start up and may leave you vulnerable, but you can fly or EX cancel it early into it and any projectiles that have started to form will continue to form and start to move, although projectiles will disappear if you’re hit. A angles down to fully hit crouchers, B angles up to catch airborne people low to the ground, but animations look identical. If you can spare the meter, it can lead to a safe way in if cancelled to 214C, which is invuln while moving and which backed with 22A is plus on shield.
623A/B: Hime’s DP. A version is not invuln but still makes a reasonable anti-air as it hits high above it and recovers quickly. B version is fully invuln on startup and starts up faster, but is extremely punishable on block and it does not get its higher vertical hitbox until the frame it becomes vulnerable again; use it when you feel like gambling on defense.
j.6B: Without a knockdown, Hime’s mixup is primarily low/throw, but you can also attempt Hime’s instant overhead, j.6B. (Against Nero and Hime, you can also instant overhead with j.B, because they’re so tall.) She gets little reward off of it outside of possibly j.236C, but it is one more thing for the opponent to need to worry about, especially if they’re one hit from death. The part of its hitbox which hits lowest is very narrow, so depending on your spacing, you’ll need jump back, jump forward, or jump neutral before using it, and it must be done as soon as possible or it will whiff. j.6B has a charged version which hits much further, but it’s easy to react to and is more just to poke at its strange distance than for mixup.

j.236C: Hits everywhere on the screen. Can be used to interrupt almost anything from any range, and it’s even faster to come out than her 236A/B when not factoring in jump startup. If you TK it, it’s very plus on block, and even safe on shield, but remember that super jump startup is twice as long as normal jump startup, and to avoid super jumping when you TK you need to already be holding down – not that that’s a problem if you’re sitting there waiting for the opponent to make their one wrong move. You can also use j.236C to turn any stray air hit or any combo you’ve fumbled into a knockdown. It’s ground techable, so you can’t get your flight oki from it if they gamble on you going for it, but if you just stay next to them and don’t try anything, you can of course punish their tech.
41236C (Arc Drive): Hits everywhere on the screen. Negative on block, even in blood heat version, and not invulnerable; mostly to be used after throw or as part of a certain combo ender. It seems to just circuit break the opponent, but it has a special property of reducing their meter by 100, and if done against an opponent who is in Heat, Blood Heat, or MAX, their meter will fall to zero (though against half-moon it will go to 100 instead.) The Blood Heat version, in addition to doing more damage, “donates” no less than 130% meter to the opponent, sometimes more, often forcing them into MAX to guarantee they’re left with nothing; this is absolutely crippling to anyone who needs meter to operate. Gives you enough time to charge up to at least 100% before the opponent gets back up, or you can charge up just a little and then go for flight oki.
Neutral
Playing neutral with Hime involves a lot of staying on the ground and maintaining her ideal position, from about the tip of 2A range to edge of 2C range, extending no further than her 236B. While Hime’s normals aren’t fast in a vacuum, they are fast relative to the distance they cover. While the exact best range to play varies based on the opponent, the general idea is to poke with a move from just outside from where they could hit you with their own version of that move, and then do staggered blockstrings trying to catch their attempts to get in on you, jump away, or really to take any action at all. If they make a wrong move at range, 236B is always there for you. Positioning is aided by her incredibly fast walk and dash speeds, including back walk, which let you easily get in position. Once the fear of god is properly instilled in your opponent, then blocking any stray normal becomes your chance to run in and start your pressure.
If the opponent likes to jump around, Hime can meet them in the air with a j.B or j.C, but make sure to fly cancel them so you aren’t left tumbling. Alternatively, depending on position, or she can use her ground movement to simply avoid them, even by running entirely underneath them, and then start something when they reach the ground.
On offense
When the opponent has been pinned down and you can rush in, you can begin your offense proper. If close enough you can chain 2As on them, staggering them or recovering and then going for throw. 2B and 2C are both safe, with 2B being neutral on block and 2C being plus, so chaining into them when you’re out of 2A range will keep them honest, and you can generally afford to move in again after 2C or maybe try to start something bigger with fly cancel j.236A/B if they’re slow to react. You also have 6[C] as one last thing to cancel to and frame trap with if they’re in range of it. Against most characters, it’s relatively safe to stagger cancel 2C on block to 236B because they can’t get close enough to punish after it, but never cancel to 236A; 6[C] is better there.
You can easily push yourself too far out with your staggered normals and go back to neutral, but it’s important not to be predictable on when you’ll continue to frame trap vs recover and run back in, and if they just want to block, then you can dash in and throw them.
Throw gets them closer to the corner, and if they’re already in the corner, you can buffer 22D into the end of your throw animation and start your mixup; from there, holding down and pressing j.B is a safejump, so even someone with a DP has no easy answer.
For extra damage in MAX, you can do throw into arc drive to drain meter, then charge back to 100%; you can also throw into TK j.236C if you just want a better knockdown midscreen.
You can set up a questionable tech situation with 2C into 22A/B or in the corner 22D vs raw 2C; your setup is generally better if they don’t tech, but they can tech to try to do something but may not want to because you can punish the tech if you do nothing after 2C. If you don’t want to spend meter and throw doesn’t quite finish them off, you can throw into 2C 236A/B, or, in the corner, throw > 2C 214A~A, but be aware that if they don’t die this cripples your okizeme.
You may see players do throw into 2C 214A 22D, but this lets the opponent neutral tech the 214A (and they have no disincentive to do so since outside of strange meter-intensive gimmicks you cannot punish a neutral tech in this situation) and if they do so they will recover early and punish anything you try to do. Against an observant opponent, going for this is a death sentence.
Once you hit them and can get that precious knockdown, you can be unrelenting. Melty Blood has a crossup guard where if you’re facing away from your opponent, they can block either way, but since hime changes directions instantly after hovering to the other side of your opponent, you can easily disregard this. After a midscreen 2C knockdown, you can do ambiguous left/rights, fast fall lows, float down then cross over with whiff j.[C] to low, throw, or land and rejump j.6B for an instant overhead. 2B makes a better low than 2A here because while it’s slightly slower, it cannot be shielded high.
After a corner knockdown, you can pin them with j.236A done while flying and then vary your overhead timing, go for low, etc. Because j.236A will blockstring into j.A and j.B, you can confirm their lack of shield and be confident they cannot shield your following mixup. The mixup itself is not as dense, But if it doesn’t work, you do at least still have them cornered.
You can attempt a double overhead with floating forward j.A j.B before landing with 2A. Most characters will crouch under the j.A if trying to block low (if done a height you can connect j.B after, only Hime and Nero will always be hit), but players attempting to “timing-block” your normal setups will struggle against this versus a fast-fall. If cornered, you can confirm their block height from j.236A and know it’s safe to go for of they blocked it high, and if they didn’t, you can wait for them to briefly leave blockstun before going in for it if you expect them to stand back up.
When doing mixup, you have two fast-falls available to you – j.22, which moves down very fast but takes a bit to input and is best used buffered out of something, and j.2[C] which should land before j.[C] can come out and which can be input in as low as one frame, but which moves slower and is best used in midscreen setups or when close enough to the ground that you fear an instant normal after landing will get you an accidental 22A/B if you use j.22.
On defense
Hime’s one significant disadvantage is that since her A normals are slow and she has low health, she struggles if forced to block. If they’re far enough out that they have to rush back in, you can risk a 2A or maybe 5B if you expect an air dash, but it will be a risk. In Hime’s case, the best defense really is a good offense, and her ranged tools are good enough that it’s far from trivial for them to just get you blocking, but when it comes down to it you really need to be good at blocking and understanding your opponent’s options if you want to succeed with Hime. Thankfully she has a strong B DP which you can use either as a guess or on reaction to certain setups, but it’s very punishable if blocked and can’t be relied upon. She can Blood Heat Activate if they’re right next to her, but this is only an option in MAX.
Hime does have one good trick on defense, though, and it’s her shield counter. Learn to react to overheads and other slower things with held shield instead of by blocking high, since moving from down-back to down takes the same time as releasing the joystick and pressing one button. It’s based on her 6C but its hitbox actually hits even further out, and it’s invuln until the just before the end of its recovery. If it hits, you get any combo you want off it, and that means good damage and a terrifying knockdown. Even if they block it, it’s +1 and leaves them at the perfect range for you to pressure them. Fearing the shield counter means your opponent must take a more linear approach to their pressure on you than they would others, which gives you an easier time reading them and can help in finding the time to get out.
If you’re in Blood Heat and the opponent wants to pressure you, note that Hime’s last arc is far stronger than any other last arc. This does not mean you should randomly throw out shield, but if you see something that you know you can shield, that might win you the round in an instant, even if it’s something you couldn’t normally punish on shield like Roa 236C, since it instantly hits the entire field. But, it won’t catch people out of invuln moves, so care must be taken with it reacting to some EX specials and arc drives.
If you do eat a combo and have to air tech, Hime has a normal character’s air movement after teching and does not suffer her normal extremely floaty momentum. Additionally, she gets her flight back after being hit and thus can always tech into flight, which also recovers her air dash to escape the corner and land far away, though if they’re chasing you you may want to j.236C just before landing to make it so they’re the ones blocking.
Combos
Basic Combo Routes
2A (5B) 2B 5C 236A j.B j.C dj. j.C AT – Beginner’s midscreen combo to air throw.
(2A 2B 2C) 236A/B j.[C] dj. AD, j.C land j.A j.C dj. j.B j.C j.22D j.A AT – Combo ending in flight air throw, letting you cancel the AT fall into j.236A, air dash, etc. Recommended input for air dash after j.[C] is 9~6A+B to do it as fast as possible.
(2A 2B 2C) 236A/B j.[C] dj. AD, j.C land 2C, 2A 2C 22D – Advanced combo. Slightly lower damage, but superior knockdown and flight oki. Must delay j.C heavily to get 2C to connect. Timing varies based on enemy height; remember that gravity scales with hit count and watch your opponent. If you think you won’t get it, go for the air throw ender instead.
(2A 2B 2C) 236A/B j.[C] dj. AD, j.C land 2C, 2A 2C 214B~B, j.A j.C dj j.B j.C j.22D j.A j.B AT – Most damaging version of this route. Requires the opponent to be in the corner by the time you do 214B~B. Trades knockdown for significant extra damage – use when you want to finish the opponent off.
2A (5B) 2B 5C 6C 236A 9j j.[C] dj. Backwards AD j.6[B] j.[C] j.22D – Combo that provides easy midscreen knockdown as long as you don’t start it while cornered. While jumping past the opponent with j.[C], the air backdash you buffer out of j.[C] will go the wrong way, enabling this combo. Can be confirmed from 2C or 2B 2C, but only if very close to standing opponent. If they’re too far away to combo into 6C, from the 5C you can do 5C 236A, 5A 236A 9j j.[C] as an alternate starter.
2A (5B) 2B 5C 6C 236A 9j j.[C] j.236A j.22D j.[C] j.236B, (float forward j.B if necessary, hovering j.C if already in corner) dj. j.B j.C AT. Ender for above starting route meant for damage. Most damaging basic route. Doesn’t quite press them across the entire stage, so you can’t get the float forward j.B if you start this combo while cornered. To get floating forward j.B and not j.6B, simply hold 3 instead of 6.
Combos from other starters
j.B or j.C j.22D j.22 land 2A 2C 236A etc. – combo from air-to-air counterhit. You want to fly cancel anyway for safety, so this confirms itself. Instantly fast-fall and catch them with 2A. Leads into any of the basic routes from when they would 236A.
5B j.C dj j.B j.C j.22D j.A AT – simple combo off of anti-air 5B. If 5B hits as low as possible, can do j.A j.B AT after flight for a bit more damage. If not at max range, can use j.B instead of j.C for less damage but an easier confirm; good if you caught their jump with it.
5D 236D or AT, 2C, 2A 2C 6[C] 236A etc. – Combo from shield counter or from air throw leading into any of the basic routes. If you catch them too low with 2C after 236D for 2A to follow it up, you can salvage it by going straight to 236A, albeit at the sacrifice of some damage and metergain. If you do so and want to do the j.C dj AD j.C route and you’re right next to them midscreen, you may need to jump backwards out of 236A.
Meter Use in Combos
F-Hime doesn’t have special combos she can do by spending meter, she just gets better enders. The relevant moves are j.236C and j.63214C.
Any route that would end in a high air throw can end in j.236C instead to put you on relatively even footing with your opponent, as can any sort of stray hit or mismanaged combo that leads to them being too high or far to properly end. Because it hits everywhere, you can throw in a few extra air normals too that would normally push your opponent out of range and still connect it, for a bit of extra damage. Beyond that, j.236C is simply damaging, and can even be performed after an air throw if you’re flying, which is the single most damaging ender F-Hime has in usual circumstances (though this doesn’t lead to a great knockdown because they’re lower than you and is best used when it would finish them off).
j.63214C is a more direct substitute for an air throw and does less damage, but the positioning you get out of it is excellent; after it, simply run up to the opponent and 2C them out of their fall then fly cancel for normalized knockdown timing with them close enough to corner for j.236A stuff but still vulnerable to crossup stuff. Any time you absolutely need your best knockdown but either didn’t get a good starter to get it from or simply had meter to burn, j.63214C is your move. Lastly, if you are in MAX when using j.63214C and you land from it while still in MAX, you can immediately Blood Heat Activate and then pick the opponent up from the ground with Blood Heat Arc Drive. If the stars align with your meter and you can get a full combo into it, it’s more damage than air throw to j.236C, but even if you have to cut your combo short to get it it’s often very worth it.
For more info, I suggest checking out this F-Hime combo and setup video by old top player Eve: https://www.youtube.com/watch?v=nCjct6Cvk20
