
Disclaimer: If you find an error, or feel like you have more up-to-date or relevant information, please let us know. We’re able to update our current material after the fact, create addendums, and generally revise our process for greater accuracy and effectiveness, so don’t hesitate to tell us.
Written by Fiendmaw
Match videos: http://www.meltydb.com/resultall.php?1c=akiha&1m=Full&tdb=any&filt=any
Pros:
-Overwhelming corner pressure
-Can corner opponent from anywhere in almost every situation
-Best defense modifier in the game
-Good selection of normals
Cons:
-One of the slower characters in the game
-All her zoning specials disappear on hit,some on block
-Poor reversal options
-Low midscreen and shield counter damage
-Her better mixups are very demanding on meter and positioning
General combo structure:
Ground chain->4C launcher->j.A airdash combo->j.2C ender
Neutral:
Her neutral involves using her normals to fish for air counter hits and controlling space with pillars(22X), puddles(214X) and webs(421X).
Essential
F-Akiha’s air normals, even though they’re reliable, lack horizontal range.
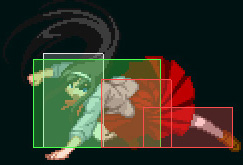
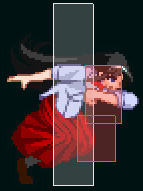
j.A is one of the best moves of its kind in the game. It’s a very reliable as a rising air normal and is an essential part of her airdash corner carry combos.

j.C is a solid jump in move,and also beats other air normals despite how it looks. Also packs a good crossup hitbox.
j.B is her answer to air moves with great horizontal range. It’s basically a wall of hit boxes enveloping her body. Despite how it looks, it’s not a bad jump in.
5A is very good at stopping instand air dashes dead in their tracks, and at catching opponents jumping out.
4C is her main midscreen launcher and a great poke in it’s own right. Due to its two hits, it’s hitconfirmable by itself, and if it hits it almost always converts to a corner situation, where F-Akiha shines.
2C is a sweep that can low profile poorly spaced jumpins. It’s hitbox and recovery are both very good.
22X(Flame Pillar)
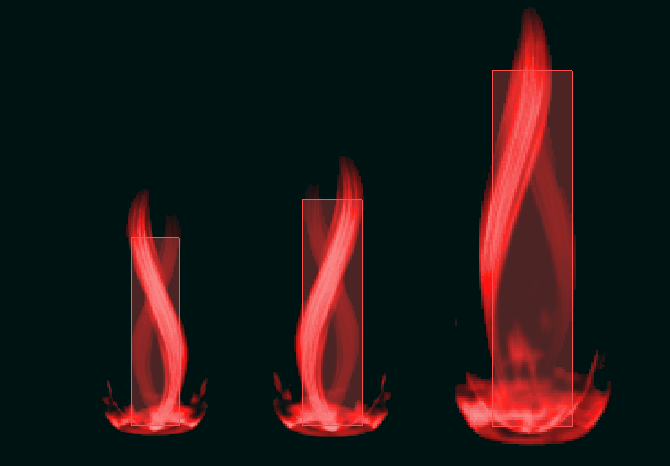
Her bread and butter special. It’s the core you build your game plan around. The mechanics are pretty simple:
Akiha places a puddle at 3 possible ranges(depending on the button used to initiate the motion)and then hold any button. Once you release the button a pillar erupts from the puddle.
The recovery is quite fast, and with pillar being close to even on block at the earliest possible release means it was made for pressure resets. However it’s poor horizontal range means it’s full potential is only unlocked when the opponent is cornered.
The pillar also changes properties depending on how long a button is held. The third level is notable due to it being air unblockable, however it also does 3 hits,meaning you won’t get an easy confirm if it counterhits the opponent in the air.
An important zoning tool in most matchups.
Disappears when Akiha gets hit, or blocks anything on the ground.
214X(Flame Puddle)

A slow projectile that moves along the floor that detonates when it comes in contact with the opponent. (Or alternatively when you release the button in the case of A version.)
A version has some uses in her corner pressure and some combos, B version knocks down and is mostly used for fullscreen zoning and a decent (but risky) midscreen blockstring ender.
A and B versions of the move disappear instantly if Akiha is hit. Trades are possible but uncommon.
EX version travels fast, is advantageous on block and provides quite a bit of corner carry by itself with proper spacing. EX version does not disappear if it’s already out, and it also OTG relaunches.

Similarly to the Flame Pillar, the three buttons correspond to three different ranges. The web has a fairly slow startup time,however it is air unblockable.
The A(close) version works well with a throw,doing increased damage.
Used in conjunction with Pillar and Puddle it can grant Akiha a fairly safe way to superjump in and apply pressure or move forward with the Pillars.
Note on these 3 specials: All of them can be EX cancelled throughout the whole animation, good candidates for cancelling them are 214C for better zoning and/or pushing the advantage or 623C for its invincibility.
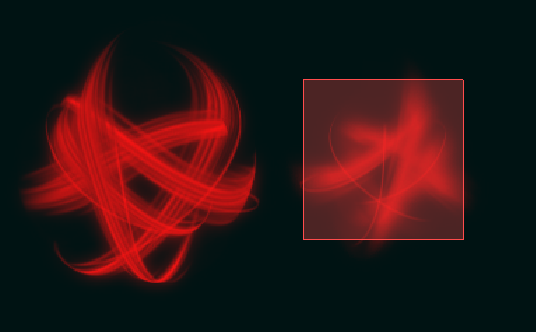
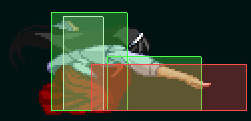
j.236X(Flame Ribbon/Tongue)
Air space control tool.They’re big,advantageous,disjointed hitboxes. However, unlike the original version of Crescent Moon,the angles are much sharper.
A version starts out in front, but then bends upwards. Very awkward to use offensively, but it’s very potent when used from air backdash to create space or tiger knee’d from a back jump.
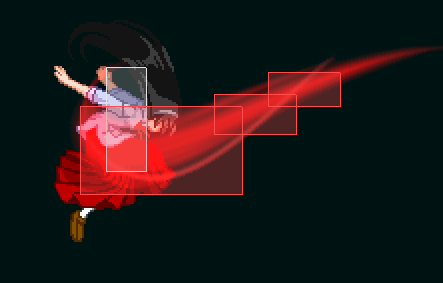
B version goes at a steep downward angle, like an air version of her Flame Pillar. Can be charged for extra damage, two hits, and more horizontal and vertical range.

Both A and B versions are very advantageous on block if tiger knee’d,however the A version only hits if done right next to the opponent if he/she is crouching.
Recovery can be jump and airdash cancelled, however A version cannot be air backdash cancelled, only forward.
623C
Her EX reversal,but that property is not why it’s highlighted This is your main OTG relaunch move,and where your meter should be spent the most.
It allows her to “fix” her corner carry combos and access better mixups when you’re already in the corner.
The last hit of the move can be double jump cancelled,meaning it lets you access your j.2C ender.
Important
5B
A standing low with good startup and hitbox, slightly advantageous on block.
5C
Slow roundhouse kick, essential part of her corner combos,and her best ground tech chase move.

2B
Two part slash to the shins. First part has a very good range for it’s startup and an excellent hitbox. Both parts can be cancelled. Make sure you hit with it, as it’s quite laggy on whiff.

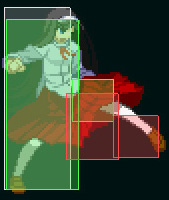
623A
Shoryuken-like move. Upper body invincibility, good hitbox and air unblockable. If you’re on your game, this move can be used to effectively score a knockdown if your opponent likes to stay in the air to avoid your zoning moves. Needless to say,it’s unsafe on block.

623B
Lower body invincibility shoryuken, but unlike the A version, it has a lot of horizontal movement up to the rising part. Very good corner carry and frame advantage on hit. Can be EX canceled when she’s doing the dash.

236C
EX Flame Ribbon offers a lot of frame advantage, and since it’s an EX move can be used in tandem with her zoning moves to lock the opponent down and open him up for damage.
Offense, pressure and mixups
Your goal in neutral is to get the opponent to the corner,so you can effectively use your pressure tools (mostly Flame Pillar) to lock him down or force a risky escape.
Thankfully as I said earlier you can accomplish this quite effectively due to her combo routes being
corner-carry friendly, even at the expense of damage.
Your main neutral tools are your varied normals. There’s no one go to move with F-Akiha, while her moves are quite specific, they’re strong in their area of expertise.
To complement your normals,depending on the matchup, her zoning moves should be used,especially 22A (close Flame Pillar).
Level 3 Flame Pillars essentially cut the screen off, boxing your opponent. However some characters can be hard to react to and release, against these characters, it can help to sometimes do a rising neutral jump/jump back j.B right above your pillar, due to it’s strong hitbox, it will rarely lose to other normals — thus making your pillar disappear. Worst case scenario they air block the j.B and eat the unblockable level 3 pillar.
Even though she has all these zoning moves,your zoning should only be used as a safer way to get in close. Due to all her zoning specials instantly disappearing on hit, a well placed iad and you have lost a chunk of health and screen positioning.
Akiha has no grounded overhead,thus her mixup game will revolve hit/throw midscreen, while also getting access to land low/late airdash high in the corner,and by spending meter, doing certain combo enders, she gets access to her best mixup which is a fuzzy guard that uses pillar to convert into a combo.
Combos
Note:All jump cancels will be forward unless otherwise stated.
Midscreen
(2Ax2/j.C) 5B 2B(1) 5C 4C j.B j.C dj j.B j.C AT(airthrow) -Basic melty blood combo,does more damage than her corner carry combos. 2B(1) can be ommited as it might push the opponent too far for 4C j.B to connect.
(2Ax2) 5B 2B(1) 2C 3C hjc j.B j.C dj j.B j.C AT -Alternative to the above combo.
The above combos should only be used if you think you can kill the opponent.
(2Ax2/j.C) 5B 2B(1) 5C 4C j.AA ADC(airdash cancel)j.AA dj j.AA j.2C
The core of her corner carry combos.However the reality is quite different, since Akiha doesn’t just want to corner carry the opponent,she also wants to land in a spot just outside the corner where her 22A can connect with the opponent(if she’s too close the pillar will be offscreen and won’t connect).
There are many ways to alter the combo depending on where you started.The easiest is delaying the two j.A’s at the end of the combo (for more carry) or doing them as fast as possible (for less carry)
However no matter how much you delay the j.A’s this combo will not carry corner to corner.
(2Ax2/j.C) 5B 2B(1) 2C delay 4C j.A ADC j.AB land j.B sd delay j.A ADC j.A j.2C
Her best corner carry combo.The two delays are for vertical positioning,first is between 2C and 4C to launch them a little lower,and the second one is delaying the j.A after the super double jump to get more height so the j.2C connects at the end.Besides the delays the other parts of the combo should be done as fast as possible.
If you realise the corner carry is too much,you can cut it short by omitting the last airdash cancel and simply doing j.B sdj j.A j.2c
Salvaging bad corner carries
It’s quite often that you just misjudge the carry potential of your combo and fall too close or too far. Thankfully you can salvage most situations, however, they all require EX meter.
If you land too close,you can do a simple otg into: 623C OTG relaunch j.A(no dj, just cancel the last hit into j.A) neutral dj j.A j2C.
It’s important to neutral dj so 22A is in range to connect.
If your opponent is in the corner but you are out of range of 22A then you can use 22B EX cancelled into 214C (this is a very early cancel,22B should not be hitting before the EX flash) into a dash 2C 22A. Alternatively if you’re short on meter you can set up a meaty 22B and dash in to continue pressure.
If you have no meter and 22B is not an option (you’re right in the corner) then the A version of Flame Web can be used. Akiha fully recovers before it hits however it can be shielded quite easily and in general it’s not anywhere near as flexible as Flame Pillar.
Corner
Her corner combos revolve around 214B giving a juggle that can be followed up in the corner.
(2Ax2/j.C) 5B 5C 6C 214B 2A 5C 6C tk j.236[B] (j.A/j/B) j.C ndj (j.AA/j.C) j.2C
Basic template for her corner combos. Good damage and gives you a 22A setup. The combo displayed is possible from the best positioning.
If you are around max 2A range then 5C should be omitted, since 6C can easily whiff.
If you hit with 2C during a blockstring then you should do 2C 6C tk j.236[B] into aerial.
If you manage to hit them and your pillar is still under them (usually right after you place it to catch wake up jumps) then you can extend your combo by activating the pillar while you’re coming down after j.2C and then doing another air string.
Initiative HEAT combos
Ground string into 214B IH cancel
-> Midscreen:dash 2B 5C 4C aerial (mind the distance to the corner)
-> Corner: 2B 5C 6C tk j.236[B] aerial
If you simply want the life regen, j.2C can be IH’d at any point.
