
Disclaimer: If you find an error, or feel like you have more up-to-date or relevant information, please let us know. We’re able to update our current material after the fact, create addendums, and generally revise our process for greater accuracy and effectiveness, so don’t hesitate to tell us.
Written by: Xedders
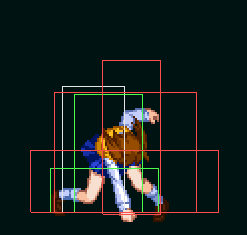
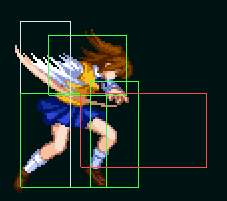
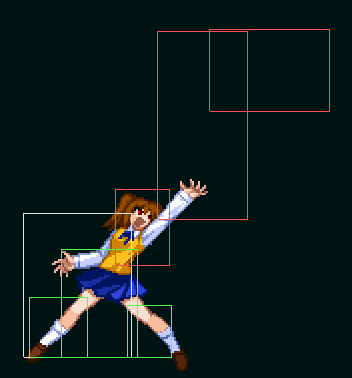
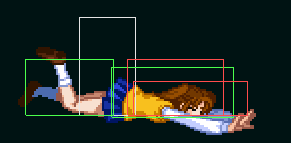
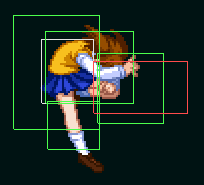
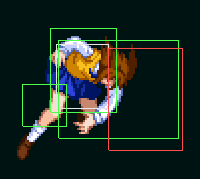
hitboxes:
combo guide:
https://youtu.be/bQpqZAgPiWc
Pros:
- Above average damage
- Anti airs confirm into high damage w/meter
- Great sweep
- Great anti airs
- Great okizeme
- Amazing arc drive (mostly AAD)
Cons:
- Highly reliant on meter
- A bit hard to get used to
- Some difficult confirms / combos
- Below average pressure
- Awkward air neutral
- Has trouble against zoners
Summary
C-Satsuki is a ground based character with great okizeme. Her pressure is a bit below average and her air neutral is a bit lacking, but once you get a good knockdown you’re going to have a pretty easy time beating your opponent up.
I’m going to refer to C-Satsuki as Satsuki (unless relevant) for the rest of this guide for visual purposes. I will try to keep things short and simple.
Neutral
In the air, Satsuki is pretty crippled and takes huge risks trying to approach like every other character. She needs to be careful, and to space correctly, else she can easily get outplayed in the air. On the ground though Satsuki has some really strong and threatening tools, more so with meter.
5A for example will pretty cleanly beat most if not all low air dashes (or even some higher air approaches). Trading with this normal (when used as an anti air) is still in her favor, and she in most cases can combo off the trade. Hits crouching opponents even at the tip of its hitbox.
Startup: 3
Active: 2
Recovery: 8

22A is another good anti air. It’s pretty fast, and covers her pretty nicely. Has f1 body/head invulnerability (see hitboxes below). It’s somewhat risky as an anti air when your opponent still has a jump because of its recovery. But if they’re above you and waiting to land with j.C or something, pressing this button is likely a good idea. It hits once, so if you get a counterhit you can combo, even in case of a trade.
Startup: 7
Active: 3
Recovery: 23

5B is very good at shutting down ground approaches, and for approaching her opponent herself. With its very long active duration and for the most part red hitbox it outright beats a lot of normals her opponent would normally use running up to her, but it’s quite slow and has a lot of recovery, so it’s not really something she can throw out like that.
Startup: 8
Active: 7
Recovery: 14
2C is one of the fastest sweeps in the game and her best low. With the shortest charge startup being 5 frames, and its impressive hitbox, this is a great move. It’s active for quite a while and reaches pretty far, but recovers for quite a while as well.
Startup: 5
Active: 3, 2
Recovery: 23

623C is an incredible move but I would only recommend using it against an opponent who’s a bit far off diagonally from you in the air, if they’re just over you at a 90-70 degree angle, it most likely won’t catch, especially if they have an extra jump, and they could even punish you (it has tons of recovery). Very easy to combo off.
Startup: 7
Active: 2
Recovery: 30
3C is Satsuki’s other low, 2C and 3C being the only ones. 3C, uncharged, is barely if at all used in neutral, as it serves about the same purpose as her 2C except with twice the startup and without a reverse beat. The charged version however, 3[C], is pretty special. It’s slow, and its hitbox isn’t really the best (although trading with it is still in her favour). But, it low profiles a lot of things, launches her forward, recovers faster and is easily comboable on hit. 3[C] comes in handy in very specific situations. Because it launches her forward a long time before the hitbox actually comes out, she can easily get shut down trying to approach with it.
3C
Startup: 11
Active: 5
Recovery: 15

3[C]
Startup: 25
Active: 7
Recovery: 13
All of these great ground tools do come at a price however as she can’t chain air normals or cancel them into anything. This means she helplessly falls to the ground after using an air normal, including her j.A, unlike most characters. Meaning, that in the air, if Satsuki’s air normals are blocked, unless blocked very close to the ground, she’s easily punishable on her way down.
j.A, with its incredible speed, hitbox and reach, really shines in Satsuki’s air game. Chasing your opponent down with this normal is very effective but also very risky as was mentioned above. It’s also active for a very long time by j.A standards, but doesn’t cover any space below her.
Startup: 3
Active: 3
Recovery: Until landing

j.B has a bit more vertical reach than j.A, sort of completing her options in the air. Hitbox isn’t the best, but it lasts for a long time.
Startup: 6
Active: 5
Recovery: Until landing
j.C is a pretty good jump-in, but that’s about it. It shouldn’t be used as an air to air because it’s slower, its hitbox is angled downwards and it knocks down to the ground on hit or counterhit. When charged, j.[C] sports a way better and larger hitbox, and is the only air normal Satsuki can cancel on block or hit. This includes reverse beating, air dashing, etc., but it’s very slow and should not be used often in neutral.
j.C
Startup: 8
Active: 3
Recovery: Until landing
j.[C]
Startup: 24
Active: 3
Recovery: —

Satsuki’s air normals are pretty straightforward: j.A hits above her, j.C hits below, and j.B is the middleground.
Defense
Satsuki’s defensive options are quite limited, and not very good, but options nonetheless.
214C is only invulnerable until active, meaning it can trade, and is safe on block (-2). However, being an ex-special, it is very easy to shield when baited (because of the superflash). Another thing to consider is that it barely has any vertical reach. This makes it very easy to jump in order to bait as well.
22C is a more serious reversal. Fully invulnerable, but pretty slow. Some would say it’s difficult to punish but really versus a competent player, once blocked, Satsuki is just waiting to be counterhit by a j.C, and most hurt quite a bit. Another thing to note is that its final hit launches forward and wallbounces, and is comboable in the corner or close to it.
Heat Activation (5E) isn’t really something I can recommend. There are -tons- of ways around it including jumping, shielding, clashing… and it takes all of her meter, which is very important to Satsuki in all aspects of her gameplay. But, when it does work it puts her in a very offensive position where she can spend a lot of meter and recover health.
Offense
- Pressure
- Mixup
- Combos
Pressure
C-Satsuki’s pressure isn’t the best but there’s still a whole lot you can do!
Things to work with:
In general, Satsuki’s pressure is very straight to the point: Her opponent wants out, but her key normals, 5A, 5B, 2B and 2C are what’s stopping them.
5B is very useful in pressure, as it pulls her in and can chain into anything. When going for prolonged pressure, you want to try to use 5B as much as possible.
Normals you’d usually want to reverse beat into would be 5A , 2A (in case you’re wondering they both have the exact same recovery frames, so no real difference there) and 2B. 2B hits mid but recovers quickly and is slightly advantageous on block (about +2) which is a pretty rare sight with Crescent moon characters but it’s not really good for much else.
–Since her only lows are 2C and 3C (3C being very risky and not reverse beat-able), her pressure almost entirely revolves around 2C being a very good sweep and her opponent wanting to jump out or press a button. Adjust your use of 2C according to your opponent’s playstyle. If they’re the careful kind, the one to wait until her 2C gets blocked so they can get out, you could stall with the rest of her normals until you feel they’ve had it and call them out. If they’re the kind to jump out you’d want to pay attention to their jump habits and test their patience etc.
Of course you should also experiment with reverse beating 2C and continuing pressure from there. It’s entirely possible with enough normals left especially when combined with its stupid fast startup. 2C 2A whiff is really fast and if you’re careful it’s going to catch people off guard or not sure what to expect.
–2[C] is advantageous on block. Very slow. Can be shielded on reaction when used predictably so use this sparingly. Since the advantage isn’t very big or anywhere near enough for you to catch a jump afterwards, some players like to up-back after it. Look out for that, especially when you’ve been pushed away far enough.
Instant air dash j.C is very strong and goes into very high damage, so when your opponent tries to poke out with lows, you could punish them with this (after 2B for example). Don’t overdo it though because Satsuki can easily get punished for it.
None of C-Satsuki’s specials are especially good for pressure. Only one worth mentioning is 214A.
–214A on its own isn’t very good on block, with a slight disadvantage, it effectively ends your blockstring. You can feint it (by holding A) but the feint animation is very slow and would probably get you hit when done close up. When whiffed however, from a good distance, it can be ex-cancelled into her ex-command grab (63214C). Use this sparingly.
Mixup
63214C: A very strong command grab. Outside of execution issues and 100 meter, you technically have no reason not to use this over your normal grab as a throw / tick throw. It steals health, deals way more damage and gives you a way better knockdown. It’s 5f and invulnerable towards active. Not jumpable post-flash. Should not be used as a reversal as it’s not invulnerable on the first couple of startup frames.
236B: Slow command grab that rarely lands and requires meter to combo off. Mostly only good in the corner and once you really got them blocking, and once you made them forget it ever existed. Half a second of startup. Good damage in the corner, especially with meter.
214B: A slow overhead you shouldn’t really use often. She can combo off it in the corner pretty nicely for 50 meter (dodge cancel), or with 623C anywhere else, but it’s really easy to block with its distinctive animation, sound effect, and well, speed.
5[C]: An even slower overhead you can play around with. Since the actual overhead starts up at a bit over half a second (full charge), you can half charge this to make them block high, then quickly 2C for a low. Rarely hits as an actual overhead, but the “feint” catches pretty often.
AAD (41236C while in BH): Satsuki’s AAD is unblockable on the ground. It’s not a throw, meaning there is no throw protection or anything like that, meaning, that if you meaty them with 5B for example, and they block, you can immediately chain into 41236C for around 5k unblockable damage. On paper this is very good, and it is really. But any player who’s aware of this is going to try and get out somehow so look out for shields, dodges, reversals, etc.
Most of Satsuki’s “normal” mixup options are pretty bad. The real mixup starts when she gets a good knockdown. Her go-to meterless knockdown is 421A (mostly used midscreen), but in the corner with meter she can use 623C for a knockdown that pulls the opponent slightly out of the corner, leading to some really mean okizeme.
A few examples:
Super jump forward -> air dash back towards end of jump -> j.C
Super jump forward -> land behind them -> 2C
Super jump forward -> land behind them -> jump -> air back dash -> j.C
Quick dash (668) -> jump (keeps momentum) -> air dash back towards the end -> j.C
Quick dash -> jump -> land -> 2C
Get creative!
Obviously, as Satsuki doesn’t have anything to prevent her opponent from disrespecting her oki, and everyone looks for ways out, you want to look out for things like heat activation (since it doesn’t require a direction to input), reversals (mostly 22x input reversals, since your crossups can mess up normal 623 inputs), shields, etc.
Be careful. Her okizeme is very good but nobody’s going to just keep trying to block it.
Combos
~ = Slightly delay next move
, = Wait for recovery to end
[] = Full charge
() = Optional
Satsuki’s combos are pretty awkward at first, but very smooth once you get used to them.
In this combo guide, I am going to list more or less every combo Satsuki can practically do, but I’m also going to give you the option to learn a very slightly less damaging version of the combo (provided it has one) that is much easier to execute (for example j.[C] j.B land 421A, instead of j.[C] ~j.B land 5C 421A), and may help you out with combos that are personally hard for you. If it helps you drop the combo less, it’s worth losing 100 or so damage over, in my opinion. If you don’t have any trouble executing either version, great!
C-Satsuki’s general combo structure:
X confirms into 2C 3C 623[A] (launcher)~… Note that you need to be pretty close to your opponent for the second hit of 2C to land. If you feel like you’re too far to confirm into 2C chain into 5B and then immediately into 2C as 5B pulls you closer.
Combos end using either 623C (when she has 100 meter), or 421A. Feel free to substitute whatever ender is shown here depending on the situation while playing! Detailed example below:
Bounce limit: Melty Blood has a wall/ground bounce of 2, meaning that on the 3rd wall/ground bounce, the combo ends. For Satsuki, this is something that you have to pay attention to because her combos almost always involve j.[C] which ground bounces.
Midscreen:
X 2C 3C 623[A] neutral jump 8j.[C] (wait until Satsuki almost hits the ground) 29 (super double jump forward) j.[C] land 5[C]~ 2[C], 2C 3C 623[A], 421A
Once you’ve reached the corner you might want to change things up and use some meter:
X 2C 3C 623[A] 8j.[C]~ 29j.[C] land 5[C]~ 2[C], 2C 5C 623[B], OTG 5B 2C 623C
Note that you should not go for 2C 5C 623[B] if you don’t have or don’t want to spend meter because the knockdown isn’t as good as 421A’s knockdown. Trying to do her standard okizeme setups after 623[B] would probably get you hit (since the opponent recovers faster), so I would recommend using 421A instead in this situation.
If you want to switch sides midscreen you can do the following:
~…j.[C] land quickly 5[C] 214A (whiff, switch sides) 2C 3C 623[A] 421A
~…j.[C] land dash under 2C…
Corner:
In the corner Satsuki has a few more options, mainly off different hits:
214B (no-charge overhead) 421A 2E ~(wait until close to ground) j.A whiff 2C 3C 623[A] j.[C] land 5[C] 2[C], 2C // 3C 623[A] 421A // 5C 623[B] 5B 2C 623C
236B (Needs to be done very close. Character specific) 5B 421A 2E ~ j.A whiff 2C 3C 623[A] j.[C]~j.B land 5C 421A — If you’re having trouble with the delay between j.[C] and j.B, you can chain it normally and omit 5C, going straight into 421A. The reason there is no 5[C] 2[C] stuff in this combo is because 236B uses 1 bounce, and 421A uses another.
100 meter variant, deals way more damage and is less specific:
236B 5B (2B optional) 623C 2C 3C 623[A] j.[C] land 5[C] 2[C] 2C // 3C 623[A] 421A // 5C 623[B] 5B 2C 623C
High damage:
With meter Satsuki can deal quite a bit of extra damage:
The following combo can be done both midscreen and in the corner. Small changes.
Corner: j.C 2B 5B 5C 2C (1 hit) 236C~2C 3C 623[A] j.[C] 5[C] 2[C], 2C 5C 623[B] 5B 2C 623C
Midscreen variant: j.C 2B 5B 5C 2C (1) 236C~2C 3C 623[A] 9j.[C] 2[C] 2C 3C 623[A] 421A (can substitute 2[C] for a dash under 2C to change sides.
Blood Heat combo: This combo needs to be spaced correctly so the heat activation does not hit the opponent. Slightly recovers health.
j.C 2B 5B 2C 3C 623[A] 8j.[C] land, 5E 5B 2C OTG 623C 41236C
— 6967 damage on full health VSion.
Common confirms off different moves (Most of these are to be used after low anti airs / when catching jump-outs):
5A anti air confirm:
22A (ch) dash up 2C 3C 623[A]~…
5A (normal hit midscreen) 5AA~421a oki
5A (ch) dash up 2C 3C 623[A]~…
5A (normal hit, anywhere on the screen w/100 meter) 5AA~623[B] 5B 623C~…
5A (normal hit, works when you knocked them too high up for 623[B]) 5AA~ 623C~…
Some small things that could save you:
*Knocked them down with 2C but missed the confirm into 3C? A close enough 5B into 623C picks them up for a slightly prorated but full combo.
*It is possible to, as long as you have meter, infinitely loop 623[B], 5B 2C 623C~~ for very little extra damage, but that very little extra damage could win you the round if they’re on their last pixel of health.
*Characters like Kouma and Riesbyfe require you to delay 623[A] after 3C for the launch, or else you get the grab version of the move. To skip the delay you could chain into 5C -> 3C instead of 2C -> 3C. 5C does not knock them down before 3C so they’re closer to the ground and the “grab” hitbox doesn’t catch Kouma/Ries’s awkward knocked down hitbox. This also deals more damage but is significantly harder to confirm into because of 5C’s single hit and terrible pushback.
