
Nanaya Shiki (Crescent Moon)
Written by: ForgoneMoose
Hitboxes: http://imgur.com/a/hfsYT
Notable players: Teru (テル), Butterfree, AUO
Pros
-Strong defensive tools
-Solid, relentless pressure
-Builds meter quickly
-Strong oki game
Cons
-Lacking neutral game, difficulty approaching many opponents
-Poor mobility, options for navigating opponent’s zoning limited
-Poor defense modifier
Overview
While Crescent Nanaya at first glance seems to have a fair number of tools in common with Tohno, it quickly becomes apparent that he actually trades a fair bit of his alter-ego’s well-rounded utilities for pure offensive power. Although he has to be very patient to get his turn in combat without simply getting killed instead for his efforts, once he is able to turn the tide of battle in his favor it often stays that way in the hands of a skilled player.
Nanaya’s dash is very quick, but short and not useful for covering ground in neutral on its own. His forward airdash is similarly short, covering even less distance with an IAD than his ground dash. To cover ground quickly, Nanaya is forced to carefully use super jumps, dash jumps, and his unique teleports to slowly grind his way through the neutral game, and get into his optimal offensive range, where he is much stronger.
Nanaya has a surprisingly strong defensive toolset, in spite of his mediocre lifebar. His DP is very fast relative to the rest of the cast’s, meterless, and with meter to spend is fairly safe to throw out in a number of situations while also giving high reward on success. His backdash is top tier, making him very slippery to try and run a pressure game on. His antiair game isn’t infallible, but it is better than what a lot of the cast has to say for.
Movement
-Walk speed in both directions is mediocre
-Dash is very fast but travels only a short distance. Always cancel into a jump or an attack, recovery is very long. Leaves Nanaya at standing height throughout entire animation
-Both air dashes are quick with low startup and travel at a good angle but go very little distance. Forward retains momentum very well, dash IAD gives you a “normal” speed airdash
-Super jump is excellent, covering lots of horizontal space very quickly
-Can fastfall with j.22. Can be used to confuse antiairs, especially in conjunction with superjump, seeing as his airdash is very short
-Backdash covers backwards ground very quickly, good if you need to back off to regroup for a moment or scam the timer for a few seconds.
-Has a command double backdash by inputting 44 during his normal backdash – there is always a brief vulnerable period during startup no matter how quickly you input it, and recovery is long enough that just backdashing twice covers ground faster
Normals
5A:
-5f startup, does not hit crouchers so is not fit for starting pressure strings
-Solid anti-jump hitbox, best used with 5A > 6E > 5A option select during pressure/oki
-Mediocre twitch antiair. Good hitbox and frame data, but extends hurtbox before hitbox comes out, so will just lose to proper jumpins anyways. Consistently beats IADs and delayed jumpins however
-Good option after antiair EX shield
-16f total animation and whiffing crouchers makes this your reverse beat normal of choice

2A:
-5F startup and hits mid, however horizontal and vertical hitbox are both outstanding for a jab. -1 on block, excellent for all sorts of pressure situations
-Strong hitbox makes it useful for mashing out of an unusually high number of pressure situations. Some attacks that normally go over lows/2As still get hit by this
-Second fastest normal that hits crouchers is 8f startup, so while this is enticing for reverse beats, you’ve often already used it in your string
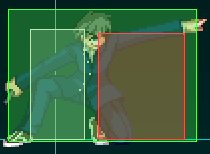
5B:
-8f mid, bad horizontal range. Slight forward movement and +-0 on block make it an excellent pressure tool if you are close enough to use it
-Must be shielded standing, primary way to blow up crouch shield
-100% starting proration and decent startup makes this your go-to punish tool
-Has some clash frames during the active period, but poor clash box and low number of clash frames make it unreliable
-Best vertical hitbox besides 5A, but still reaches lower than it. Can use dash 2A > 5B as an antijump string
-Frame advantage, fast recovery on whiff, and crouch shield crush make this a good choice for a meaty
-Can OS against wakeup Heat activation using 2A > 5B+D on oki

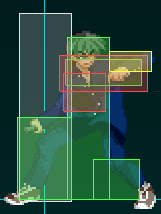
5BB:
-A followup that is really only used for some combos
-Does not cancel into anything on block and is very unsafe. Special and (super)jump cancel on hit, allowing for combos if it hits
-Hitbox is not as nice as the animation would make you believe, and being a followup instead of a standalone move kills any antiair utility it would have regardless
-Can be charged to become a gimmicky 28f overhead, on top of having to use it after 5B. Gains special cancel on block when charged, cancel to 22C for a combo into 2C on hit or to stay safe when it’s inevitably blocked
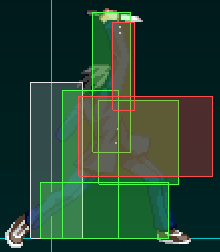
2B:
-8f low. Good active frames and no hurtbox on Nanaya’s knife or hand make it a reliable poking tool
-Moves Nanaya forwards and retains dash momentum during startup. (Dash) 2B controls the floor in front of you fairly well and scares the opponent into either hanging back more or approaching from the air instead
-Bad recovery. Do not leave this uncanceled in pressure, and only use this from max distance in neutral or you risk having it avoided and possibly punished
-Big horizontal range means this is your go-to long range punish
-Primary low for high/low mixups
-Primary stand shield crush
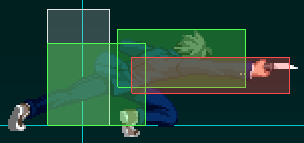
5C:
-Hits mid, high pushback on block but pulls Nanaya far forward after connecting
-Forward movement and high blockstun makes this an excellent pressure tool
-5C > immediate 5A whiff gives slight frame advantage, but the large pushback makes it difficult to use for pressure
-Can be charged for up to 27f startup, full charge makes it hit overhead and launch the opponent on hit
-Charge is a solid overhead. Can release partial charge at any time, can cancel into normals even at full charge, full charge animation occurs too late to give the overhead away
-Abysmal recovery. Do not whiff this or leave it uncanceled in pressure, you’ll get hurt. Becomes uncancelable on connect once Nanaya starts pulling his arm back
-Therefore, having this backdashed while trying to use it for high/low mixup is bad news bears; use this as a mixup only when the opponent isn’t looking for it
-Use this to pick up air counter hits for max damage

2C:
-Hits low, but has 11f startup and bad recovery time
-Moves Nanaya closer to the opponent on block than 5C and has less pushback on block; amazing pressure tool
-Long sliding distance and active frames make this great for stopping backdashes even midscreen; 2A > 2C string starts pressure on block and catches reversal backdash
-Always knocks opponent down on hit, is needed for all of your strongest midscreen combos as well
-Your only move that low profiles. Can therefore duck under some projectiles and even counter certain air approaches with this, but beware the long recovery time
-No hurtbox on Nanaya’s heel, low profile, and knockdown on trade means this can plow through some attempts to poke out of pressure resets. I.E, instead of dash 2A just 2C. This loses to jumpouts however

j.A:
-5f, hits mid, has an upward angled hitbox
-Hitbox is worse than animation suggests, but is your only air attack that covers an upward angle and it does this job well enough
-Jump up j.A can be used to setup tick airthrows against already airborne opponents
-Used to control height during some air combos
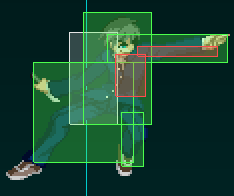
j.B:
-7f startup, overhead, 2 hits
-Looks much more useful than animation suggests. Only 4 active frames, hitbox does not extend fully until the last 2 of those frames, only hits directly below and right in front of Nanaya despite animation
-Is your only air to air that hits directly in front of you
-Primary button for IADing in with, but beware poor hitstun on grounded opponents. Must use 2A to combo, and this requires low height connect
-Has two hits and you can cancel the first hit into j.C to mixup with 2 highs/1 high then low, but the gap is large between when the second high would connect and the low option would connect so this is a weak mixup
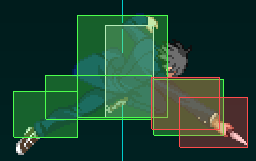
j.C:
-10f startup, overhead, nice hitbox
-Has good active frames, hitbox that extends all across Nanaya’s arm and knife, and no hurtbox on the knife
-Excellent space control tool if you keep the opponent at the max distance of the knife, especially if done while retreating
-Good air to air if the opponent is approaching from below, but does not hit opponents at even or higher level than Nanaya. Beware the above average startup however
-Huge hitstun and blockstun, air to ground j.C > land > dash 2A will often work in either case
Specials
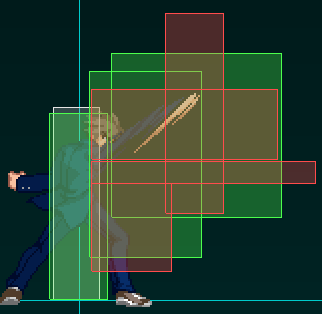
236A:
-The 11f startup, hurtbox on the slashing animation for the entire active window, and air blockability make this move look bad at first glance, but it is actually very useful regardless of these flaws
-Best combination of horizontal and vertical reach of any of your attacks by far, good for space control. Beware projectiles and strong pokes however
-Can control Nanaya’s horizontal movement using left and right throughout entire animation
-Being -1 on block means that even though there is plenty of time for the opponent to react, you still have tricky options to reset pressure afterwards with. Becomes extremely devious if opponent lacks frame data to contest you with anything at specific ranges
-EX cancel at end of animation allows you to score a knockdown off ground or air connect with meter, but super cancel prorates your damage pretty badly
-Long animation makes this good for hitconfirms or frametraps late in pressure strings with few normals to work with
-Decent frame advantage on hit means you can meaty standing opponents after grounded hit
-Hitbox has a blind spot at the far end of its range where the move can be crouched under by shorter characters, long range 236A will get you hurt in such matchups. A similar blind spot opens up next to Nanaya after the first hit of the move, but this one is less important to keep in mind
236B:
-Slower startup and recovery than 236A and lacks EX cancel, so not fit for combos, pressure, or space control
-You get this move when you try to cancel into 236C but it turns out you didn’t get as much meter from your preceding combo as you thought you did
-Don’t use this move
236C:
-Is similar to 236A, but more hits and more damage
-Main draw to the move is being air untechable on hit, sets up your strongest oki while also doing decent damage for 100 meter
-Can cancel the first hit of DP into this and move backwards to make DP safe on block midscreen or give more reward on hit
623A:
-7f startup
-Has a bit of head invul during startup and can beat some things, but isn’t super reliable
-Is best suited as an antiair, as it has a good angle for this and gives high reward on counterhit, plus is airunblockable. However, head invul is not great and strong or delayed jumpins often trade or beat it outright
-Pressing the button again late in the active frames gives a followup that sideswitches and gives knockdown, allowing you to meaty. Followup can miss if 623A connects at an odd enough angle, this resets the game to neutral.
-Most viable midscreen meterless combo ender, if you need to use one
623B:
-6f startup
-Full invul from frame 1 until the end of the active frames, super reliable!
-Amazing meterless reversal, plows straight through things DPs have no business plowing through on oki and during pressure
-Is a key antiair tool, being fast, air unblockable, and giving knockdown
-Pressing the button again late in the active frames gives a followup that sideswitches and gives knockdown, allowing you to meaty. Followup can miss if 623B connects at an odd enough angle, this resets the game to neutral.
-Has EX cancel on first hit, EX cancel to 236C lets you make DP safe on block and gives you a better combo on hit
623C:
-Like 623B, but worse in most ways
-Has 4f startup, but is telegraphed more than 623B by the superflash, and is air blockable
-Does moderately higher damage than 236C and in the corner can be looped for much better damage than 236C loops. Use if you have meter and really want to kill them with your combo, or you have a bit of MAX left to spend during a corner combo
-Pressing the button again late in the active frames gives a followup that sideswitches and gives knockdown, allowing you to meaty. Followup can miss if 623C connects at an odd enough angle, this resets the game to neutral.
22A:
-Forward teleport, fast, crosses through opponents until Nanaya starts reappearing
-Full invul while Nanaya is invisible, can be used to go through certain projectiles in neutral, beware recovery period however
-Not fit for defense as you’re in counterhit state until Nanaya is 100% invisible during startup – deceptively long startup
-Can cancel last ~2/3 of recovery animation into anything except another 22A
-Loses to 2A mash due to autocorrect if used on pressure, learn ranges where max range 2A or 2B connect after canceling into it
22B:
-Neutral jump teleport
-You retain all air options as soon as you reappear, for all intents and purposes this is a neutral jump that you can cancel your normals into on block
-Useful for pressure as it must be disrespected in different ways than all your other options after the teleport startup animation
-Not fit for defense as you’re in counterhit state until Nanaya is 100% invisible during startup – deceptively long startup
-Can half charge to feint 214A/C
-Can charge for homing teleport
22[B]:
-Teleport that tracks opponent’s horizontal position
-Can change where Nanaya appears by holding directions during startup
-2 is the go-to direction, leaves you behind opponent close to the ground. Can be used as a long ranged approach against zoners, but long startup means doing it preemptively on a read is usually required to keep it safe. Can j.C > 2B for a full combo, or j.C > IAD j.C for a simple mixup
-4 puts Nanaya in front of the opponent. You have to delay j.C slightly so it’s somewhat telegraphed as a mixup, but you get pressure either way and it keeps the opponent on edge
-8 leaves Nanaya very high in the air behind the opponent, which baits common antiair tactics
-6 leaves Nanaya behind the opponent at a distance, which is sometimes useful for running away from the opponent or baiting specific antiairs targeting 22[B]2
-If the opponent sees the 22[B] coming, they can simply dash away and reset neutral, regardless of which direction you pick
-Also leaves Nanaya in CH state for a moment before he can even do anything after he reappears
22C:
-Feint for other teleports
-Can be canceled into anything halfway through the animation
-Leave animation uncanceled for a moment to make it feint 214A/C
-Use to gauge reactions to teleport startup animation during neutral and pressure
-Can dash in and throw afterwards if they respect teleports too much
214A:
-Long startup, then sudden teleport into overhead
-Slash hits overhead, unshieldable, airunblockable
-Airunblockable means this catches late jumpouts, but jumping before Nanaya starts disappearing makes 214A whiff
-Long recovery period on ground if Nanaya doesn’t touch opponent during teleport
-Despite appearance, has a small window where Nanaya can be counterhit by 2As during startup
-Slightly minus on block (-3), and can be punished with a throw if the opponent EX-guards it
-After it’s blocked without EX-guard, the threat of your 623B may allow you to keep attacking
-Best suited for okizeme where the long startup is irrelevant. Avoids heat activations and many reversals, only good options are blocking and backdash/dodge
-Gives long knockdown and OTG relaunches so great for setting up oki as a combo ender
-Ends combo on hit, opponent is full invul until wakeup on hit

214B:
-Big unsafe dashing knife slash thing
-Super punishable on block, has worse startup and active frames than it appears to, worse hitbox than animation suggests, huge risk for meh reward if thrown out on a guess in neutral
-Only huge range move you have, so sometimes necessary to use in neutral regardless
-Can input 214 if you suspect the opponent will commit, then just hit B on reaction to something punishable
-Sends opponent to opposite wall for wallbounce, can chase with jump cancel air dash for a corner combo if near the corner
-Sets up damaging combos in the corner
-If used late in corner combos, can set up your nastiest oki
-If used while right next to the opponent, functions differently. Straight upward launch for combos, not as punishable on block

214C:
-Slow teleport command grab
-True command grab, but usually loses to midscreen backdash regardless due to poor range and mediocre startup. Also does not activate versus dodge for some reason
-Long recovery period on ground if Nanaya doesn’t touch opponent during teleport
-Very easy to mash against compared to 214A. Requires complete respect from opponent to work
-Slower than 22C > dash throw, but more rewarding
-Best suited for blowing up people content to just stand block 214A
-Can double jump cancel recovery for more oki options
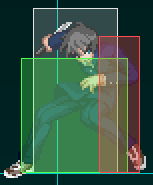
j.22:
-Fastfall. Instantly sets Nanaya to zero horizontal momentum and max downward velocity no matter what momentum he has
-Fairly subtle animation and only a couple frames of landing recovery, but immediately refaces Nanaya when input. Also shoves Nanaya to the left or right if he’s too close to directly on top of the opponent, so true ambiguous crossups are impossible with this
-Superjump/dash jump fastfall is a common crossup option on oki
-Is a special move, can cancel air normals into this on hit or block
41236C/Arc Drive:
-Full invul, but very slow startup
-Can be used as a reversal through very high commitment attacks sometimes, but you have better reversals to begin with and it leads to mediocre reward for using so much meter
-Can hold 2 to make it faster and hit low but deal less damage; if you must use this move for some reason, do so, as it is a lot faster and prorates better making it more reliable on defense and more damaging during combos
Blood heat 41236C/Another Arc Drive:
-Same as arc drive, but much faster, reaches much higher, is much more damaging, and is unblockable
-Can always dodge raw AAD by mashing forward dash or dodging after Nanaya touches you, can also airthrow top Nanaya to get a punish and break the BGM
-Your most damaging combo ender by far. If you end up in Blood Heat for whatever reason, end rounds by comboing into this
Last Arc:
-Ground EX shield to activate
-Mediocre last arc. Damage range is bad, high damage range is same as low damage range for better last arcs
-Fast and unblockable but only hits opponents on or near the ground – not great against autonomous projectiles and whiffs against crossups
-Very stylish at least

Neutral
Neutral is where Nanaya has the most trouble, and any competent opponent will very much use this to their advantage. His pokes are very narrow and have poor hurtboxes on them, so challenging purebred rushdown characters’ assaults will often result in you getting counterhit for your trouble if you don’t do the exact right option. His options for covering spans of distance beyond the length of his short ground dash are limited as well. His tools for dealing with opponents who are content to sit at a distance and zone the whole match are limited.
Against rushdown opponents, jumping and doing falling j.C is a strong way to control space while slowly advancing or while retreating due to its great hitbox for Nanaya standards and good active frames. Having this hit or ground blocked will let you start a combo or pressure.
Using 236A as the opponent is about to approach effectively sets a large barrier in front of you that shoves them back if they try to approach from most any angle. On block, you can use the movement to move Nanaya into the most effective range for the matchup or simply back off if you need to breathe. If the move counterpokes them out of an attack, you can EX cancel for extra damage and start pressure freely. Beware characters who have decent projectiles, as they can hit you out of 236A easily, likewise characters with strong pokes can hit you out if you use the move predictably.
If you can position yourself in range for it, dash 2A is a very safe and reliable “poke”. It leads into a full combo or pressure using your C normals to move closer, and is much safer than your other ground pokes on whiff.
Preemptively using 2B, especially when combined with dash momentum, can serve as a strong counterpoke that forces the opponent to take a more predictable neutral approach. It will usually end badly for you however if you use this from less than max range, or if the opponent has a hard read on your actions, as having this air dashed over is usually a punish for your efforts.
Dash 2C is a rather situational tool. It covers a large amount of ground fairly quickly, but it easily jumped over and has longer recovery than you would like. It low profiles, and so goes under a number of projectiles and some pokes, making it somewhat of a counterpoke that should be utilized sparingly.
If you need to cover large distances at once, the ideal option that you would like to be able to use is superjump j.C, as Nanaya’s superjump is very fast and j.C is hard to beat out if the opponent lets him get into a position where he can use it effectively. Superjumping across the screen gives your opponent ample time to plan a strategy to deal with your obvious approach, however, and decent opponents will employ a number of different tactics to shut you down.
Many opponents who anticipate your superjump will attempt to antiair you before you can get into proper range for j.C. This can be defeated using fastfall; as you begin descending from the superjump, instead fastfall and (dash) 2B for a low counterpoke to try and hit their antiair attempt.
Some will try to shield the obvious j.C. If you think the opponent won’t just immediately antiair you, you can neutral double jump as you get near the opponent then drift forward. You should have time to land and crush their shield, or otherwise confuse an opponent if they tried to block your j.C instead.
If you need to get through swarms of projectiles, remember that you can still block while superjumping forwards, you’ll get there eventually. Also, shielding them will keep you moving forward at halved speed instead of getting pushed back. If doing so would leave you uncomfortably close to the opponent, cancel shield into fastfall, or j.C if you were able to EX shield.
You can also cover lots of ground quickly by dashing, quickly jumping forwards and then varying the timing of your forward air dash to make your angle of approach more ambiguous or just to cover more or less ground.
You can situationally use 22A to pass through projectiles, but the recovery means you’re liable to get smacked in the face by your opponent’s normals if you get too close with this. Best used from very far distances.
22[B] skips through everything that they throw at you from a distance, but has a very slow and telegraphed startup. In order to not have it simply countered in some fashion, you must do it very early on a read, so somewhat situational.
214B has huge range and corners the opponent on hit, but it is hugely unsafe on block or whiff. What you can do to use it more safely is buffer 214 in anticipation of the opponent committing and then just hit B when you see a certain animation you want to punish. Be careful, as 214B has more startup than it looks, poor active frames, and a bad hitbox to boot. Use this move grudgingly, as it is needed sometimes. Certain moves such as Aoko’s orbs even allow you to react to the startup and input 214B if you are looking for them – if certain fullscreen tactics are troubling you, lab out opportunities like this.
Pressure
2A: This is your pressure starter of choice due to being your fastest normal that hits crouchers and having good range for its speed. Being only -1, you can either chain into anything else that you want or just go for a throw if you predict respect.
5B: Bad horizontal range, so this is generally used either early or late in blockstrings. Is neutral on block, so you can either reset after letting it recover or delay cancel into another normal if you anticipate disrespect.
2B: This is your staple low for all purposes, as your only other low is 2C which has poor startup and recovery, and does not allow easy or optimal confirms as a starter. Has a solid delay cancel window but poor frame disadvantage on block, so your only mixup is teleport/delay cancel.
5C: Has large blockstun and pulls Nanaya close to the opponent if delay canceled. Only way to generate a gap in blockstun to frame trap with is 5C > longest possible delay > 2C. 5C > immediate 5A leaves you at slight frame advantage, but leaves you at a long distance from the opponent where you are vulnerable to jumpouts. Learn to delay canceling this as long as possible. Can also be used as a frame trap tool as the startup can be varied freely using the charge and 5C > 5A whiff leads into a full combo with dash 2A.
5[C]: Is a fairly subtle high/low mixup option that allows you to continue pressure if blocked, but can consistently be blocked if the opponent is looking for it, and loses hard to backdash, even if the opponent is cornered. 5[C] is the overhead option that punishes respect, 5{C} > 2B is a fake overhead into low that blows up disrespect and makes them think twice about stand block on reaction to 5C startup. 5[C] is air blockable and lacks 5C’s large delay cancel window, so your options on block are more limited. Chain into 5B after 5[C] to confirm into a combo on hit and keep up the pressure on block.
2C: Hits low and pulls Nanaya very close to the opponent on delay cancel. 2C > max delay 5B is a frame trap that also allows you to 5B reset late in blockstrings. 2C > delay 5A throw is a throw setup that does not require you to dash, and forms a mixup with 2C > delay 5B being the frame trap counterpart. If you have not used 2A already (common in oki situations), you can do 2C > 2A and reset pressure, which gives the opponent less reaction time than 2C > 5B.
236A: -1 on block, big horizontal and vertical range, and you can control where Nanaya ends up when it ends. If it catches someone early in a jump it plops them back down on the ground for more pressure. On ground block, Nanaya should position himself in a range where the opponent has the worst possible frame data for dealing with the fastest move Nanaya has available at said range. Against characters with weak jab and/or reversal options, 2A from just beyond throw range is hard to deal with and resets pressure, or you can do max range 2A to beat faster jabs through 2A’s superior range. Other options include far range 2B > 5C against chars with weaker midrange pokes than close range options, and midrange jump j.C in prediction of low pokes or respect. If you feel like blowing lots of meter, you can get in their face and do 623B(1) > 236C to force respect. 236A also moves you closer to the opponent and autoconfirms, making it a good final frametrap when combined with its big range. At long range, this will whiff against many characters on crouch connect, despite the animation, and you will probably be counter hit in this case.
Teleports of any kind: Relies on the opponent not being prepared for the startup animation, and even then only 22X would work. A delayed jumpout before 214X would start moving will make it so that only 22C and 22A leave you in a decent position to try and do anything, and with limited options to catch their descent. 214A/C can downright be punished with j.C, and 22B leaves you too far away to do much even if you airdash forwards. 22[B] has an even bigger, more telegraphed startup, and the opponent can just move away from any direction you pick by using their air movement.
5A rebeat: Resets pressure if respected, and this can be done off of any of your normals. Add a delay before rebeat if done with 5C or 2C to avoid being pushed back a ton. If the opponent looks for the rebeat text to disrespect, simply do a string like 5A whiff > cancel to 2B for a punish.
Reset > dash throw: The backbone of your pressure, as it gives you a basically unreactable mixup that compels the opponent to stop blocking, however little damage it may do.
Reset > dash 5A 6E 5A: Slower than dash throw, but catches both jumpouts and respect if they don’t mash.
Reset > forward jump: 5A rebeat or 22C open Nanaya up for a mixup between IAD j.B for a high option or forward jump fastfall 2B for a low. Requires respect from opponent, use this to tilt players who just want to block your pressure all day.
Reset > tick airthrow OS: After a pressure reset, you can jump/superjump forwards and j.A, then immediately input j.A again. If the opponent jumps out during the gap, they will block the first j.A then block another j.A, where you can then delay airthrow, which is an inescapable setup. If they do not jump, you will whiff one j.A and can recover then j.B as you fall. This option can certainly be disrespected if they react, but it’s definitely safer than going for the gamble that is superjump airthrow.
Combos
Midscreen:
hitconfirm > 2C > 5C/5B/5A > j.B > j.C > dj.B > j.C > airthrow
Basic baby combo. Requires 2C and another normal to be reserved.
…2C > 5C/5B/5A > j.B > j.C > j.A > sdj.B > j.C > airthrow
Inserting a j.A here allows you to super double jump without going over them, which pulls you closer to the opponent if you’re trying to air combo and you think you might be too far away to finish the basic air string.
hitconfirm > 2C > delay c.214B > dash 2A > 5C > j.B > j.C > dj.B > j.C > airthrow
Higher damage, sideswitch, allows combos after 2C even if all other normals have been used.
5B > 5C > 2B > 2C > c.214B > dash 2A > 5C > j.B > j.C > dj.B > j.C > airthrow
Your go-to meterless punish.
2B > 5C > f.214B > jump cancel fastfall > 22[B]
Your only confirm from long range 2B. Can input fastfall > 22[B] as 222[B].
2B > 5C > f.214B > delay forward jump delay airdash > j.B > sdj.B > j.C > airthrow
From round start position or closer from the corner, you can pick up an air combo off the above long range 2B combo instead.
2B > 5C > f.214B > delay forward jump delay airdash > j.B > land 236C > 2C > 214A
…and also convert into 214A oki if you have meter. This has a slightly shorter maximum distance from the corner that it works at, as doing j.B from too high lets the opponent tech before 236C.
236A > [6] > (623CC)
Best confirm off grounded 236A frame trap. 623C whiffs if 236A connects at long range.
5[C] > (5B) > j.B > j.C > dj.B > j.C > airthrow
Confirm off overhead. Exclude 5B if 5[C] was used from long distance.
2B > (5C) > 2C > 5BB > 22C > j.B > j.C > dj.B > j.C > airthrow
Confirm off of low mixup. Exclude 5C if started after 5{C}.
hitconfirm > airhit 5C > AAD
Max damage ender in BH. If you happen to end up in BH for whatever reason, go for it. Huge damage compared to any other ender, but poor oki if they survive.
Corner:
hitconfirm > f.214B > jump cancel fastfall > 2C > 5BB > 22C > jump j.B > j.C > dj.B > j.C > airthrow
BNB combo in corner, allows air combo even at max distance and without 2C ready. You get a full combo even from max range 2B > 5C with this.
hitconfirm > f.214B > jump cancel delay fastfall > c.214B > 2C > 214A
Sets up meterless corner oki for low damage, use if no meter for 236C.
hitconfirm > 2C > 5C/5BB/5A > 236C > 2C > f.214B > jump cancel fastfall > 2C > 22C
Sets up corner pull oki for 100 meter.
hitconfirm > 2C > 5C/5B/5A > (623C > 2A > 5B) xN > 5BB > 22C > j.B > j.C > dj.B > j.C > airthrow
623C loop. Can freely dump meter for more damage in your combo in the corner. Becomes mostly a waste of meter after two loops. Try not to go into the loop after f.214B, cuts damage significantly because of proration.
236A > 623C > 2A > 5BB > 22C > j.B > j.C > dj.B > j.C > airthrow
You can go into a full air combo off ground hit 236A in the corner if you have 100 meter to spend. Like the equivalent combo midscreen, this does not work if you connect with 236A from far away.
Okizeme
- j.C > airthrow
Gives Nanaya only slight frame advantage and sends him flying back increasing distances depending on the height you airthrow at, resulting in no oki if used midscreen. Optimize for corner carry instead of frame advantage in this case.
In the corner, Nanaya is left closer, and can either dash 2A 5B for anti mash and anti jump or 2B for a true meaty. After 2B, you can either 5C and confirm a f.214B into a combo, or rebeat 2A and either dash in or 2B, creating a simple mixup.
Nanaya can also dash 5A 6E 5A if the opponent respects the knockdown for a free throw, or he can dash block delay throw to bait reversals while also throwing respectful opponents.
Despite the frame advantage, teleports are not good in this situation. They can still be jumped out of just like during pressure, the frame advantage isn’t enough to force them to respect 214A.
- j.C > fastfall
If you air combo midscreen, this is sometimes better against characters with strong zoning games on the ground, particularly if their air games are more limited. This allows you to tech chase and potentially catch their fall with something like 236A, whereas airthrow resets neutral if you aren’t already very close to a corner, giving such an opponent the advantage instead of yourself.
- hitconfirm > airhit 5C/5BB > 236C > 2C > 214A
Convert any air combo opportunity into a long knockdown for similar damage instead. Huge frame advantage anywhere onscreen, sets up cheap mixups.
…214A > dash neutral jump land 2B crossup low
…214A > dash neutral jump drift back land 2B sameside low
…214A > dash neutral jump airdash back j.C fake crossup high
Three way setup, j.C also baits reversals. Positioning the sameside low to stay sameside is character specific, and also depends on distance from opponent when you start 214A.
…214A > forward jump > land 5B sameside
…214A > walk forward jump > land 5B crossup
Ambiguous crossup setup. If done in the corner, use neutral jump > drift forwards instead of forward jump. Exact distance you must walk is character specific.
…214A > dash jump immediate fast fall > 2B sameside low
…214A > dash jump slight delay fast fall > 2B crossup low
…214A > dash jump airdash back j.C sameside high
Fastfall mixup. j.C option baits reversals as well.
Fastfall alone is not a mixup. It corrects Nanaya’s facing the moment it is input and Nanaya is shoved to one side of the opponent the moment his foot touches the opponent’s head space, giving away where he will attack from. It cannot be an ambiguous crossup – it can only be a mixup through surprise.
…214A > superjump forward fastfall > 214A
…214A > superjump forward fastfall > 22C > meaty 2B
…214A > superjump forward fastfall > 22{B} > j.C
Teleport mixup. Meaty 214A beats everything but reversal backdash/dodge and stand block, while 22C allows you to react to backdash/dodge and punish or catch stand block.
…214A > Heat Activation
You can activate Heat after 214A ender and still dash up and meaty. Not that great since you usually have to sacrifice meter to get to 214A ender anyways, but the option is there if you’re really bleeding for red health.
- hitconfirm > airhit 5C > 623AA
Convert any air combo opportunity into a meaty situation for less damage instead, use if no meter for 236C. Undoes 214B sideswitch, or causes sideswitch if done without 214B.
Can dash in and do any meaty of your choosing afterwards, or airdash j.B.
- corner hitconfirm > f.214B > jump cancel fastfall > 2C > 22C
Corner pull oki. Gives all the same options as 214A ender in the corner, but with some extra ones as well.
…22C > 22A > 2B crossup low
…slight delay 22C > 22A > 2B sameside low
…22C > 22B > j.C sameside overhead
…22C > 22C > 2B sameside low
Teleport mixup. Must delay j.C after 22B a little bit in order to get a conversion.
…22C > superjump forwards > land 2B crossup low
…22C > superjump forwards > airdash back j.C sameside overhead
…22C > superjump forwards > doublejump airdash back j.C crossup overhead
Corner three way, somewhat more subtle than midscreen setup.
- throw
After throw, you have a small chunk of frame advantage with which to do the meaty of your choosing or do a simple mixup with IAD j.B or 5[C]. Like with 623AA ender, not enough frame advantage to do anything fancy.
Defense
5A: Will lose if you try to use it as a normal antiair, but it will blow up anything not totally legit very consistently: snipes IADs, delayed jumpins, and antiair shield baits.
623B: Is airunblockable and full invul for a long time while also giving a meaty situation on hit, but beware having this baited with double jump or air shield. Is an excellent reversal as well, being very fast and safe on block with meter, but beware experienced opponents who will bait this using pokes that take advantage of it’s poor ground to ground horizontal range.
623B(1) > 236C: If the EX cancel is difficult for you, deliberately bring your stick to 2 instead of putting it back to neutral after inputting 623B. This ensures you do not accidentally input 6236, which would result in you getting 623B(1) > 623C for your trouble.
Heat Activation: Nanaya’s heat hitbox is horrendous, so this will probably whiff more times than not if you try and use it defensively in such a fashion. You have better reversal tools as it is, anyways.

Shield > 623B: Is your best option off antiair shield if you do not trust EX shield.
EX Shield > 5A: Gives you a CH conversion off EX shield antiair.
Jump forward j.A: j.A’s upward angle takes control of antiair situations where you preemptively meet the opponent’s air approach in midair.
236A: If used preemptively as an antiair, the high vertical hitbox will catch a lot of things. The extended hurtbox means this often trades with jumpins, which means you get a full combo for free with dash 2C instead of being forced to EX cancel if you want decent reward.
Backdash: Very quick total animation, good travel distance, and average invul make Nanaya’s backdash all around very good. Use fuzzy backdash input [1] > 4A+B > [1] to minimize risk.
2A: Solid mash option. Although it’s not 4f, it has excellent horizontal and vertical reach that allow you to just press it in situations where reversal jab normally wouldn’t connect.


