Disclaimer: If you find an error, or feel like you have more up-to-date or relevant information, please let us know. We’re able to update our current material after the fact, create addendums, and generally revise our process for greater accuracy and effectiveness, so don’t hesitate to tell us.
Written by: @AStupidpenguin
Edited by: @MeltyMedia
Frame data on specials gathered usi
ng the frame advance tool
All the images were pulled with framedisplay, this is a link to the images used in the guide https://drive.google.com/open?id=0B8CpksVCCwA5ZzRhM2t3RVk4MHM
Note: 214() represents an orb being detonated. [] means a move is charged. X refers to any button of the orb series.
Contents:
1. Introduction
2. Ground Normals
3. Air normals
4. Specials
5. Combos
6. Okizeme
1. Introduction
What is C-Roa?
With a combination of extremely strong zoning, setplay, and pressure, C-Roa is a character who is centered around exploiting a mistake from your opponent to an absurd degree. If you like locking down your opponent, flashy pressure and combos, or just want to play a scummy top tier, and are willing to put in the work, C-Roa just might be the character for you.
Roa’s gameplan revolves around getting into a position to set his horizontal lightning orbs for his zoning game or starting up his pressure. Part of what makes the character so strong is that he is capable of performing both so well that any characters able to deal with one aspect of his gameplan will usually get blown up by the other. For instance, C-Arc, due to her myriad of reversal options and the massive reward she gets from landing her strong abare, is very risky to pressure. However, she lacks any sort of zoning tool or full screen punish, so Roa can simply sit back and lock her down with TK orbs. Furthermore, Roa doesn’t have to commit to either tactic, as his zoning tools are also pressure tools, and his less flexible pressure tools let him set up his zoning tools, allowing him to go from zoning to pressure or vice versa freely in response to the flow of the match.
He can have some difficulty getting started, but once Roa gets his offense going, it’s almost impossible to stop. His orbs let him dominate neutral and almost completely shut down his opponent. His ability to cancel his specials into his other specials allows him to have terrifying pressure that does absurd chip and guard damage, forcing your opponent to take a gamble heavily skewed in your favor, or if they are playing h-moon, spend 100 meter to try to return to neutral.
Defensively, Roa relies heavily on his Heat, which is likely the best in the game to its quick startup and enormous size. Heat does much more for Roa than most characters, as a successful Heat results in Roa getting orbs out which lets him start his zoning. Outside of that, he has a meterless DP, that while sub-par, is functional. While his fast 2C makes for solid abare, his
lackluster 2A and 5A can cause some difficulty getting out of pressure. For Roa however, landing abare, even on block, is huge as he can push the opponent out far enough that he can get his offense set up.
Although he has minor flaws defensively, C-Roa’s unmatched ability to control the flow of the game alongside monstrous okizeme and pressure makes him quite possibly Melty’s strongest character. He takes effort to learn and play, but rewards it more than anyone else.
2. Ground Normals
5A- frame 5 mid, whiff cancelable. kinda stubby, and the outer hitbox will whiff on most crouchers. The inner hitbox is great for staggers and tick throws, and when further out the move is solid for reverse beating into as well as catching jump outs. It doesn’t push Roa very far away so it’s useful for the anti-hmoon bunker OS and since it hits crouchers you can use the anti-heat OS when resetting your pressure.
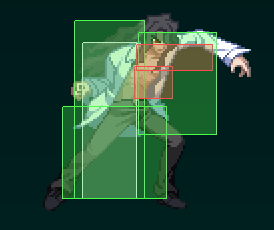
5B- frame 9 mid with an exceptionally long reverse beat window. It can be whiff canceled into for staggers and can be used after 22C(0) at distance to continue blockstrings as it will beat out most 2As.

5C- frame 9 and 22. 2 kicks that hit mid. Really you should always be canceling before the second hit on block, as the first hit getting ex blocked will usually result in the second hit whiffing and you dying. On top of that people can bunker out between the two hits.
That’s not to say that the second hit is useless, 5C(2) is difficult to get over due to its height and covers a large area while active as it covers 2 sprite states over 7 active frames. Additionally it moves Roa forward quite a ways, so it can be used as a sort of way to get back in after getting pushed out by your pressure while throwing out a hitbox that will challenge attempts to escape. It’s situational for sure, but in conjunction with plus specials like 236[A]>22A and 236C, you can use 5C(1) whiff to some strong results.
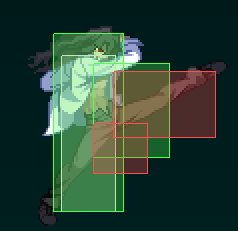
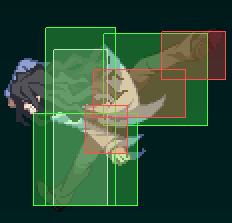
2A- frame 5 mid. The normal of choice for Roa’s extended staggers and a good normal for tick throws. Like his 5A, it’s a bit stubby so it’s not that great for abare.
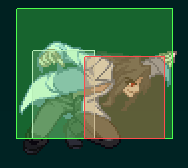
2B- 8 frame low. Another decent normal that can be used to follow up 22C(0) at distance, when spaced properly it will beat out most 5As, but it will lose to 2A mash.

2C- 9 frame low, hard knockdown.
A solid 2C that slides Roa forward and has a small disjoint, it’s useful to call out jump outs due to causing hard knockdown and having a hitbox that extends rather high up. Helps Roa establish presence in pressure outside of 2B range.
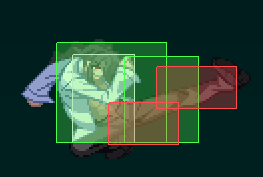
Can be used as abare to challenge characters able to pressure outside of the range of 2A as it is relatively quick and since it moves him forward so much covers a large amount of ground. The disjoint will cause it to beat out a number of normals, like Nero’s 2B before frame 13 and F Nanaya’s 5B, and its relatively low startup lets Roa contest more than he would otherwise be able to.
Good places to look to use it as abare are after a Reverse Beat into 2A/5A when you think they are going to follow up by poking to try to catch a jump, pokes after moves that are neutral or minus, such as F-Sion using 236A 2B, or when your opponent is using repeated non-disjointed pokes. Keep in mind though, while it’s quick and moves him quite a ways, it will still get blown up by big disjointed normals such as Warachia 2C, C Nero 5C and the like.
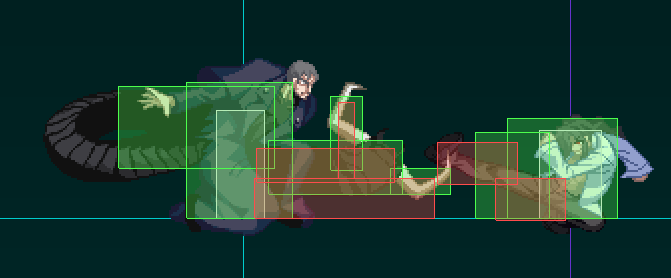
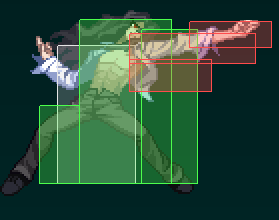
6C- 12 frame Reverse Beatable mid command normal. Solid for calling out jump outs from too far out to use 5A, and more reliable than 2C or 5C due to hitting higher up. Generally, when using it to poke like this, cancel into 22C when farther out to get a hard knockdown on hit and plus frames on block, and 5a when a bit closer to whiff cancel back into your blockstring or confirm into 22C on hit. One strong example of this kind of tool is distanced 5C(1) reverse beat 5A whiff cancel 6C>22C, which is a solid way to spending 1-3 22A charges to reset pressure.
3. Air normals
J.A- 6 frame mid. Roa’s go to air to air, it’s quick and can be canceled into itself, letting you confirm or air tick throw. You can use it to cancel your forward airdashes while running away to get to the ground quicker.
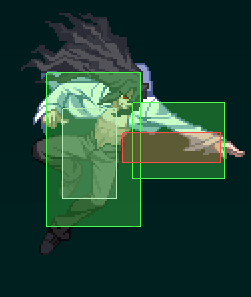
J.B- 7 frame high, Roa’s usual jump outside of the corner as it won’t push the opponent out nearly as much as J.C on block. It’s active for 7 frames so you can use it somewhat early when you are jumping in so you don’t run the risk of being airthrown. Used as an air to air for opponents under you.

J.C-8 frame high. Used heavily in IAD shenanigans as its long reach and ability to link into 2B lets Roa combo off airdash back J.C, which plays a large part in his mixups and okizeme. Another solid air to air for opponents under you, but since it’s less active than J.B its less useful for scrambles.

4. Specials
22X Series- The 22X series is moves that charge his lightning counter and uses it. Can be used to cancel his 214 series as well as his 236 A and B.
22A- gives 1 charge. Charges change the properties of 22C and increases damage. The animation is cancelable after frame 20.
22B- gives 3 charges. Much slower at 37 frames, and when used removes some of the properties from his 22C. For general purposes just ignore it, 22A is usually a much better option.
22C- Frame 16. Spends all charges and causes a vertical bolt of lightning to come down, the properties of the bolt depends on the number of charges:
0 charges- +3 on block, can be confirmed on reaction into 2A/5A on hit and into any normal on counter hit (use 2b at distance). Hard knockdowns airborne opponents.
1-3 charges- Recovers much faster, which allows Roa to perform longer lightning loops. +15 on block so you can dash back in to reset pressure. Launches grounded opponents, but is techable and can be difficult to confirm off of. At range when being used to get back in, make sure that you use a normal before using it that makes an airtight blockstring, as it cannot be confirmed off of on reaction. Having a hit of 5C or 6C gives you more than enough time to confirm so you can follow up with 5C(1) on hitconfirm.
4/5- Slightly more plus than 1-3, but anything above 4 charges should generally not be used outside of combos. Launches grounded and airborne opponents high enough to allow for an orb to be set before they hit the ground, allowing for big damage without pre-existing orbs. It detonates all existing orbs. The importance from this level of lightning comes from allowing Roa to do big damage without needing orbs already out, since 2C>6C>22C(4/5) lets him put out an orb, cancel it into 22A, and catch with 2A.
6- Same properties as 4/5 but is additionally air unblockable and causes Circuit Break.
7/8/9- homing air unblockable launcher. It will whiff dashing/fast moving opponents, but can be used to get easy resets into big damage off air techs. Detonates all orbs.
236X Series– Horizontal lightning series, important to Roa’s pressure and combos. Being cancelable into orbs, it lets him have presence outside his normal pressure range and have options to get out more orbs and 22A charges instead of immediately having to cancel into an orb detonation to get back in from longer distance. It can also be used midscreen in blockstrings to push out the opponent to create distance.
236A- A horizontal bolt of lightning. Cancelable into 214X and 22X. Uncharged it is frame 14 and minus 3, however canceling into buffered 22A (must be input very quickly, within the first 14 frames of 236A) makes it +4. Charged it is frame 25, +8, and is cancelable into 236B. Canceling into buffered 22A reduces recovery by 1 frame. Can be used as a repeated poke outside of pressure range for normals if you have an orb out and your opponent is scared of delayed orb detonation/236C.
236B- Less plus with slightly longer startup at 16 frames but hits twice. Primarily used to cancel 236[A] at the end of midscreen blockstrings to push your opponent further away to set orbs, or quickly canceled into 214C>236C to hitconfirm 236[A]. Uncharged it is -3 and if canceled into 22A is +2, Charged it is frame 23 and +6. When canceled into 22A it is +5.
236C- This move is what you’ll be spending meter on. It OTGs, it’s air unblockable, pretty fast, almost fullscreen, and plus on block. In neutral just having the meter for it can scare your opponent out of trying to do any sort of zoning, and in pressure you can use it to get out orbs that are airtight on both ends or at the end of your pressure strings to blow up fuzzy jumps. On hit it does an untechable wallslam into a techable knockdown, which lets you dash or IAD forward to catch them with 2C and combo them or just set up TK orbs. You can use it to confirm things you normally wouldn’t be able to, like hitting with a charged TK orb from fullscreen.
It can also be used to punish grounded techs as it’s air unblockable, but since it also OTGs you can time it so that it will catch every option off a soft knockdown. The most notable use of this is giving Roa a guaranteed tech trap/missed tech punish off grounded throw that leads to orb setups or oki.
Defensively, it’s a great special to cancel shield into due to its speed. Since it’s plus, it wins the interaction when blocked as well since you get to start a blockstring. As a result, shield>236C is a solid way to deal with safe jumps.
It can be shielded on reaction so it won’t do much against an airborne opponent in neutral state, but due to it’s very low recovery, it’s unpunishable by most of the cast on EX Shield except at point blank, so it can be used to try to call out jump outs or blow up attempts at zoning without much repercussion, but watch out for characters like Hime who can punish it off grounded shield.
214X series- Roa’s orb series. Each button is bound to an orb, and is used to both set and detonate its designated orb. The orbs have two states, uncharged and charged, and last for 13 seconds before disappearing. Uncharged orbs will hit once and are +19, while charged orbs will hit five times and are a whopping +27. Grounded orbs are air unblockable. They can be set can be canceled with 22X and 236C, while air 214[X] set can be canceled with 214[X] as well as being jump cancelable.
His j.214[X] orbs are almost fullscreen, unreactable, air unblockable, jump cancelable, and cancelable into more orbs. They can be TKed, so use the input 2147[X] to do them close to the ground. He can link two orb detonations of the same height to confirm into a loop or into 22C for hard knockdown. Roa getting out a single orb can very well be the end of the game, which means characters without a very quick fullscreen whiff punish need to stay on top of him constantly.
Uncharged air orbs are air blockable and do not cancel into each other, nor will they link into orbs at the same height. Resultingly they are very rarely used.
Air orb detonation is jump cancelable, allowing Roa to safely detonate orbs while in the air or for pressure shenanigans like 2147([X]) IAD JC to get overheads in airtight blockstrings
623 Series- It’s a DP, nothing too complicated but there are some quirks. It can also be used in the air to end combos.
623A- air unblockable, but its short range limits its functionality. Can be used in the air and then canceled into EX DP to close out rounds. Air version is air blockable.
623B- A true meterless reversal. Comes out on frame 4, invul until frame 6. Only frames 4 and 5 are air unblockable, so it really shouldn’t be used to try to beat jump ins. Air version is entirely air blockable and lacks invul.
623C- Fully air unblockable, moves Roa much faster. Wallslams. All the hits need to be shielded individually, so it can be hard to deal with. Generally not worth the meter but it can be good situationally. Air version is air blockable, but has invul, so it can be used to beat airthrow resets and air meaties if you feel like taking a massive gamble.
Arc Drives- Unsafe and lacking invincibility, Roa’s AD does solid damage, but isn’t overly useful outside of combo filler.
Arc drive OTGs and does damage. It’s also unshieldable and air unblockable so you can use it to call out jumps but you’re better off using other options.
Another Arc Drive – Air unblockable and unshieldable. Doesn’t OTG, but can be comboed off of and resets OTG/wallslam counter. If people aren’t respecting your wakeup blood heats and immediately teching the wallslam, you can punish the tech with 236C and then another arc them, which gives you about 7-9k depending on if you have more than 4 charges of 22A. It’s a gimmick and you can’t do it on reaction to the tech, so don’t try to rely on it, but it will certainly make them calm down with their techs.
5. Combos
Basic Combo Intro
Roa’s combos revolve around his lightning loops, done with his 214 series and 22C. The basic concept is that an orb has enough hitstun to set another orb and immediately cancel into 22C, which can be linked into the orb to OTG relaunch.
As a general rule ending with orb 22A will give you better pressure and combo options, while ending with TK orbs is better for a more zoning focused approach to the matchup, and generally a better option outside of the corner. If you are slightly off the corner and want pressure, use b and c orb so that the orbs will be all the way in the corner.
The combos in this guide are unoptimal for simplicity. For more complex, higher damage combo optimization, check out Ragu’s C-Roa Combo Theory and Easy Combo Intro (link located at bottom).
I made a short video of these combos with the inputs displayed, so if you are having difficulty with the timings, you can use it as a reference. https://www.youtube.com/watch?v=odZWvvh3Qi4
Simple resourceless damage combo
2C>6C>JC,J.B>J.C>JC,J.B>J.C>airthrow
Easy and basic, gives decent damage without any resources, but doesn’t give any orb setups. Airthrow can be replaced with 623A>623C for higher damage. No reason to use this combo unless it will kill, orb setups are far more important.
Corner variant
2C>236A>22A,5A>JC,J.A>J.B>J.C>JC,J.B>J.C>airthrow
The 236A>22A,5A link can be a bit finicky. If you’re having trouble getting it you probably just need to cancel 236A faster. If 5A doesn’t come out it’s getting eaten by 22A. Same as before, no real reason to use this combo except to kill.
Basic charged orb combo into setup
2C>214[A]>22C,214(A),214[A]>22C,214B>22A
Simple combo to get out 2 orbs and let you meaty with a normal. The loop can be done with B orb as well, and C if in the corner. The end after 22C can be replaced with 2 charged TK orbs then cancel into detonation of the grounded orb if you want to have horizontal orbs.
Basic uncharged orb setup
2C>236A>214B>22C,214(B),214B>22C,214(B),214B>22C,214C>22A
Using uncharged orbs gives more damage as you can do two loops, but sets you up with uncharged orbs, which have less combo potential and aren’t quite as good in pressure.
Same as the charged orb setup, you can forgo the second orb and 22A charge for TK orbs. A orbs will work as well, but don’t hit out quite as far as 22C, and 22C will whiff on some characters at max range 2C
Lightning loop off basic orb setup
2C>6C>214(X),214X>22C(1),2A>6C>214(X),214(X),214X>22C,2A>6C>{214(X),214X>22C,}*3 214X>22A
Having 2 orbs and a charge of lightning lets you do 5 reps. Omit the first rep if you don’t have a charge of 22C and the second rep if you only have 1 orb. If you have a charged orb, do the first rep with the uncharged orb and then on the second rep detonate the uncharged orb first, it will make the combo scale better and do more damage.
Combo for 4+ charges of 22A
2C>5C(2 hits)>22C,214B>22A,2A>6C>214(B),214(B)>22C(1),2A>6C>{214(B),214B>22C,}*3
If you have any orbs able to hit at the start of the combo, make sure to detonate them before using 22C(4+), as 22C(4+) will detonate the orbs which will kill the hitstun of 22C(4+), letting your opponent tech out of the combo.
2 TK orbs
5C>236A>214([X]),214([X]),214[X]>22C,{214([X]),214[X]>22C,}*2 214X>22A
For use when you have two TK orbs out. If you don’t have any charges of lightning you can put 22A between the orb links letting you get another rep by catching with 2A after 22C. If you have a grounded orb as well, detonate it after the two TK orbs and you will be able to do a 2A catch after 22C
100 Meter oki combo
5C>236A>214C>236C dash forward 2C(slide under)>2147[A]>2147[B]
Gives solid damage and sets up for Roa’s left/right okizeme.
Gold airthrow combos
If you have an orb out, you can do airthrow>2A>6C>214(X) to start loops, keep in mind the airthrow itself counts as a knockdown. Likewise if you have 4 or more charges of lightning you can do 22C after 6C to go into the 22C combo.
airthrow,2A>6C>22C,(214X>22A) or (2147[X]>2147[X])
Low damage, but gives hard knockdown and orbs. Against most characters you can do 5C(2 hits) instead of 6C for more damage.
100 Meter
Airthrow 2A>236C 66 2C TK orb*3
Gives okizeme and more damage.
6. Okizeme
Roa’s strongest oki tool revolves around a unique interaction between his orbs and the game’s crossup protection. If jumping over the opponent puts you on the same side as a tk orb relative to the opponent, when the orb is detonated, Roa will turn around and the crossup protection normally present on orbs won’t be activated.
https://www.youtube.com/watch?v=kU38o0zfOu0
Midscreen
Here is a video of both of these next two setups for reference
https://youtu.be/Pi9OUPSNOCk?t=15m17s
OTG charged orb detonation, 2C>TK Orb*3>orb detonation, (jump forward orb detonation crossup)/(airdash back J.C,2.B)
A favorite of Red Melon, a simple powerful setup that’s hard to block, gives solid damage, loops back into itself, and leads smoothly into pressure. Some notes, 2C is done immediately after the orb detonation for a hard knockdown, and you must be right on top of them so that the orbs will be on the other side of your opponent.
124C>236C, 2C(Slide under) TK orb jump cancel forward (airdash back J.C)/( 214([X]),land,214(C))
Strong oki that gives good damage. 236C distances them from the corner, so you can use this to set up okizeme in the corner.
Additional resources
Tonberry’s “How to be a terrible human being” tutorial series- specifically pressure, oki, and mixup sections for a more advanced look at these areas. Largely ignore the combos section, Ragu’s combo tutorial is a better resource.
https://www.youtube.com/watch?v=kuLMwPY6rZc
Ragu’s C-Roa Theory and Easy Combo Intro ENGLISH
https://www.youtube.com/watch?v=N6r2sDhkQe4
Mizuumi wiki page
http://wiki.mizuumi.net/w/Melty_Blood/Roa
