Disclaimer: If you find an error, or feel like you have more up-to-date or relevant information, please let us know. We’re able to update our current material after the fact, create addendums, and generally revise our process for greater accuracy and effectiveness, so don’t hesitate to tell us.
Written by: Inso
Hitboxes by: heavymetalmixer
Pros
– Strong neutral game
– Versatile space controlling projectiles
– High damage punishes (5B/C starter)
– Can force hard to disrespect situations on wakeup
Cons
– Limited Okizeme without spending meter
– Subpar mixup game
– Has trouble creating ambiguous pressure
– Air normals are weak in air-to-ground
Overview
A traditional projectile zoning game isn’t too strong in Melty since it requires you to sacrifice mobility, but this character’s set of projectiles is versatile enough to work also for offensive purposes. She can harass even at full screen, making life difficult for everyone. By throwing out the right projectile at the right time, you can restrict your opponent’s movement and focus on how to approach. Her normals are also effective in taking advantage of the situations she creates and in scrambles.
Normals
5A
Decent anti-air, doesn’t hit crouchers.
6AA
Good for creating frame traps from 5A or hunting back dashes midscreen. By regular H-moon rules, the second hit can only be canceled into specials.
2A
Rather slow, but good range. Not a low.
2B
Fairly active sweep-like move that trips the opponent but doesn’t give hard knockdown on air hit. It can also be used as anti air when properly positioned because of how low to the ground she sticks, low profiling a lot of moves.
5B
Her best combo starter, can catch jump outs when properly spaced. Has a short cancel window by Melty standards.
5{B}
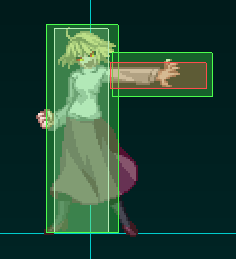
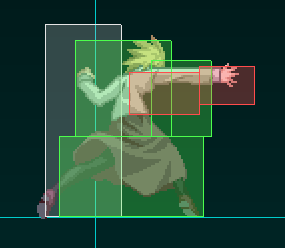
Half charging 5B makes it a 2 hit move and moves her forward more, increasing the move’s reach. The first hit will trip crouching opponents so you may need to adjust the combo in case it hits.
5[B]
Full charging 5B makes it an overhead and grants a short period of armor just before going active. Too much proration to be scary but pretty good range for an overhead.
5C
Fastest normal outside of 2A/5A so it is good for interrupting pressure. Might whiff on some low profile moves, or blocking female crouchers if done at max range.
5[C]
Fully charging it extends the reach and makes it a really slow but quite damaging unblockable. Mix it up with 5[B] to catch people sleeping.
2C
Has the longest reach out of all her normals and is a low. It’s possible to connect with 623B for a combo unless you are too far.
3C
Slow and armored attack that hits low and gives hard knockdown. Punishable on block if done too close. Hitting on OTG always launches the opponent at a specific height, making it consistent to combo of from (by linking a 5C) regardless of gravity.
j.A
Decent air to air move, slightly slower than j.B so you won’t be using it much outside of combos.
Her only air normal that hits overhead. Great air to air move due to its range and priority. To get maximum damage when expecting air counter hit I suggest buffering airdash behind the first hit so the second doesn’t come out. Also very strong when used defensively while air dashing backwards. If used in air to ground situations it must be done either high enough so that she falls with the second hit at ground level or low enough that the first hit will connect with crouchers.
j.C
Good vertical hitbox to challenge from below. On hit, will send the opponent upwards. Is not an overhead.
j.2C
She spins around hitting in a circle with her claws. Mostly a combo ender for a little more damage and meter gain, although it creates distance between you and the opponent. It has armor through all the active frames so it could be used to challenge in the air, but it is punishable on block.
Specials
236A/B/C
Reppuken style grounded projectile, air unblockable. They are hard to confirm into combos on regular hit, but really easy on counter hit, which can make people really scared of pressing buttons on her pressure. The A version comes out faster, travels slower and is negative on block at point blank, but it can give you frame advantage if you do it from a distance (about 5B max range).
The B version comes out slower, travels really fast and is slightly positive on block at point blank. The EX version is her only true reversal, but can sometimes be punishable on hit and deals very little damage.
214A/B/C
Blood Ring projectile, travels slowly and stays on screen for a good amount of time. The grounded version isn’t really useful for this moon since 236 fares better. The only situation where you want to use them is to force a favorable trade against attackers from the air. The B version releases two blood rings and is EX cancelable.
The EX version has some invincibility on startup but not enough to serve as a reliable reversal, however it is positive on block so a good risk to take sometimes.
Forward striking teleport, launches and is jump cancelable on hit. This move is very useful as it gives this particular moon the chance to confirm combos from far outside of her normals’ range. The A version can also OTG and lead to a combo. Negative but safe on block and EX cancelable. The B version reaches farther so it’s the one you’ll be using more often, but it is very punishable on block. The B and EX versions are air unblockable.
The EX version has no invincibility but after she teleports she can’t be stopped, so if the opponent is at advantage but can’t interrupt you fast enough it is a good escape option. Since she travels a predetermined distance, can be slightly positive on block if done at max range. If it hits, she will catch and throw the opponent over her shoulder and you can combo if sufficiently near the corner.
421A/B
Defensive teleport, it’s recovery can be canceled into forward teleport. I couldn’t find much use for this move except maybe mixing up your pressure or baiting heat in some situations, but there are other ways to do both so you don’t really have a good reason to. She barely moves back for A version and moves a few steps behind on B version.
22A/B/C
Mystic Eyes. Fullscreen head-level invisible attack, if it catches the opponent doing something leads to high counter and can thus be comboed from any distance. Doesn’t hit crouchers. The A version comes out faster but has a lot of recovery while the B version is the opposite. The A and the EX version can OTG. Can also be done in the air but it is harder to hit and confirm, serving only for specific combos.
j.214A/B/C
Far more useful than the grounded version, air blood rings will be your main space control projectile on neutral, covering your approaches or retreats. When it hits, it hits so hard it actually freezes the game, and getting a counter hit on them can almost always lead to a combo. The A version doesn’t stay on screen for long but it keeps your jump momentum while leaving you in counter hit state until you recover on the ground, so it is usually a good idea to use in tandem with air dashes. It can give you frame advantage if spaced properly.
The B version will hold you in place until she shoots a blood ring that stays active for a long time, and after that you can use whatever air movement options you have left.
The fact that you can air dash backwards sooner than you can air dash forward makes it harder to use it offensively. The EX version has some invincibility, can be used at the end of air combos after an airdash, and is the only way she has to set up good okizeme.
63124C
Costs 150% meter and works similarly to 623C, but has a larger hitbox, bigger range and is easier to combo from. Also air unblockable and hits OTG.
Arc Drive (41236C)
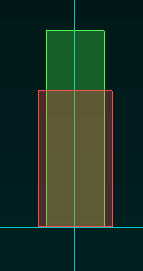
Drops the Moon on the enemy. Has a really thin but vertically long hitbox above her hand on activation, if this hitbox catches the opponent, the Moon descends fast. It may be used to catch people right above you but I wouldn’t advise going for it since it isn’t that fast and you can be hit out of it. If the hitbox misses you go invincible while performing a summoning animation, after which the falling moon will stay on screen slowly descending until it hits the ground as an unblockable that nets you a combo opportunity. Getting hit or thrown while the moon descends will cancel the whole animation, and since while summoning the opponent has enough time to lock in on you it’s not really worth going for. Plus the unblockable can still be avoided or mitigated in a number of ways, so it is a hard to pay off gamble.
Neutral
Ideally you don’t want to go directly against your opponent in most situations because that is not what you excel at and things can go wrong. Instead, you want to abuse your non-committing tools to hunt for counters while you advance or retreat (think SF4 Akuma air fireballs).
Reppuken gives you some control of the ground, forcing your opponent to take to the air if he doesn’t want to block it. Then it is up to you to challenge him in the air with j.B/C, run under 2B, or hide behind blood rings, either way, it is important to stay mobile and to never corner yourself.
Proper blood ring spacing is very important, as well as being aware of blind spots. The higher you do it the greater the gap between you and the projectile, and the lower you do it the less it covers the air space above you.
Offense
In the corner, ending combos in air throw gives you very little to work with regarding oki, but as long as you have your timing right, your 2A will beat out buttons or jump attempts, and you can even mix between 2B/5B to discourage shielding. If you get hit by wakeup throw or mash it is because you were too late to press anything (it can happen). There isn’t much you can do to deal with reversals other than baiting, and to that purpose defensive teleports might be useful if you need to worry about multiple options (such as command grab and/or DP).
To gain good oki, you need to finish combos in air EX Blood Ring, which gives you enough time to set a safe jump or projectile that will leave you at greater advantage.
On pressure, you can rely on 5{B} and 5A6A to re approach, and her whiff cancel 5A recovers pretty fast. Despite the fact that properly spaced Reppuken helps maintain frame advantage, it creates obvious gaps a smart opponent might think to disrespect in creative ways, so I suggest you use sparingly to that end and more for hunting counter hits.
Her basic mixup is 5[B] overhead and half charge 5C into 2B, but neither lands good damage. She can also get some mileage from ground throws in the corner taking advantage of a no tech situation with 623A or 3C OTG, after she establishes techs to any side can be punished by OS (walk back 2B). Punishing throw tech or mash attempts with 5B (for damage) would be a way to get high damage.
Defense
Your neutral game is your best defense. Once you are forced to block, you’ll probably need to spend meter to get out unless you wait for the opponent to push himself out or are willing to risk 2A mash. H-moon bunker or 623C during a gap are the most guaranteed ways to get out. Alternatively, you can try 214C if you know the opponent has committed to something and won’t likely be able to avoid the move.
Useful links:
https://www.youtube.com/watch?v=nB4pzHM7UAY – Combo Video by Texas Tim


![5[B]](https://drunkardshade.com/wp-content/uploads/2015/12/5b.png?w=1060)


