 Disclaimer: If you find an error, or feel like you have more up-to-date or relevant information, please let us know. We’re able to update our current material after the fact, create addendums, and generally revise our process for greater accuracy and effectiveness, so don’t hesitate to tell us.
Written by: Naast
Japanese wiki: http://www24.atwiki.jp/seifukuakiha/
Match videos: http://www.meltydb.com/resultall.php?1c=seifuku&1m=Crescent&tdb=any&filt=any
Pros:
- High damage
- Any hit leads to a corner carry
- Good pressure
- Very strong okizeme
Cons:
- Poor anti-airs
- Bad wake-up options
- No rapid-fire A normal
Combos:
- ground chain (e.g. 5A 5B 2B 6B 5C) > 2C 6C 214A j.BC dj.[C] dj.A (whiff) j.214A (land) dash 214A j.BC dj.[C] > setup
Essential combo for Seifuku. Full corner carry. The j.214A has to be delayed as much as possible. In the corner, the double jumps have to be vertical jumps (8). A standard ender for this combo would be to setup a j.22 pit (A/B depending on distance, C if you want to spend meter), charge it to activate it as a meaty or keep it up to activate it later during pressure.
Editor’s note: I found it easier to do the air portions of this combo as j.ABC 95[C]~+[E]. This way you add another input (neutral air E) which counts as another attempt for an aerial [C].
- ground chain (e.g. 5A 5B 2B 6B) > 5C 214A 5C j.BC dj.[C] dj.A (whiff) j.214A (land) tk j.214A dj.C (land) j.BC dj.[C] > setup
Going straight into 214A from 5C instead of using 2C leads to higher damage. The tk j.214A route is harder but more rewarding.
- ground chain (e.g. 5A 5B 2B 6B) > 5C 236C 6B 5C 2B 2C 6C 214A j.BC dj.[C] j.A (whiff) j.214A (land) 214A j.BC j.[C] > setup
Corner combo that uses 100% meter. C-Seifuku is not very meter dependant. 236C combos from 5C and from any counter hit normal, and is very + on block so you can use it during pressure.
236C > 6B is technically a 2f link, but there seems to be a 2f buffer specifically for 6B (and 6C) which essentially makes it a 4f link.
- 5[C] 2C 214A 5C > …
Midscreen overhead combo. In the corner, because of the wall bounce from 5C, the full 214 loops are not possible.
- 5[C] j.[C] j.214A double jump j.C (land) j.BC dj.[C]
Corner overhead combo.
Neutral:
Seifuku has decent ground pokes, but no reliable anti-air. Her strongest options are in the air. You will need to be mobile and put yourself in spaces where your tools are at their strongest.
Her ground dash is useful when you need space, as you can dash under aggressive opponents and reach the other side of the screen quickly.
- j.236B covers a huge zone in front of her. It doesn’t lead to any real damage, but is still a very important tool for Seifuku. j.236B is two frames faster than j.236A

- j.214A/B will be your most important tool in many matchups. It is jump cancellable on block/hit/whiff, can lead to her BnB and is pretty safe to just throw. Combined with j.236B, Seifuku can control a very wide space. Be careful though as some characters can punish it with ease.

- j.B will be your main air-to-air. It has a great upward hitbox and 4 active frames which makes it a good normal to fish for counter hits with.

These three moves will be your main tools in the neutral game, but you will obviously need more than this.
- j.A is a decent normal to use when the opponent is below you. With 6f of startup, it is her fastest air normal. It’s still not an ideal choice, and when going air-to-air you’ll generally want to be either in front of them or below.

- j.C is not useful as an air-to-air move, but is great for air-to-ground. It can hit behind her although the hitbox does not extend very far behind.

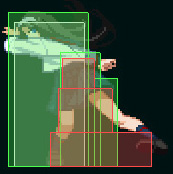
5A 5B 6B 2C pics
- 5A/5B/6B/2B. These normals are good pokes with decent hitboxes, which is made even better by her very fast dash if you want to get in that way. Her B normals can also be used to stop ground approaches.
- 214A can be used as an anti-air but is very risky. It can not be air blocked, and leads to her BnB.
- j.236C has a lot of (strike) invincibility. If the opponent shields one of your air normals, you can beat their counter clean with j.236C. You can also use it after an air held shield. It has even more range than j.236B and is very positive on block. It can be used as a defensive move against overly aggressive opponents. Its only con would be its lack of throw invincibility, but that should not be a problem in real matches. Each hit has to be shielded individually.
- 214C can be used as a fullscreen punish, for example against Heat activations.
Offense:
Pressure:
- 2A. Low. It’s her only normal that gives frame advantage at +1, so you will reverse beat into it very often. Can not be chained into itself. 6f startup.

- 5A is a standing low that you’ll want to use to start blockstrings. Can not be chained into itself and is -2 on block. At 5f startup, it’s her fastest normal so you might want to use it after half charge 5C for fake overheads.
- 5[C] is an overhead that does not lead to her full combo in the corner. Half charging it into reverse beat 5A/2A is a strong mixup. 30f startup when fully charged.
- 5B is another standing low. Good to catch jump out attempts. -2 on block.
- 2B is surprisingly NOT low. -3 on block.

- 6B is a long range poke that looks similar to her 5B (but does not hit low). Also good to catch jump out attempts. -4 on block.

- 5C combos into 214A and 236C without counter hit. As mentioned earlier, mixing between full and half charge is a good mixup. 13f startup without charge.

- 214A leaves her at -1 on block, but if spaced properly you can keep applying pressure. Since it can not be air blocked you can use it to catch jump out attempts.
- 236C is +9 on block and on hit, and combos from 5C or from any other normal on counter hit. If it is blocked, you get to reset your pressure. If it hits, you can score big damage. If you catch a jump out attempt with 5/6B 236C, you’re also rewarded with a full combo.
- The real threat lies in tk j.214A. If you make the opponent block it, you can jump cancel and force a jumping mixup, with for example…
-
- j.[C]. When fully charged, it gives Akiha a bit of upward momentum that can be used to create a fuzzy guard-like mixup with j.B (j.[C] j.B delay j.A to combo, or half charged j.C (land) 5A).
- j.[C] (whiff) command throw
- j.C airdash j.C
- nothing > airdash j.C
- j.C j.214A > repeat
Okizeme:
Any combo that ends with a j.[C] in the corner leads to her dangerous okizeme. Cancelling j.[C] into a pit setup (22), and then activating a charged pit on their wake-up lets you force mixups safely.
Some examples:
- j.[C] 22B, pause, 22[B] (land) super jump
-
- j.C 5A
- j.[C] j.B delay j.A 5A
- j.[C] (whiff) 5A
- j.[C] (whiff) command throw
- j.[C] 22C, pause, 22[C] (land) walk forward, forward jump
- late airdash j.C
- j.[C] j.B delay j.A 5A
- j.C 5A
- j.[C] (whiff) 5A
- j.[C] (whiff) command throw
- j.[C] (small delay) 22B airdash j.C
- j.[C] (small delay) 22B airdash j.[C] (whiff) command throw
