
Disclaimer: If you find an error, or feel like you have more up-to-date or relevant information, please let us know. We’re able to update our current material after the fact, create addendums, and generally revise our process for greater accuracy and effectiveness, so don’t hesitate to tell us.
Written by Arkhar, Proofed by Specs
Links
- Japanese Wiki: http://wikiwiki.jp/mb_len/
- Moves Hitboxes: http://imgur.com/a/5kSky
- Match videos: http://www.meltydb.com/resultall.php?1c=len&1m=Full&tdb=any&filt=any
Overview
Len is a “control” character. You have to use your zoning tools to control the match as much as possible and tilt it in your favor. As she is squishy, you have to think twice before committing to something in combat. In addition, she lacks a decent reversal, which makes her even weaker against opponents that lock you down easily.
I like to classify her three moons as follows: Crescent, focused on okizeme; Half-Moon, focused on mobility; Full Moon, focused on damage. F-Len has the most peculiar zoning tools, the mirrors (214A, 214B, … ), that are very helpful since they provide unique control options and can even help in pressure. Mastering these tools at a high level is very challenging, as it requires experience and good reads since one poorly timed mirror can cost you the match.
The focus of this guide is on showing how can you start with F-Len, with basic and advanced combos and mirror tricks. But the main key to mastering her is to practice a lot and learn to use her unique tools, as with any other character.
- Pros
Easy combos
Easy to pick up
Deals high damage
Good normals for air footsies
Good priority on normals
Small hurtbox
Catwalk (crouch walking)
Unique zoning with her mirrors (214 A, 214 B, … )
Advantage against zoners that rely on reflectable projectiles
Can apply afuzzy guard mixup with her j.C
- Cons
Suffers against rushdown characters
Lacks a decent reversal
Low HP
Linear pressure
No grounded overhead
Moveset Tables
Normal Moves
The following link shows frame data for normal moves (values from: Japanese Len Wiki):
Normal moves table
Special Moves
The following link shows frame data for special moves (values from: Japanese Len Wiki):
Basic Combos
Ground
Mid screen or in the corner.
5A 5B 5C 3C 623A jBC jBC AirThrow
This is her main BNB. Focus on learning this combo, as it’s easy with a bit of practice and does good damage.
Ground Throw
Mid screen this works only on specific characters, but is universal in the corner.
GroundThrow 3C 623A jBC jBC AirThrow
This one is even easier than the ground one, when used on the corner. Character specific when mid screen.
Air Throw
Mid screen or in the corner
AirTrhow 3C 623A jBC jBC AirThrow
Works against any character and can be used mid-screen or in the corner.
Advanced Combos
Combos With Mirrors
With mirrors that were already in place
Usually you can just throw the opponent at the mirror, after an air or ground throw. After a simple ground combo, and throwing at a horizontal mirror (214 A or j.214A). Those are usually hard to land, since the horizontal mirror causes a wallbounce.
5A 5B 5C 3C 623A jBC jBC AirThrow>Mirror Dash jBC jBC AirThrow
After a simple air throw combo, and throwing at a ground vertical mirror (214B or j.214B).
AirThrow 3C 623A jBC jBC AirThrow>Mirror Dash jBC jBC AirThrow
Place a j.214B mirror in mid-air to do this one. It´s a bit hard to land, but the damage is great. You literally have to move your opponent to the mirror, and without an air throw. See the linked video.
jC 5A 5B 5C 3C 623A Mirror j214B(TK) 214B jC jBC AirThrow
Mirrors Placed mid Combo
Ground combo, in the corner or midscreen.
5A 5B 2B 214A DASH 5C jBC jBC AirThrow
Ground combo, midscreen.
jC 5A 5B 2B 214A HighJump jC Lands jBC jBC AirThrow
Ground combo in the corner, grants okizeme with a mirror, only works on taller characters.
jC 5A 5B 5C 3C 623A IAD AirThrow Land 5A 2B 214A 2B 214A
Ground combo, mid screen, grants okizeme with a mirror, only works on taller characters
jC 5A 5B 2B 214A HighJump jA AirDash AirThrow Land 5A 2B
5A 2B Loop
This loop can be applied when the opponent is falling to the ground (obviously without the possibility of recovery). Usually the loop can be repeated three times in a row, assuming your positioning is correct and you have the timing right. It grants around 10~20% bonus damage to the combo. About the timing and positioning: the 5A needs to hit just before the enemy hits the ground, followed instantly by 2B. Here are a few examples of the loop:
Gameplay
Neutral
If your opponent uses projectiles that can be reflected, you can leave a single mirror in the middle of the screen (214A or j.214A) to limit their zoning. You can also spam these mirrors to assist with your own zoning. As an example, as soon as you release a 214A mirror, you can not set another 214A until the last one vanishes. However, you can instantly set aTK j.214A because the game recognises it as a different horizontal mirror.
The j.214B mirror can be used to intimidate your opponent and make them afraid of going over you. Place the mirror and lure your opponent to fight near it, as they cannot tell exactly when you’re going to activate it; that uncertainty itself is a form of pressure. If the mirror hits, you can get a good combo.
The projectile mirrors 214A, 214B, j.214A and j.214B can NOT be shielded by the opponent. Keep that in mind to improve your game control!
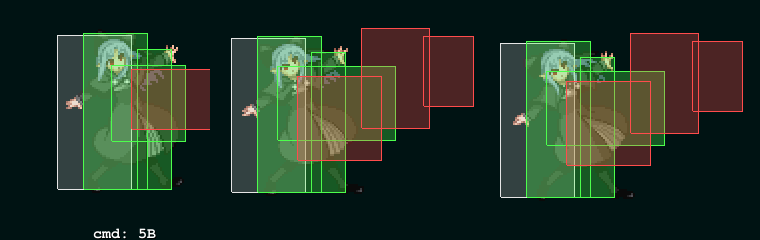
Another excellent zoning option is 5B. It covers a wide area that can be used to zone out your opponent, and when it hits, can be confirmed into air combos.
j.C is an excellent normal that can be used tocrossup and has a decent hitbox. Be careful when using it in the neutral game since it takes time to activate, leaving Len open to a counter hit. Also, j.C can be used to apply fuzzy guard, which can be very useful to pressure the opponent. An example can be seen on the following link (from another moon, but it´s the same idea in the end):
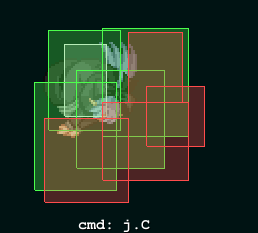
Len’s fuzzy guard demonstration
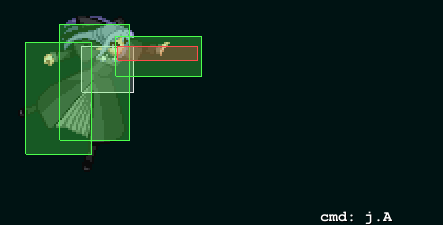
j.A can be used to trade hits in mid-air, since it hits faster than her other air normals. Try to fish for counter hits with it.
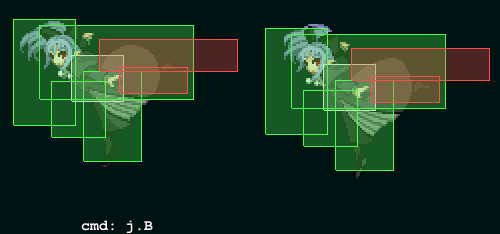
j.B is faster than her j.C, hits horizontally (situationally useful) and followed by a j.C can be used to apply fuzzy guard.
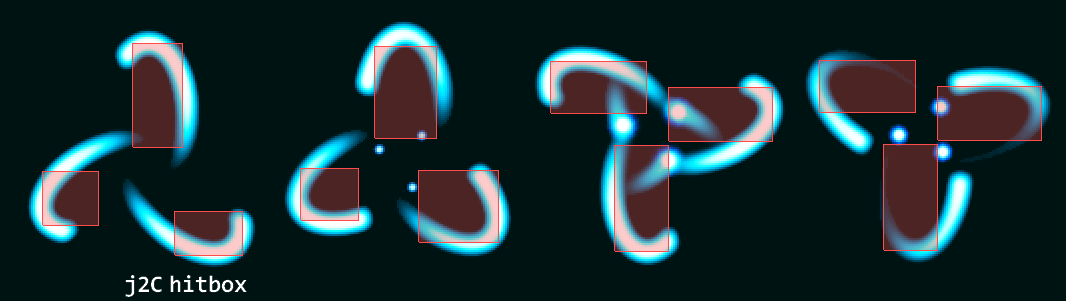
j.2C can be spammed, since it hits multiple times. However, it cannot be followed up by other moves to combo, unless it single hits as a counter.
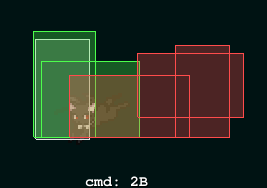
2B has nice priority and better range in this moon. When it connects, it grants a hard knockdown.
236X is another control option. 236A is a slow fireball, 236B is a faster one and the super 236C is slower, but hits multiple times. Be mindful when using them, since they leaves you open.
Offense
Your main focus in pressure strings will be applying frametraps (abusing of the priority of F-Len’s normals), tick throws and punishing jumps. Also, to break the opponent guard, the j.C fuzzy guard can be used, if setted up correctly.
Depending on your play style, you can focus on combos that give you okizeme or ones that put the enemy in a “tech punish” situation. Most Japanese players focus on the latter since they do more damage.
Mirrors set up on okizemes can be very helpful to maintain your pressure, since they cannot be shielded by the opponent. Besides, you can use them to help to confirm a fuzzy guard, or even to try to trick the opponent into guarding improperly:
Other than that, you can easily tech punish your opponent with F-Len’s 5B. This move has good range, and can be linked to her other normals (5C, 2B, 3C) to confirm a combo.
Defense
Reversal
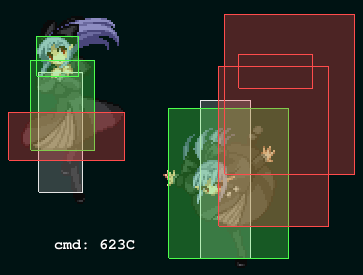
623C has horizontal range and usually trades with most normals, not being a good option as a reversal. However, you can go for an air combo if you successfully hit it:
Her AD and AAD can be used as reversals, and are very good options. Be mindful on when you use them, since they consume all your meter.
Catwalk
The “catwalk” (walking while crouched) is a unique tool that helps you punish an opponent that does not have much experience against it. When you are under any kind of pressure, try to pass under the opponent when they use some kind of air move, like an IAD for example. That way, the opponent will land and miss the hit, creating an opening you can capitalize on. Examples:
