
Disclaimer: If you find an error, or feel like you have more up-to-date or relevant information, please let us know. We’re able to update our current material after the fact, create addendums, and generally revise our process for greater accuracy and effectiveness, so don’t hesitate to tell us.
Written by Brick
Match vids:
http://www.meltydb.com/resultall.php?1c=ciel&1m=Full&tdb=any&filt=any
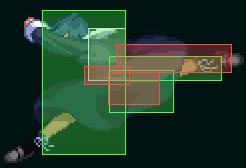
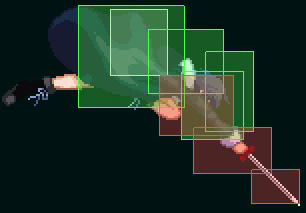
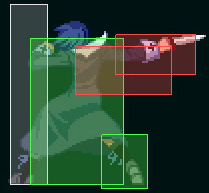
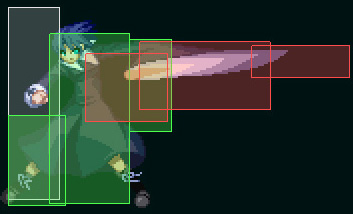
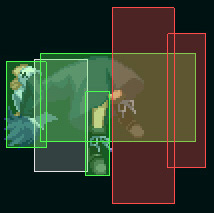
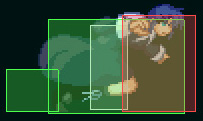
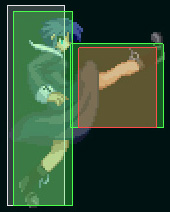
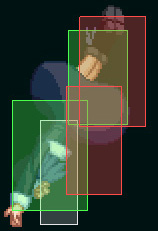
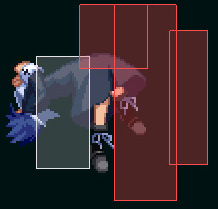
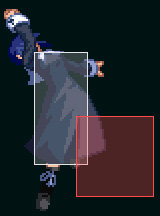
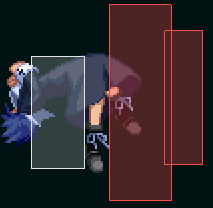
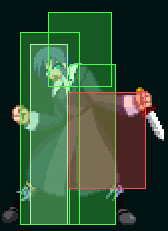
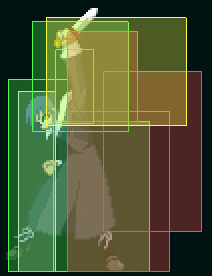
Hitboxes by bobo40k
Japanese Wiki
http://www19.atwiki.jp/mbaa-ciel/pages/1.html
Pros
Well rounded, lots of moves and options to choose from
Good movement options
Good pressure and damage
Very good anti air options
Gets a lot of use out of meter
Cons
Requires meter for a real reversal
Meter hungry in general if you make use of all her tools
Combos
*Here is a basic beginner combo that’s very easy to execute
5B 2B 2C 3C j.B j.C j.B j.C 22B AT
*A more advanced combo for better damage
5B 2B 2C 4C (2 hits) 236A 5B 5C j.B j.C j.B j.C 22B AT
You can start them from any jump in or A confirm. Can substitute the 22B for a 22C for better damage spending meter, but no oki at all. Only useful if it will give that little damage boost needed to kill. If you start the combo from too far, you’ll need to cut 5B or 2B, otherwise you will be pushed too far and 2C will whiff. You can cancel j.236B into 2B 2C and go into the combo from there if you hit a grounded opponent with it.
*Air counterhit combo
2C 4C(2 hits) 236A 5B 5C > air combo
Works the same as a follow up to shield counters. Works the same for any combo following a j.214C stun. In this case, you can add a 4[B] at the start to get even more damage.
*Golden Air Throw confirm
AT (delay) j.236B 5B 236A 5B 5C > air combo
You need to delay the j.236B so that it hits when the opponent is close to the ground and you can follow up with the rest of the combo.
*You can combo after 63214B if you are close to the corner. If you are close to the corner but not really there, the opponent will bounce between you and the corner and you can combo into 5A > Air combo or directly into 236C. If the opponent is in the corner when you grab them, they will bounce outside the corner and you can follow with a better combo
5A 236B 5B 5B > Air combo
Neutral
Quick summary: Take advantage of Ciel’s movement and air options, as well as her projectile attacks, to quickly switch between harassing the opponent and going in to start your pressure. Good anti airs and projectiles let her play a decent defensive game if need be.
Essential
As with most melty characters, you’ll want to spend a lot of time in the air. Fortunately, F-Ciel has a lot of options here, so let’s go through them
*j.C: very good air button, great horizontal reach and can be used as a “crossup”. Good to control space in the air and good jump in.
*j.2C and j.2[C]: very nice option to have, her divekick can let her alter her jump trajectory in addition to the standard movement options and can catch people unprepared, netting you some air counterhits. You can still combo out of it if you counterhit a grounded opponent. If you charge the move, Ciel will stall in the air while the typical charge flash is shown. Useful to add yet another option by delaying the timing with which she’ll hit, which can help in making the opponent commit a mistake. Charged version also gains interesting properties: unlike j.2C it must be blocked high and it’s special cancellable. In neutral, this move gives her another air option and as such, gives her better control of the air game. Mix up charged version and uncharged version to prevent the opponent from predicting the timing too easily and keep him on his toes.
*5A: her fastest poke that also has a decent reach, you’ll find yourself using this one a lot.

*5B: only 1 frame slower than 2A, if offers a good reach for a low hitting attack. If you find yourself trying to approach the opponent from the ground and playing grounded footsies, this is a good move. +1 on block.

*2B: similar to 5B, it trades some speed for a better reach.

5[C]: the charged version of this move is useful in neutral as a very good anti air since it gains clash frames. Even if the opponent manages to land and block it in time, it still yields +1 frame advantage. It’s useful even if the opponent is trying to bait anti airs by jumping and dashing away as it moves Ciel forward, throwing the opponent off, and it recovers fast enough. Can be used in the ground game if you’re gutsy and know your spacing as a sort of slower, far reaching, armored poke. This takes practice and knowledge though, as clash frames only activate for a certain part of the animation and only work on attacks that would hit the torso to head area (so no low attacks at all). In all cases, beware of multi hitting moves as they will blow up this attack.


*214A/B/C: her grounded projectiles. A version can be followed up by 623C into air combo (j.A j.C etc.) on reaction even from full screen (although a dash before 623C may be needed and the combo may be character specific). B version is not air unblockable, but it can still catch people carelessly coming at you or using normals/specials in the air. It has lots of recovery and can be easily jumped over or run under if the opponent is familiar with her, so don’t abuse it. It can be cancelled into C version. In the same way, C version can easily be jumped over and punished, but it has pretty good reach and causes hard knockdown even if only one of the projectiles barely hits. Use in moderation.
Important
*j.B: has a better downward hitbox than j.C so it can be useful as a jump in or an air to air in situations where the opponent is lower than you.

*j.214A/B: Ciel’s air projectiles. You can still air jump after throwing out A version, which makes its use in neutral pretty safe, but converting it into anything will be impossible in most cases. B version can be followed up two times by keeping 4 pressed and pressing B for each additional attack. You can confirm the first attack hitting into the followups for pretty decent damage considering the distance it can hit, or continue even on whiff to catch an opponent trying to go for a punish. This however is a pretty risky tactic as the recovery, especially if you finish the whole series, is huge and the only option you have after throwing the first one is either continuing with the series or falling to the ground. It’s an useful move, but don’t overuse it as the risk is high.
Throwing out the C version randomly is not worth it since it can easily be dodged and result in a simple waste of meter.
*236A/B: B version is air unblockable, good reach, but slow overall. One of the properties of this move that few people know about is that it’s cancellable in any EX move throughout its whole duration, even the recovery frames and even on whiff. This means that if someone tries to jump over this otherwise slow move and go for a punish, you can still save yourself with a 22C cancel on reaction.
A is not nearly as useful in neutral due to the smaller range and minor probability of catching someone at that angle.

Extra
*j.236A/B
These moves are rarely used in neutral, but A version can still come in handy if you find yourself in need to return to the ground and cover a lot of distance fast, for example if you end up on the opposite side of the opponent while still turned to his back to run away.
Offense: Pressure, mixups and okizeme
Quick summary: F-Ciel’s main offense plan is to take the opponent to the corner, where her okizeme game is the strongest thanks to her ability to use j.214C after air throw. She has lots of ways to open up the opponent, like many + on block moves and mixups such as overheads and command throws.
As with most F-Moon characters, if you manage to get close you’ll want to start your pressure with repeated 5A or 2A chains and staggers, mixing them with dash ins, instant air dashes to get back in and of course keeping up your strings and frame traps to catch the opponent mashing.
*On hit, you’ll want to go into your bnb. Ciel doesn’t really get much out of her air throw knockdown, especially midscreen, but her air throw is not ground techable. This, coupled with her ability to execute special moves after an air throw, gives her good options especially in the corner and with meter thanks to j.214C. j.214B and j.236A/B are other possible, albeit less rewarding and/or more risky options for no meter. Let’s take a look at each option.
*j.214C: as previously stated, her best and safest option, at the cost of meter. DP safe, will catch opponents trying to jump out or mash (although most people familiar with the character won’t press buttons after they see it). You want to delay your j.214C until when you are close to the ground. On hit you can easily go into your bnb into the same thing again (meter build from your bnb will be enough to keep ending in j.214C). On block, you can start your mixup game as the opponent is held in place. The only real option the opponent has in this situation other than correctly blocking is shield or bunker, but both can be baited, or beaten with a throw.
*j.214B: mostly safe option, on block it doesn’t lead to anything other than some chip. Can catch impatient people trying to jump on wake up. Can be confirmed into the followups on hit for decent damage. It’s safer midscreen, but the opponent will have even less reasons to get hit by it in this situation. You can try to use the followups as a sort of distanced frame trap if you stagger them, but finishing the series on block while the opponent is in the corner will get you punished and is generally more unsafe the further you go in the series.
*j.214A/B: they look the same, but B version will hit while the other will whiff, allowing you a throw attempt or a try at starting pressure. Obviously not DP safe at all, you’ll want to try this against characters with no reversals or mixed with moderation with your other post air throw options to catch them off guard since other options are DP safe and they will be expecting those. You can get mashed out of A version on landing. B version is negative but safe and can be cancelled into a full combo on hit.
If your offense gets blocked, it’s time to go into pressure.
*5B: this is all around one of Ciel’s strongest normals, useful in a lot of different situations, like pressure in this case. The reach and speed are not bad for a low hitting attack and this move is also +1 on block. On hit it can be comboed into 2B 2C > bnb. On counterhit, it comboes into 5[C], which is also +1 on block and doubles as a frame trap on blocked 5B. The weak point of this combination is that is you are too obvious with it, the opponent can try to shield the 5[C] for a punish. Ways to deal with this are staggering 5B into 2B. This will catch jump out attempts, preemptive shields and mashing and it also comboes into 5[C] on counterhit. Since it’s +1 on block and has so many possible followups, people will tend to block after it, which gives you an opportunity to reset pressure. Doing 5B into 5B from a distance where the opponent’s A attacks will whiff can also be a legit frame trap.
*5C/5[C]: Charged version is +1 on block, full combo on hit, great move to use during pressure. Can be cancelled or delay cancelled into 236A/B. The cancel window lasts through all of the move’s recovery, allowing you a lot of freedom in the timing of the cancel. This ability will give you the opportunity to make the opponent blocking and respecting your pressure even if you’re usually further and with less options by the time you reach this point of your string. This can open up opportunities to set up a cancel into 63214A/B/C instead or simply something like a 5[C] > 5B frame trap (similar to 5B into 5B) or a pressure reset. However, 5[C] is not a real blockstring with any of her moves and as such can easily be shielded if you are too predictable with it. 5C has the same cancel properties and is a real blockstring with her B moves, but is not + on block and has a slightly smaller reach.
*236A/B: You’ll usually want to cancel into this moves from 5C or 5[C] as specials are the only possible cancel option. A version hits low and trips the opponent. You can follow it up with an OTG string or simply OTG 236C. You will catch people holding up to jump away because they think the pressure is over or expecting something like a 63214X cancel. 236B is similar, but it doesn’t hit low, so you’ll have to slightly delay it in order to catch people trying to do stuff like jumping away. B version is also a safer bet on block since it yields +1 advantage. A second 236B after a blocked one can catch the opponent trying to jump and can be converted into a combo by jump cancelling into instant air dash.
*22A: This move has the property of being able to be EX cancelled while in the air on hit, block and whiff. This means that at any point during your pressure string (usually towards the end, like after a blocked 5C) you will be able to safely reset your pressure via a 22A j.214C cancel at the cost of 100 meter.
Mixups
*63214A/B/C: Ciel’s dashing command grab. A and C version have clash frames towards the end, B doesn’t. A version causes some damage and a hard knockdown on hit. B version is pretty useless midscreen, but can be followed up in the corner for more damage. C version does better damage than A version and lets you choose the direction in which you want to throw the opponent, while still performing a hard knockdown. During C version, you are left in the air, with your air options available. Meter is consumed as soon as you input the move and not upon connecting the grab even though the super flash only activates then.
A version will be the most used as it doesn’t require meter or positioning, while also having the clash frames in case the opponent tries to mash out of it.
*4B/4[B]:
You can also go into 4[B] overhead at any point in your string from A and B normals, though be aware that fully charging it will leave a big enough gap to be mashed out. Both versions have low invincibility after her leg has ascended, and moves like low 2A attacks (like for example F-Aoko’s) won’t be able to hit it. You have a few cancel options from this. 214A will let you go into a full combo on hit, but on block it’s not completely safe (especially from closer ranges) and will at best end your pressure. 236B is a safer but less rewarding choice as it is +1 on block, but on hit it activates a special 4[B] follow up that knocks down the opponent and doesn’t let you combo afterwards. This followup in particular can be used to end OTG strings in the corner.
As with most overheads in the game, the charge is mostly reactable. To mix it up, you can go for half charged 4B into 236A, which will people standing up in reaction to the overhead startup. You can then follow up with an OTG 236C.
*3C/3[C]: Attack that has Ciel performing an angled jump in the air towards the opponent at the same time. 3C is special cancellable on block and you can use it in a similar way to 22A, although the range is shorter and, most of all, you can’t cancel it on whiff, leaving you in a very punishable state if you misjudge the distance. For this reason, if you want a simple j.214C pressure reset, 22A is a much better choice. However, 3C can be cancelled in non EX moves, such as late cancel j.236B for a frame trap that can go into full combo on hit and j.236A to try and fake the j.236B to keep up pressure, or a j.214A jump canceled into whatever other air option.
3[C] trades a longer startup in exchange for becoming an overhead and being cancellable even on whiff, like 22A. The cancel properties are the same as 3C, with the added ability to cancel into an air jump or air dash.

From jump ins, Ciel has various options.
*j.C will let her cancel into j.2C/j.2[C] and into special moves. j.214C is a great cancel option and at the cost of meter it will grant you a very easy combo confirm on hit or guarantee you keep up pressure on block.
*j.B is similar, but has less block stun. Note that j.B j.214A is not a real block string and can catch people mashing. j.214A can be jump cancelled again to make it safe and even let you continue pressure, but the angle and speed are not ideal.
*j.2C/j.2[C]: as previously explained, this is her divekick move. On the offensive, both versions can be used to make the opponent’s anti air whiff by stalling her in the air for a little while and hitting at an awkward angle. The charged version can be cancelled into special moves. Cancel it into j.236B and you’ll be able to confirm into a full combo on hit and still be safe on block. If you mix it up with j.236A, you’ll be able to land and take the opponent by surprise with a throw or be able to start your offense, but beware as you will not actually be + after this.
Defense: Anti airs, fending off pressure and reversals
Quick summary: Ciel has a great variety of anti air options, but lacks a real reversal without the use of meter.
Essential
*It goes without saying, D > 236D into combo is a very important defensive tool. On hit, pick the opponent up with your air counterhit confirm. Another important shield option to be aware of is 623C. This can actually be used as an escape in certain situations, in particular in situations where the opponent can place projectile hitboxes to protect himself while going for a mix up, like for example C-Seifuku’s pillars. This option takes meter and if the opponent is looking for it, it may be punishable, but it’s still a nice option that not many characters have that you can keep in mind.
*j.A: very short range, useful in aerial situations when you predict the opponent using a slower poke like a j.B or j.C and counterhit them for a full combo. Not really used otherwise.

*5A: definitely her best defensive normal under pressure, as the mix of speed and reach makes it perfect for interruption attempts in the opponent’s pressure and overall defensive use. Much better than 2A since her 2A has a very low range. Of course, 5A goes into combos on hit and the ability to pressure on block.
*5[C]: as explained in the neutral section, the armor and forward movement make for a great anti air, one of Ciel’s best options.
*22A: this version of the move has no invincibility at all, but has a decent hitbox and a fast enough startup. The reason this can be good as a defensive tool is that the startup keeps Ciel grounded. If for example on wake up the opponent mistimes a meaty attack, you will trade counterhits. However, you will in most cases recover fast enough to catch them as the 22A will launch them in the air, unable to recover until landing, open to a full combo pickup. However, don’t abuse this technique, as the 22A has no invincibility whatsoever and you’re taking a big risk every time you try it.
*22B: an invincible DP, it’s used more as an anti air than an actual reversal as it won’t hit crouching opponents. Good vertical hitbox and completely air unblockable, still situational because it’s more risky and less rewarding than her normal anti airs.
*22C: costs meter but is her only real reversal against low hitting attacks and does very good damage. Considering the 22 command, it’s easy to hit left/right mixup attempts with it. Good defensive tool, just don’t abuse it.
Important
*4C: another good anti air, it covers the area above her head. You want to time it and use it in a situation where only the second hit connects, netting you an air counterhit combo.
Extra
*4[B]: technically the clash frames activate faster than 5[C] and the move can be used as an anti air, but in general it’s not a good idea. In pretty much all cases it’s better to go for one of your other options like 5[C], 4C, 22B or shield depending on the situation as they are more reliable.
