
Disclaimer: If you find an error, or feel like you have more up-to-date or relevant information, please let us know. We’re able to update our current material after the fact, create addendums, and generally revise our process for greater accuracy and effectiveness, so don’t hesitate to tell us.
Written by Novril, proofed by Specs
I’m going to finally try the new format that I’ve been planning for character guides. Instead of a move list structure, I’ve tried to organize almost everything I know about the character like a flowchart, explaining the available options in every possible situation.
I’ve divided the information into 3 categories: neutral, offense and defense. And each category is further divided into 3 tiers depending on the importance of the information: essential, important, and extra, where the things you’ll be using more frequently are on a higher tier compared to “extra” edge cases.
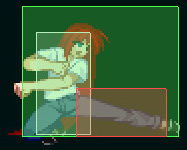
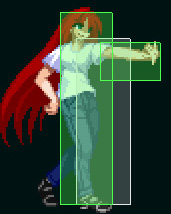
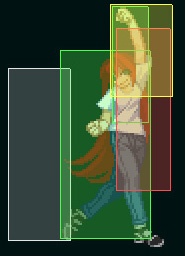
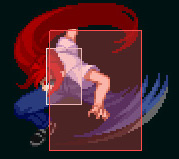
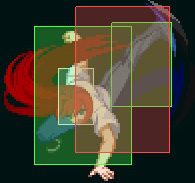
Hitboxes by bobo40k
Match vids:
http://www.meltydb.com/resultall.php?1c=aoko&1m=Full&tdb=any&filt=any
Japanese Wiki with frame data and other information
http://www3.atwiki.jp/aokoaa/
Pros
*Newbie friendly but still very effective at high level with good fundamentals
*Well rounded; she’s pretty similar to a SF Shoto in design
*Double airdash adds a lot to mobility and offense
*Her supers provide her amazing utility
Cons
*Very dependant on super meter for maintaining momentum
*Defensive options are passable at best
General combo structure:
Ground chain -> 2C 3C -> Air combo -> Ender
Ground chain -> 2C 63214A (choosing orb okizeme over damage when you don’t have 100 meter)
Neutral: Pokes and space control
Quick summary: Controlling space with orbs, well spaced normals like j.C, j.B, 2A, 5B, and harassing from afar with 236A fireball.
Essential
Air footsies play a vital role in MB’s neutral phase so I’ll start with the jumping normals.
*j.C: The light saber is the your biggest threat. Its range means that no one can challenge you at your down-forward angle. Just make sure to start it early enough so it won’t get beaten before it comes out.

*j.B: Your go-to move when both you and the opponent are at the same height.

*2A: This is a great spam-able A attack. Hits low, has good range and is fast. At close ranges this is your go-to move. As a side note, 5A is inferior in most aspects (1 frame slower, less range) but it may hit opponents who try to jump away, or moves that hop above lows. To hit confirm, use several A attacks in a row or, if at max range, chain into 5B.

*5B: The Japanese wiki linked above calls it “The Yakuza Kick”. It feels like Ryu having access to a Dhalsim normal which starts full combos. This is the basis of F-Aoko’s power in ground engagements, because if you keep yourself positioned at its max range, the opposing characters don’t have normals that can compete with its combination of speed and range. It also allows you to convert from hits that left the opponent far away. To hit confirm a 5B starter, do 5B-2C.

*Your air dashes are really good and you get 2 per jump, in addition to the double jump/high double jump. Use them to make your mobility better and more unpredictable.
*j.214A/B: The air version of the orb is the safest one to set up, so that’s what you usually start with. Jump or air dash backwards and right before you land place the orb, and you’ll be free to move again as soon as you hit the ground. You can then hide behind the orb and place more orbs if you want. You can set up to 2 air orbs using the 2 buttons. The orb explodes when the opponent touches it or on its own after roughly 5 seconds. The opponent can make the orb vanish by attacking it, but this means they need to whiff normals and be open for your attacks, or use attacks they don’t normally want to use just to reach the orb’s position. The orbs don’t vanish even if you block or take hits, making them a good defensive tactic that makes it hard for the opponent to just rush you down. You can stand behind the orb and even if the opponent jumps above it and attacks you, they’ll land on the orb and must stop attacking to block the explosion, or get hit by it which allows you to combo afterwards with a 5B.

*214A/B: The ground versions of the orb have their own limit, independent of the air orbs, so they can be placed on the screen at the same time, allowing for more than 2 orbs in play. You can place one of each button, but the set up is a bit different. You can choose where to set up the orb by holding the button and releasing it when it reaches the desired position. Once set they work in the same way as the air orbs. Putting it on the screen is safer, as long as you do it early enough that the orb comes out before a jump-in hits you, which then causes an air counter hit and a trade in your favor. Less useful against characters who can easily reach both you and delete the orb with the same jump-in attack.
*236A: If the opponent is discouraged from attacking you behind a wall of orbs, or wants to chill from afar and set up projectiles or manually charge super meter, annoy them with magic missiles. It can be crouched under and the projectile can’t really prevent the opponent from getting at you through the skies, so I wouldn’t call it a zoning tool like the orbs, but more of a poking and harassment tool, maybe even anti-zoning because it can interrupt opposing zoning.

It can score surprising hits if you can time it so that the opponent lands on it from a jump. Just be careful not to use this without orbs around you or without meter, because if you use it right as the opponent jumps at you it’s a free punish. If you have meter, you can cancel the punishable whiff into 236C which will keep you protected from jump-ins. This move is extra useful against characters who can’t crouch under it (Hime, Nero and Warachia).
*236C: A barrage of magic missiles. Usually this has a role of “pay 100 meter, get 1 offensive opportunity in return”, because they are forced to block for a long time as you approach freely. Usually canceled from 236A for whiff safety or after a far away knockdown like an airthrow combo ender, because the 236A prevents them from jumping away from the incoming super. Can also be used in blockstrings and combos to push into the corner if you really can spare the meter for it.
Important
*j.A has short range so it’s usually better to simply keep yourself in positions and ranges suitable for j.B and j.C, but in some situations you’ll be close enough and you’ll need the extra speed, and then j.A becomes useful.

*From an aerial counter hit you can either continue the combo with 2C 3C->air combo. At very close ranges 2C will whiff because it moves forward, so do 2B 5C-> air combo instead.
*Air throw is risky to whiff but useful if you can predict the opponent’s location well, and leads to a combo. You can pick the opponent up after it like you’d do after an aerial counter hit.
Extra
*3C: Can catch jumpers if you are willing to commit to this option, but it’s not the kind of normal you’d want to start attacking with in case they don’t jump. Because it’s a C move and you are playing a Full Moon character, it limits your options after it connects.
*2B can sometimes be useful because of its low profile and extra range compared to 2A. Can chain to 2C.

*2C: When used as a starter, think of it like an EX 5B. It has low profile, even more range, and only one frame slower. The problem is that it’s much slower to recover on whiff, and as a C move, leaves you with less options when it connects, compared to 5B, so it’s much more situational. Hit confirm by doing 2C 3C.

*421A/B: Orbs that are set up in an upwards diagonal angle. They don’t explode when the opponent connects them. Instead you need to keep holding the button, and they explode when you release it. The opponent can’t get rid of them by attacking them, but you lose a button by holding them. The A version is close and B version is farther up. On neutral they are pretty slow to set up and they disappear if you get hit, but they are still useful in specific matchups and situations. You can choose which button you have to hold, and which normals you lose access to. Simply input the command and hold the button, hold another button as well and then release the original button. That way you can sacrifice the button you’d need the least in a specific situation.

Offense: Pressure, mixups and okizeme
Quick summary: Use air throws or j.214C to end air combos with a knockdown and continue attacking. When possible, place orbs on top of the opponent as okizeme. Push to the corner and once there enforce strong mixups with airdashing and 214C.
Essential
As I’ve mentioned already, at close ranges you spam A attacks and at far ranges you use the chain of 5B 2C.
*If your 5A/2A spam hits, proceed with the following combo: (2A 2A) 5B 2B 2C 3C->air combo.
*If your A attacks are blocked, you are in a good position since you are +3 on block. From there you can either dash 2A or instant air dash j.B or j.C to reposition and reset pressure, or instead you can delay 2A or delay 5B (depending on the range) to catch attempts of ‘abare’ — trying to interrupt between your moves.
http://en.wiktionary.org/wiki/Appendix:Glossary_of_fighting_games#Abare
*Another benefit to delaying single 2As is that if you score a counter hit you have enough time to confirm and continue a combo.
*At the max range of 2A, where you can’t connect 2 of them to confirm, instead you should do 2A->5B->2B, all of which can still connect and allows for an easy hit confirm.
*2B leaves you at +2 frames on block. While overall inferior to as advantage on block, you can still try to reset pressure by ending with a 5B or 5B->2B. The pushback can leave you at a spacing where 5B will beat the opponents normals, depending on the matchup, and mixing it up with continuing the blockstrings into delayed C attacks and specials will make the opponents more hesitant to quickly press buttons after the blocked B attacks to begin with.
*If your max range 5B 2C hits, proceed with 3C and into an air combo.
*If your max range 5B 2C is blocked it pretty much ends your momentum, but you still need to mix up between different enders to make the opponents scared to “take their turn” or try to shield:
5B 2C->nothing (Only do this at max range because 2C is unsafe up close)
5B 2C (delay or no delay) 3C or 4C or 2AA
(Both 3C and 4C are safe on block but have different speeds. 3C is better for most purposes but 4C does not whiff at the absolute maximum range so get used to using it when needed)
5B 2C (delay or no delay) 3C or 4C -> 22A or delayed 63214A or 22B
22A is a safe ender that leaves you at -2. . Delayed 63124A is -7 on block but made safe because of the pushback of 3C/4C and will catch quick retaliation attempts, but frame wise 22A is preferable. 22B leaves at +1 on block but comes out slowly so it has an exploitable gap.

*5B can also be used on its own as a poke, as it’s +0 frame on block, and on counter hit you can confirm into a combo with another 5B into 2C.
*F-Aoko’s forward airdash is fast and short, which makes it great for offense and mixups, combined with her great aerial normals j.B and j.C. Remember that even before you can even attack, you can fake and cancel the airdash into a jump or into backwards airdash. Mix between the options to avoid being predictable with it.
*The air combo you need to do depends on the ender you want to go for, either an air throw or a j.214C orb. If you intend to end with an air throw you can do whatever connects, usually jump forward j.B j.C double jump forward j.B j.C throw. If you intend to finish with a j.214C orb you need to do jump forward j.B j.C neutral double jump j.C j.214C. Basically omit the 2nd j.B, and sometimes you’ll even have to either omit the 1st j.B as well for the orb to hit, or go for a side switch by replacing the neutral doublejump with a double super jump (29 in the air).
*Air throw ender: At midscreen the air throw ender throws the opponent far away and gives you nothing, but the closer you are to the corner, the shorter the throw distance becomes, giving you enough time to run and attack with 2A or 5B on the opponent’s wakeup. If you really want to keep attacking after a midscreen throw you can always force the opponent to stand into 236A 236C (Be ready to run in and grab them if they shield the super).
*j.214C ender: Costs meter, but gives you great okizeme anywhere with orbs. After hitting with it you need to catch the falling opponent with a 2C->214A, or 2C->63214B->tiger knee 2147[A]. The charged version of the air orb functions the same, but negates the jump momentum you had, so even though you were rising you’ll be able to land immediately. After the super orb you also have time run under and switch sides before doing the 2C. In both setups, the opponent wakes up into the orb and is forced to either block it or shield it while you are free to attack.
*j.A is overhead, fast to come out and can combo into 2A. So what you can try to do against an opponent who is waking up into the orb is to jump and them mix up between lowest possible j.A and a lowest possible j.B/j.C (doesn’t get to come out) -> land ->2A. You can also try to use air dashes to mix the side you land and 2A from, but if the opponent is near the corner it’s usually better to push him towards it.
*Everything becomes so much better in the corner! Your airdash no longer goes above the opponent to the other side, and now becomes your main mixup tool. When you get them scared to push buttons with j.Cs or orbs, you can do a mixup of empty jump 2A and low airdash into j.B/j.C.
*A quick reminder that if you land after an airdash without doing any attack, there’s landing recovery, but if you do an attack, even right before landing where it didn’t have time to come out, you won’t have landing recovery. So when going for an empty jump 2A after an air dash, always remember to start doing a j.B/j.C right before you land.
*Because you have a double jump and 2 air dashes, after every jump j.B/j.C you can either land and 2A, or jump cancel it and immediately do airdash forward j.B/j.C. Executing the 2nd airdash without gaining height will require some practice. (With an arcade stick, the input I find more comfortable to do the jump cancel instant airdash is 76A+B.)
*Alternatively, you can cancel your blocked j.B/j.C into an j.214A orb and force them to sit still for your next instant airdash.
*After a j.214C air combo ender in the corner I also like finishing with a 2C->421[A]. I don’t go for the 421B overhead laser which will be mentioned later, but instead I go for a jump-in mixup and explode the orb at different times before hand to prevent them from trying to escape.
*If an H moon character shields your jump-in normal, react by double jump canceling it and blocking the followup attack, then punish it with a full combo.
*Blue Fire: Probably the most effective usage for meter for F-Aoko. In the corner you can end any blockstring with 214C and force the opponent to block for several seconds while you are free to do a jump-in mixup, and repeat as long as you have meter to spend. The standard way to enforce it is with a blockstring ending with 2C->22A->214C. Not only this is tight, but if the opponent decides at any point in the blockstring to get hit on purpose to avoid blocking the Blue Fire, 22A can be followed with j.A into an air combo. If you are somewhat near the corner and want to push the opponent as much as possible into the corner for a Blue Fire, end your blockstring with 2C->4C->63214A->214C.
*After a corner airthrow combo ender, you have just enough time to run-in and get them to block a 5B, ideally into a blockstring ending with Blue Fire. To make shielding harder for the opponent in this situation, mix the running 5B with a running 63214B canceled into Blue Fire, or with instant airdash offense.
*Air to air j.A becomes much better in the corner. You can force jumpers to block a j.A chain and then tick an air throw for a full combo.
*63214A/B always give the chance to do 2147[A/B] for an orb setup, so a basic hard knockdown meterless bnb would be 2AA > 5B > 2B > 2C > 63214A > 2147[A] (2C can only go into 63214B after j.214C).

Important
*After j.214C, instead of going for okizeme you can extend the combo with 2C 22A j.A->air combo. The scaling means it does not add much extra damage so it’s only useful to finish off the opponent, or to generate an extra push into the corner (this includes a side switch if needed), provided you have another 100 meter to use in the corner afterwards.
*Ground throw: F-Aoko’s ground throw is pretty bad. Does lousy damage and only leads to a soft knockdown. You can try to catch tech rolls with a 2C 3C, or attack OTG with 2A 5A 5B 2B 214A. Mostly only valid as a mixup option against very low life bars.
*4[C]: Charged 4C becomes an overhead. It’s slow so the best way to make it hit is to mix 5B 4[C] with 5B (max delay) 2C. To get something out of it you always need to cancel into a 63214A without delay, which means that 4[C]->63214A is only safe when used at 4[C]’s max range. On hit you get a knockdown into orb okizeme or you can do 4[C]->63214A->63214C j.C 3C->air combo to finish a match. It’s an option to be aware of but still subpar compared to airdash mixups.

*421A/B 421A/B: Doing the motion again with the other button while holding the 1st button shoots a laser which is overhead and in the corner can be linked into 2A but it’s pretty hard and requires very specific positioning. Be familiar with this option but I’d rather use the 421 orb to cover for airdash mixups.
*There will be times where you’ll want to get okizeme without spending meter and you are willing to sacrifice damage for it. So instead of doing 2C 3C into an air combo, end the gound chain with a 63214A. In the corner it gives an air dash mixup.
Defense: Anti-airs, fending off pressure, and reversals
Quick summary: Be patient and pick the right times to use shield, interrupts and dragon punches.
Essential
*623B: This is a dragon punch that fills its minimal role and nothing more. It’s weak and almost always hits twice so no extra reward on counter hit. But having a meterless, reliable reversal is in itself good. 623C is faster but costs meter. 623A is also faster but can only be used an a situational anti-air.

*Interrupt where you can with 2A or 5A.
*Your anti-air game, other than smart usage of D->236D, revolves around meeting the opponent in the air instead of letting them jump on your head, and blocking while you force them to touch orbs you have set up.
*F-Aoko’s backdash is okay to evade things at midscreen. In the corner, when it’s just invincibility without the increase in distance, its usage is much more specific.
Important
*3C can be used as an anti-air but it’s somewhat slow, has a weird angle and tends to clash a lot.
*2B and 2C can be used as anti-airs against very specific jump-in attacks.
Extra
*Charged 5C shoots a laser to the top of the screen, but since it’s slow and thin it only works in very specific situations.

