
Disclaimer: If you find an error, or feel like you have more up-to-date or relevant information, please let us know. We’re able to update our current material after the fact, create addendums, and generally revise our process for greater accuracy and effectiveness, so don’t hesitate to tell us.
Written by Dodge
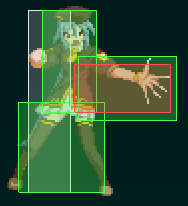
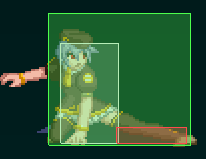
Hitboxes: http://imgur.com/a/EcyR6
Match videos: http://www.meltydb.com/resultall.php?1c=tatari&1m=Half&tdb=any&filt=any
Pros
Low technical requirement, combos and neutral are almost entirely based on versatile normals and command normals.
Most hits can get the opponent to the corner from almost anywhere, where a throw can lead to a damaging combo.
Summons can serve as backup when applying okizeme mixups/pressure.
Good mobility, can quickly get up close against zoners.
Cons
No good defensive options under pressure besides universal half moon techniques. Long recovery on back dash.
Very short range normals.
General combo structure:
Ground chain -> 2C 3C -> Air combo -> Ender
Ground chain -> 5A6AA 6C -> dash 6C 2C -> Summon setup or 5C 3C -> Air combo
Practical combos (by XxTexasTimxX):
https://www.youtube.com/watch?v=0IU3Tenb-q4&list=FLwBeEekPeFuSUwTo3MbR6-Q&index=21
https://www.youtube.com/watch?v=8qgTK0mOMQ8&list=FLwBeEekPeFuSUwTo3MbR6-Q&index=20
Neutral
Quick summery: Use your air to air normals and 6B\6[B] (matchup dependent) to make the opponent consider staying on the ground, where you can surprise them with a quick 5A after a ground dash or j.B after an airdash (preferably with momentum gained with a quick ground dash done just before) and begin your offense.
Essential
*j.C: Her go-to air to air normal. Comes out fairly quick and covers a wide angle.

*j.B: Good air to ground normal, can cross-up easily. Can chain to j.C in the corner for a stronger combo start in case of a hit.

*5A: A quick jab with great hitbox to start your offense after closing in the right amount, can also easily catch opponents slightly above you (i.e catch an opponent just as they jump) if you proceed with 5B and an air combo.
*6B/6[B]: Shoots some white swirly thingy out of her hand. Covers space in front of her for quite a few active frames and recovers quickly. The charged version takes a bit longer to come out but covers a much wider area. Use this to catch descending foes and annoy them after they air tech. Notice that while it usually does 3 hits, if you time it so that they’ll be hit by the last few frames of the attack it will only hit once and allow you to continue with a combo in case of a counter hit. Same goes for a trade. Usually no conversion on hit, but it is cancel-able into a super move (623C would be the appropriate one) on hit and interestingly, even on whiff.
This tool is more useful against characters with poor mobility, such as Riesbyfe.

Important
*j. 2B/ j. 2[B]: Your dive kick. It’s actually not that great, you have to hit near the feet area to actually be able to start a combo off of it on hit or not be at a frame disadvantage on block, and it does not hit high. Still, a very useful tool to have, it can be used to quickly descend to the ground and surprise your yet in the air opponent with a grounded anti air move. It is also useful for closing in on an opponent whiffing a move while you’re high in the air. Charged version just favors you a bit more frame-wise after a hit/block but all notes still apply.

*You should use 2A+B (air dodge) when in the air in case you need to reposition towards the opponent, or just to float a bit more and change the dive’s timing.
*2A: Well, standard low kick. Nothing special but you’ll need it if you want to start your offense with a quick low hitting move. It is also your quickest normal with 3 frames of startup.
*2C: Your longest range normal, hits low. Reverse-beat to 2A on block to cancel the long recovery. You should also use it to catch floating enemies after an aerial counter hit and follow with 5C 3C -> air combo. 5A 5B serves as a weaker alternative but is easier to time in situations where the opponent is far and you have to dash first. Long recovery on whiff.

*5B: Quick anti air normal for when you anticipate someone airdashing in on you, jump cancel to an air combo in case of a hit.

*j.A: Mostly for when j.C or j.B won’t come out in time, spam for continues blockstun or chain to another aerial normal on block. Does not hit overhead.

Extra
*214C: Summons Akiha, she walks forwards a bit and does a kick which wall-slams. Opponents often have the tendency to jump to the air where she cannot bother them, anticipate this and try to catch them off guard, air throwing would be a nice solution. Akiha also blocks the opponent’s movement and can destroy traps or eat projectiles for you.

*623A: Has a high horizontal hitbox and upper body invincibility. Your solution for when opponents are directly above you. Convert into a combo on counter-hit only.

*236A: Has longer reach than your normals and comes out quick, making it a valid tool when it’s low damage is just enough to finish an opponent off, or to punish certain moves.
Offense
Like most of the cast in this fast paced game, offense is where H V-Sion shines. You have many different ways to mix-up your attacks mid chain, and many ways to reset your offence and keep the pressure.
Summons will help you with your okizeme, always use them after a knockdown.
Essential:
Recommended mindless basic chain for beginners to start offense: 2A 5B 5C 5A6A
In case of a hit, follow up with: A 6C -> dash -> 6C 2C into either 5C 3C j.B j.C -> jump cancel -> j.B j.C -> air ender or a summon setup. It has great corner carry and nice damage. Note that 5A6A will whiff if you start the chain from too far, you may want to take a look at the “Practical Combos” videos linked above for more advanced and situation specific followups if you want to take your game to the next level.
In case they block, at this point or prior to it you should be chaining into one of the following:
*2C which hits low, followed by either 3C and an air combo on hit or 236A/236B on block.
*2B neutral on block, an opportunity to reset pressure.

*6C which hits overhead, and leads into the same delicious combo described above on hit. While it’s disadvantageous on block, it’s fairly safe (unless shielded, which can be done on reaction). Don’t overuse it.

*236A: A way to extend your chain at the cost of ending your momentum. Say your opponent is on the verge of death and you are Slowly chaining your hit’s on him, delaying every hit to catch him mashing or trying to jump away. He patiently blocks through the whole chain until you’ve been moved away from him and use 2C. Then, just when he thinks you’re done and attempts to jump out, you follow up with this move when he let his guard down. Converts into a combo on counter hit (quickly dash with 5A).
*236B is advantageous on block. Dash in with 5A to reset pressure.
Can be charged for even more advantage and a major hit to the opponent’s guard bar.

*It’s absolutely important to include delays in your chain to catch mashers and jumpers! Even this basic chain with these handful of follow ups can get you pretty far if you can vary the rhythm and followups.
*As you get a bit more familiar with the character you should start mixing your chains more, and reset more using reverse beats when they are available. Besides dashing in with 5A or 2A after a reset, you can also use the following to get your momentum back:
*Air dash -> j.B (Possibly crossup)
*Dash – > throw. Near the corner her throw allows her to catch the opponent with 2C into an air combo for decent damage, or a summon setup. A useful mixup tool to have near the corner.
Okizeme:
H V-Sion’s has 2 types of combo enders:
- Air combo ending with an air throw or j.236C (Usually leaving the opponent in the corner)
- A usually less damaging ground combo ending with 2C or 623C
*For both types, you should end with a super move when in heat mode or when the extra bit of damage can finish your opponent off, otherwise it’s usually a waste of meter.
*Ending an air combo near the corner with an air throw, you can use j. 2B to catch neutral techs and whiff j.C to land quickly and heavily punish forward techs with a combo starting with 2a.
*When ending with j. 236C just use 5C as soon as you land. If you time it right it should catch both types of techs and even OTG them if they don’t tech for an extra bit of damage. 5C in general is a good move to catch ground techs, be it after burst or whatever.

*Ending a ground combo with 2C or 623C, always use 214C/214B (summon) afterwards! The summon lets you try risky mixups and serves as your backup in case they fail. As they wake up, you should mix 2A spam, 6C and throws. Again, varying your timing is key since on successful shield your opponent is also immune to your summon’s attacks.
Important:
*ARC-DRIVE: This command grab can strengthen your okizeme even more, it has invincible startup and an Akiha summon can still hit while it’s active to add more damage. Plus, it heals a little so you can make that regular victory a perfect again 😛 Just don’t be predictable by using it every time you can.
*Air throw: When the opponent is pushed against the corner with a summon and yourself in front, it could be tempting for them to try and jump out of this position. Read your opponent and catch them in the air as they leave the ground.
Extra:
*j. 2B spam: Can be used to mess with your opponent after wake up. Just repeatedly jumping and dive-kicking a few times in a row can cause them to do something stupid (2A mash) and get counter hit.
*236C: Can be used during HEAT to reset pressure mid chain as it gives nice frame advantage. Otherwise, probably a waste.
*214A: An pretty gimmicky follow up after 2C. If 2C hits, it can OTG and you can follow up with 6[C] for a bounce and a knockdown/air combo ender. When blocked the opponent might think you’re trying to set up 214B or 214C and may attempt to do something instead of block, only to find out this summon attacks much earlier. If spaced correctly it should leave you at a slight frame advantage even when blocked.
*623C: Can be used as an ender to a ground combo if you have meter to spend (meaning during HEAT mode). Grants extra damage, and good knockdown to set up a summon.
Defense
Essential:
*Rising j.C: With it’s wide angle it’s good against various types of aerial approaches given you have enough time to jump and have it come out. Cancel into another jump/air normal on block.
*5B: Good solution against air dash resets.
*5A: your preferable attack to mash when trying to interrupt resets
*214D: Good use of meter when locked in block state by some spell or summon, especially during HEAT when you don’t have much to lose anyway, as staying there blocking won’t do you much good. Safe if blocked.

Important:
*623A: Has upper body invincibility, you can use it as a reversal if you think you’re confident you’re gonna get attacked from the air just as you get up, given there’s nothing else to interrupt you like an orb or a summon.
*623C: While fairly slow, punishable on block, and can be shielded on reaction, it’s her only invincible reversal. As risky as it is, on hit it causes good damage on its own and is really a momentum changer, granting knockdown with enough time to setup a summon. Might be less risky to use during HEAT so that you have the H-moon auto-burst to back you up.
*Rising air throw: Can be used in a defensive manner like rising j.C. Comes out faster but you have to match the heights of your characters above the ground or else you’ll miss the throw and be prone to counter hits.
Extra:
*2D/5D: Use when anticipating a meaty on wakeup or a in response to a highly telegraphed attack. Due to the harsh damage scaling after using shield you should follow up with a combo ending with a knockdown. Remember to use 214B/214C afterwards to support your okizeme.
*2A+B: Against specific attacks with long recovery (like some pressure reset moves of some characters).
*Her backdash can be used to evade some stuff, but is generally pretty bad as it has long recovery. When trying to back out, jump back -> air dash backwards ->2A+B should create a lot of distance quickly.
